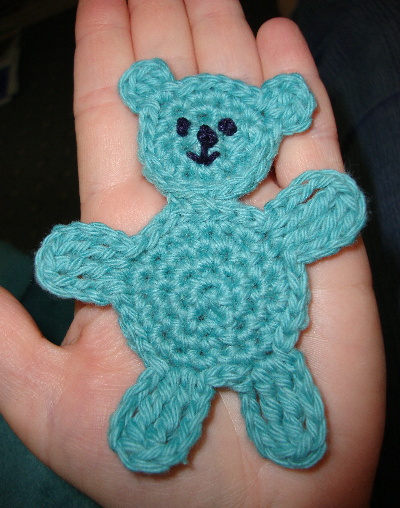
Little Bear Appliqué /Pin /Fridgie
CROCHET PATTERN
USA Terms / UK Terms
by Linda Z. O'Halloran
May 2010
I couldn't find a little bear
appliqué, so I designed one.
They are 3.5 inches long with 3.5mm hook and DK yarn.
With 4.0mm hook and Aran yarn, would be slightly bigger.
Quick and easy.
Something fun to sew onto blankets or clothing to add interest.
Here are the instructions in UK/ Irish terms:
Base Circle for Head and Body...
Round 1. Ch2. Do 6 dc in 1st chain. Pull end to tighten. Join with slip st to 1st dc.
Round 2. Ch1, 2 dc in same st as joining. Do 2 dc in each dc around. (12 dc)
Round 3. Ch1, 2 dc in same st as joining. (dc in next dc, 2dc in next dc) around. Join
with slip st in first dc. (18 dc)
For Head:
To the above base circle....
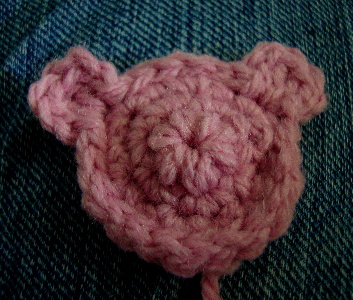
Round 4. In next dc make ear.
Ear = (slip st, ch2, 2 tr, ch2, slip st)
Then slip st in next 5 dc.
In next dc make 2nd ear like the 1st. Slip st in next 11 dc.
Fasten off, but leave a 7 inch length of yarn for joining head to body.
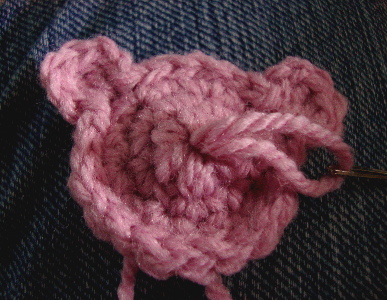
Snout (optional): For a 3-dimensional effect, you can use the length of yarn (left at the beginning)
to make straight stitches radiating from the center...


For Body:
To a 2nd base circle as in Rounds 1-3 above...
Round 4. Ch1, 2 dc in same st as joining. Repeat (1 dc in each of next 2 dc, 2 dc in next dc) around.
join with slip st to first dc. (24 dc)
Round 5. Make leg in next 2 dc as follows....
Leg = (slip st, ch4, ttr) in next dc, then (ttr, ch4, slip st) in next dc.
(Note: ttr starts with 3 wraps around hook).
Slip st in next 4 dc. Then make arm in the next 2 dc as follows...
Arm = (slip st, ch4, dtr) in next dc, then (dtr, ch4, slip st) in next dc.
(Note: dtr starts with 2 wraps around hook).
Slip st in next 7 dc. Make 2nd arm as the 1st.
Slip st in next 4 dc. Make 2nd leg as the 1st leg.
Slip st in next dc. Join with slip st to first st. Fasten off.
Embroider face with contrasting dark yarn, making 3 french knots for eyes and nose. Make straight lines for mouth.
Add pin or magnet or sew onto clothing as you wish.
================================
Here are the instructions in USA terms:
Base Circle for Head and Body...
Round 1. Ch2. Do 6 sc in 1st chain. Pull end to tighten. Join with slip st to 1st sc.
Round 2. Ch1, 2 sc in same st as joining. Do 2 sc in each sc around. (12 sc)
Round 3. Ch1, 2 sc in same st as joining. (sc in next sc, 2sc in next sc) around. Join
with slip st in first sc. (18 sc)
For Head:
To the above base circle....
Round 4. In next sc make ear.
Ear = (slip st, ch2, 2 dc, ch2, slip st)
Then slip st in next 5 sc.
In next sc make 2nd ear like the 1st. Slip st in next 11 sc.
Fasten off, but leave a 7 inch length of yarn for joining head to body.
Snout (optional): For a 3-dimensional effect, you can use the length of yarn (left at the beginning)
to make straight stitches radiating from the center...


For Body:
To a 2nd base circle as above...
Round 4. Ch1, 2sc in same st as joining. Repeat (1 sc in each of next 2 sc, 2sc in next sc) around.
join with slip st to first sc. (24 sc)
Round 5. Make leg in next 2 sc as follows....
Leg = (slip st, ch4, dtr) in next sc, then (dtr, ch4, slip st) in next sc.
(Note: dtr here starts with 3 wraps around hook.)
Slip st in next 4 sc. Then make arm in the next 2 sc as follows...
Arm = (slip st, ch4, tr) in next sc, then (tr, ch4, slip st) in next sc.
(Note: tr here starts with 2 wraps around hook.)
Slip st in next 7 sc. Make 2nd arm as the 1st.
Slip st in next 4 sc. Make 2nd leg as the 1st leg.
Slip st in next sc. Join with slip st to first st. Fasten off.
Embroider face with contrasting yarn, making 3 french knots for eyes and nose. Make straight lines for mouth.
Add pin or magnet or sew onto clothing as you wish.
or to improve on the pattern.

They are 3.5 inches long with 3.5mm hook and DK yarn.
With 4.0mm hook and Aran yarn, would be slightly bigger.
Quick and easy.
Something fun to sew onto blankets or clothing to add interest.
Here are the instructions in UK/ Irish terms:
Base Circle for Head and Body...
Round 1. Ch2. Do 6 dc in 1st chain. Pull end to tighten. Join with slip st to 1st dc.
Round 2. Ch1, 2 dc in same st as joining. Do 2 dc in each dc around. (12 dc)
Round 3. Ch1, 2 dc in same st as joining. (dc in next dc, 2dc in next dc) around. Join
with slip st in first dc. (18 dc)
For Head:
To the above base circle....
Round 4. In next dc make ear.
Ear = (slip st, ch2, 2 tr, ch2, slip st)
Then slip st in next 5 dc.
In next dc make 2nd ear like the 1st. Slip st in next 11 dc.
Fasten off, but leave a 7 inch length of yarn for joining head to body.
Snout (optional): For a 3-dimensional effect, you can use the length of yarn (left at the beginning)
to make straight stitches radiating from the center...
For Body:
To a 2nd base circle as in Rounds 1-3 above...
Round 4. Ch1, 2 dc in same st as joining. Repeat (1 dc in each of next 2 dc, 2 dc in next dc) around.
join with slip st to first dc. (24 dc)
Round 5. Make leg in next 2 dc as follows....
Leg = (slip st, ch4, ttr) in next dc, then (ttr, ch4, slip st) in next dc.
(Note: ttr starts with 3 wraps around hook).
Slip st in next 4 dc. Then make arm in the next 2 dc as follows...
Arm = (slip st, ch4, dtr) in next dc, then (dtr, ch4, slip st) in next dc.
(Note: dtr starts with 2 wraps around hook).
Slip st in next 7 dc. Make 2nd arm as the 1st.
Slip st in next 4 dc. Make 2nd leg as the 1st leg.
Slip st in next dc. Join with slip st to first st. Fasten off.
Embroider face with contrasting dark yarn, making 3 french knots for eyes and nose. Make straight lines for mouth.
Add pin or magnet or sew onto clothing as you wish.
================================
Here are the instructions in USA terms:
Base Circle for Head and Body...
Round 1. Ch2. Do 6 sc in 1st chain. Pull end to tighten. Join with slip st to 1st sc.
Round 2. Ch1, 2 sc in same st as joining. Do 2 sc in each sc around. (12 sc)
Round 3. Ch1, 2 sc in same st as joining. (sc in next sc, 2sc in next sc) around. Join
with slip st in first sc. (18 sc)
For Head:
To the above base circle....
Round 4. In next sc make ear.
Ear = (slip st, ch2, 2 dc, ch2, slip st)
Then slip st in next 5 sc.
In next sc make 2nd ear like the 1st. Slip st in next 11 sc.
Fasten off, but leave a 7 inch length of yarn for joining head to body.
Snout (optional): For a 3-dimensional effect, you can use the length of yarn (left at the beginning)
to make straight stitches radiating from the center...
For Body:
To a 2nd base circle as above...
Round 4. Ch1, 2sc in same st as joining. Repeat (1 sc in each of next 2 sc, 2sc in next sc) around.
join with slip st to first sc. (24 sc)
Round 5. Make leg in next 2 sc as follows....
Leg = (slip st, ch4, dtr) in next sc, then (dtr, ch4, slip st) in next sc.
(Note: dtr here starts with 3 wraps around hook.)
Slip st in next 4 sc. Then make arm in the next 2 sc as follows...
Arm = (slip st, ch4, tr) in next sc, then (tr, ch4, slip st) in next sc.
(Note: tr here starts with 2 wraps around hook.)
Slip st in next 7 sc. Make 2nd arm as the 1st.
Slip st in next 4 sc. Make 2nd leg as the 1st leg.
Slip st in next sc. Join with slip st to first st. Fasten off.
Embroider face with contrasting yarn, making 3 french knots for eyes and nose. Make straight lines for mouth.
Add pin or magnet or sew onto clothing as you wish.
Email Me if you have questions or find errors.
Feel free to use and share this pattern, to sell items made using this pattern,or to improve on the pattern.