This tutorial will teach you how to add enemy tanks that drive around and shoot in your level.
Take the existing map you made from Part I and we will make your tank fight enemy tanks. The first thing we are going to do is make a tank start driving along a path when the level starts. Once it sees the player it will open fire on them.
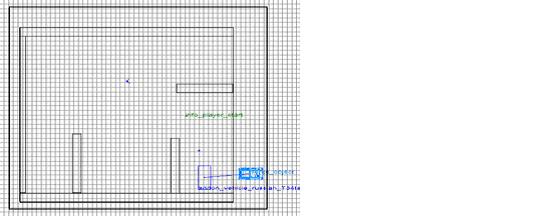
Diagram 2-1 (Top View)
Place some brushes in your map to create walls that the tanks hide behind when they start. Now we will add our first enemy tank. Create a brush and hit “n” to bring up your “Entity” window. From the entity menu, double click on “vehicle_german_panzer-tank” and your brush will change to that entity. To rotate the starting direction of your vehicle, select the vehicle and open your “Entity” window. At the bottom of your “Entity” window you will see buttons with 90, 45, 360, etc… Press the corresponding direction that you would like your vehicle to be facing (90 = north, 180 = west, etc…).
Now we have to give the vehicle a targetname. In the entity window, with the vehicle selected, enter the following values into the Key and Value fields at the bottom of the entity window.
Key: targetname
Value: s5_tank1
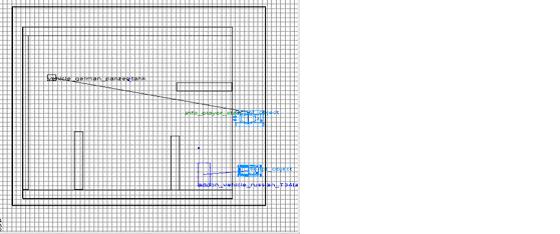
To give your tank collision you have to target a bounding box. Instead of creating your own bounding box, copy the one from “test_Tanks.map” in the SDK. To do so, open the map file and select one of the pieces from the bounding box and then press (crtl + e) to select all pieces of the bounding box. With the bounding box selected open your map. When is asks copy selection, click yes. This will bring the bounding box of the tank into your map. Deselect the tank mask and select the panzer tank image. Open the “Entity” window and enter the following into the Key and Value fields.
Key: target
Value: panzer_tank
This will connect your tank to the tank mask and give it collision. The Collision mask/bounding box can be placed anywhere on your map. Try to place it somewhere the player will never be but still inside of your skybox. Placing it under the terrain is as good as any.
Diagram 2-2 (Top View)
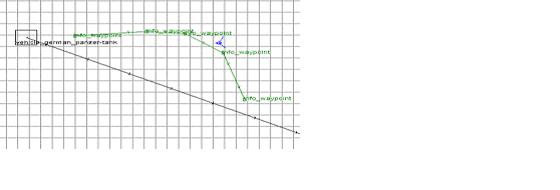
Time to add the path that the tank will take. This is achieved the same way the path for the halftrack in “Riding a Vehicle Tutorial” was done. Right click on the grid and select “info” -> “vehiclepoint”. This will create the first point that our enemy tank will travel to. You want to place this in front of your enemy tank. This is not where your enemy tank will start but where it will move to first. Therefore we have to give your first vehicle point a targetname and then tell your enemy tank to target the first vehicle point. In your “Entity” window, with your vehiclepoint selected, enter in the below values to the Key and Value area.
Key: targetname
Value: s5_tank_path
Create a new vehiclepoint but instead of entering a Key or Value you are going to use the default one given to you. Deselect the vehicle point just created and select the first vehicle point. While the first point is selected, select the second vehiclepoint that you just created and press “ctrl + k”. This targets the first vehicle point to the second one, creating a path with an arrow pointing to the second vehiclepoint. Keep creating vehiclepoints and connecting them to the previous point until you have the desired path you want your vehicle to take.
Diagram 2-3 (Top View)
At this point you can add the script below to your map and your tank will move along the path you have created.
Next we will make another tank that starts to move when the player’s tank drives through a trigger. Create another tank and path by following the same steps above. After you have finished that we have to make the trigger that will start the tank moving. Make a brush that will act like a wall and place it where you know the player’s tank will drive through. Right click on the new brush and select “trigger” -> “vehicle”. Give the trigger a targetname by adding the following to the Key and Value.
&nbs; Key: targetname
Value: tank2_trigger
That is all we have to do to our map file.
Create a file with the same name as your map file and the extension .scr. For now copy and paste the script below or from “test_Tanks.scr”. If you take it from “test_Tanks.scr” make sure you change the targetnames and file name to match the ones in your map.
level waittill prespawn
level waittill spawn

main:
	level.lookahead = 256		// how far enemy tanks "look ahead" when driving
	level.enemytankspeed = 200	// how fast the enemy tanks are
	level.sightdistance = 2048		// how far the enemy tanks can "see"

	$player holster			//holster the players weapon
	$player takeall			//take all weapons away from the player
	$player physics_off		// use tank physics instead of player physics

//attach the player to the tank
	$playertank waitthread global/vehicles_thinkers.scr::players_tank NULL
	$playertank vehiclespeed 200	//set the speed of the tank

	thread second_tank		//start the second_tank function

	// setup enemy tank targets...
	level.playertanktarget = $player

	//wait 5 seconds and then start moving the first tank
	wait 5
	$s5_tank1 thread TankGo $s5_tank_path level.enemytankspeed empty_panzer_desert

	end

//----------------------------------------------------------------------
second_tank:
//----------------------------------------------------------------------
		//wait until the trigger is hit then start the second tank moving
	$tank2_trigger waittill trigger
	$tank2 thread TankGo $start_tank2 level.enemytankspeed empty_panzer_desert

	end

//----------------------------------------------------------------------
TankGo local.path local.speed local.type:
//----------------------------------------------------------------------


	self immune aagun
	self thread global/vehicles_thinkers.scr::enemy_tank_think 0 local.type
	self thread drive_path local.path local.speed

	end

//----------------------------------------------------------------------
drive_path local.path local.speed:
//----------------------------------------------------------------------
	self.driving = 1

//       drive Vector position, speed, acceleration, reach_distance, look_ahead
	self drive local.path local.speed 30 200 level.lookahead
	self waittill drive
	if (self)
	{
		self stop
		self.driving = 0
	}

	end
Here is a break down on what is happening.
$s5_tank1 thread TankGo $s5_tank_path level.enemytankspeed empty_panzer_desert
The line above is a call to thread the TankGo function. It passes three variables to the TankGo function and then jumps into the code below.
//----------------------------------------------------------------------
TankGo local.path local.speed local.type:
//----------------------------------------------------------------------


	self immune aagun
	self thread global/vehicles_thinkers.scr::enemy_tank_think 0 local.type
	self thread drive_path local.path local.speed

	end
The three variables that are passed are the target name to the path, the speed of the tanks and the last one tells the game what type of tank to use so it knows what model to use for the destroyed tank.
second_tank:
//----------------------------------------------------------------------
		//wait until the trigger is hit then start the second tank moving
	$tank2_trigger waittill trigger
	$tank2 thread TankGo $start_tank2 level.enemytankspeed empty_panzer_desert

	end
This function waits until the trigger is activated by a vehicle and then runs the TankGo function passing it the necessary variables.
//----------------------------------------------------------------------
drive_path local.path local.speed:
//----------------------------------------------------------------------
	self.driving = 1

//       drive Vector position, speed, acceleration, reach_distance, look_ahead
	self drive local.path local.speed 30 200 level.lookahead
	self waittill drive
	if (self)
	{
		self stop
		self.driving = 0
	}

	end
Here is where we actually make the tank start moving. In self.drive we set the speed of the tank, the acceleration and the look ahead distance. The look ahead sets the distance the vehicle “looks ahead” for obstacles. The last conditional “if” is run once it has reached the last vehiclepoint and checks to see if the tank is still alive, if it is, the tank stops driving.