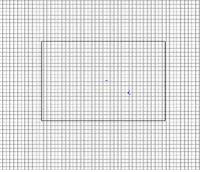
Open MOH-Radiant and create a flat brush like the one below. This will be the ground that your vehicle will be moving along (1-1). Save your map file as “test_yourmapname.map” yourmapname can be anything you want, just make sure you start it with “test_”. By starting your map name with test_ it will automatically load default scripts, animations and sounds to your level.
Diagram 1-1 (Top View)
Create a small brush and then press “n” to open the “Entity” window. From the list of entities double click on “addon_vehicle_german_snowy-halftrack-antitank”. This will turn your brush into the vehicle entity. To rotate the starting direction of your vehicle, select the vehicle and open your “Entity” window. At the bottom of your “Entity” window you will see buttons with 90, 45, 360, etc… Press the corresponding direction that you would like your vehicle to be facing (90 = north, 180 = west, etc…).
Diagram 1-2 (3D-view and Entity Window)

Now we have to give the vehicle a targetname. In the entity window, with the vehicle selected, enter the following values into the Key and Value fields at the bottom of the entity window.
Key: targetname
Value: MyJeep
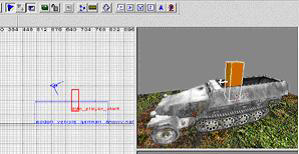
Time to put the player in the vehicle. Right click on the map grid and select “info” -> “player” -> “start”. Place the “info_player_start” in the back of the vehicle (1-3).
Diagram 1-3 (Side View and 3D Window)
All that is left is to put the vehicle waypoints in and create the path that our vehicle will travel. Right click on the grid and select “info” -> “vehiclepoint”. This will create the first point that our vehicle will travel to. You want to place this in front of your vehicle. This is not where your vehicle will start but where your vehicle will move to first. Therefore we have to give your first vehicle point a targetname and then tell your vehicle to target the first vehicle point. In your “Entity” window, with your vehiclepoint selected, enter in the below values to the Key and Value area.
Key: targetname
Value: path_start
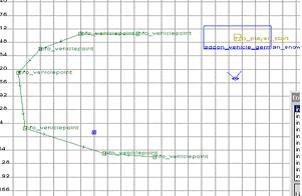
Create a new vehiclepoint but instead of entering a Key or Value you are going to use the default one given to you. Deselect the vehicle point just created and select the first vehicle point. While the first point is selected, select the second vehiclepoint that you just created and press “ctrl + k”. This targets the first vehicle point to the second one, creating a path with an arrow pointing to the second vehiclepoint. Keep creating vehiclepoints and connecting them to the previous point until you have the desired path you want your vehicle to take.(1-4)
Diagram 1-4 (Top View)
One last thing. You need a bounding box so that your vehicle will have collision. Take the one that is already created for you from the map file “test_VehicleRide.map” that is in the SDK. To do so, open the map file and select one of the pieces from the bounding box and then press (crtl + e) to select all pieces of the bounding box. With the bounding box selected open your map. When is asks copy selection, click yes. This will bring the bounding box of the vehicle into your map. Deselect the vehicle mask and select the vehicle image. Open the “Entity” window and enter the following into the Key and Value fields.
Key: target
Value: halftrack_mask
This will connect your vehicle to the vehicle mask and give it collision.
Make sure to add a skybox to your level.
You are all done with your map file now all you have to do is add the script.
Create a file with the same name as your map file and the extension .scr. For now copy and paste the script below or from “test_RideVehicle.scr”. If you take it from “test_RideVehicle.scr” make sure you change the targetnames to match the ones in your map.
level waittill prespawn
level waittill spawn

main:

	level.playerjeep = $MyJeep
	level.playerjeep nodamage		// don't want the vehicle to be damaged

	level.playerjeep thread	global/vehicles_thinkers.scr::PLAYER_JEEP_CONTROLLER
	level.playerjeep thread PLAYER_JEEP_Drive

end

//-------------------------------------------------------------------------------
PLAYER_JEEP_Drive:
//
//	This is where you can define the path you want the vehicle to take...
//-------------------------------------------------------------------------------
	//		 speed
	self drive $path_start 250
	//             speed accel look_ahead
	self modifydrive 250 100 256
	self waittill drive
	self stop

end
Your vehicle should drive around with this script but here is what is going on in each line of the .scr.
level.playerjeep = $MyJeep
level.playerjeep nodamage
The first line simply sets a variable to the targetname that you have given your vehicle. The Second line says that we don’t want the vehicle to take the damage instead we have it set that the player takes the damage.
level.playerjeep thread	global/vehicles_thinkers.scr::PLAYER_JEEP_CONTROLLER
level.playerjeep thread PLAYER_JEEP_Drive
The first line attaches the player to the vehicle and mounts them on the weapon. The second line threads the PLAYER_JEEP_Drive function below it.
self drive $path_start 250
//             speed accel look_ahead
self modifydrive 250 100 256
The first line starts the vehicle moving towards the first vehiclepoint and gives it the speed of 250. The next line sets three variables on how the vehicle moves. The first value sets the speed of the vehicle, the second sets the acceleration of the vehicle and the last sets the distance the vehicle “looks ahead” for obstacles.
self waittill drive
self stop
The first line tells the script to wait until the vehicle has moved to the last vehicle point. Once the vehicle has reached the last vehicle point it stops.