CDRWin is used to make an 'image' of the PSX game that is to be copied to the Hard Drive. CDRWin is the program that Paradox use to make the patches with and you must also use CDRWin to apply the Patches. A free demo of CDRWin can be downloaded from Goldenhawk the makers of CDRWin. If you like and use the program then why not buy it, you can do so online at the Goldenhawk site. Make sure that you have Windows Setup and CDRWin Setup for use on your computer. Make a New Directory on your HDD to download the patch files to (I'll call mine PSX_Patch) and another for the CDRWin 'image' file (I'll call mine PSX_Image).
1... Download the patch file and save it to your new directory (PSX_Patch). The patch file will be 'zipped up' to save space and time when downloading. This file will need to be 'unzipped' in able to see the patch files. Use the windows shareware program 'WinZip' to unzip all the patch file downloads. Here is a guide on How to use WinZip. With WinZip installed you will only have to 'Right Click' on the 'patch.zip' file in explorer to extract the files. Click on the 'Extract to' button and extract the files to 'The Same Directory' (PSX_Image) that the image file of your PSX game will be saved in. The directory (PSX_Image) will now have the 'unziped' patch files in it. There are usually 3 files in the downloaded 'patch.zip' file, 'patch.exe' (the patch file itself), an 'id' file and an 'info' file. The info file has the extension .nfo and may be opened using notepad or in explorer renaming the .nfo extension to .txt and then clicking on the file to open it up in notepad. The '.nfo' file (infomation file) should have instructions on how to apply the patch to the image file contained within it. Some .nfo files do contain that information but others do not, so read on and learn to how to apply the patch file to your image file.
2... Using CDRWin, make sure you have the correct setup, make an image of the PSX game to your HDD with the Extract Disc/Track/Sectors' page. Save that image to your new image directory (PSX_Image). Give that image file a name (PSX_Name). When CDRWin has finished making the image the PSX_Image directory will have 2 more files in it, 'PSX_Name.bin' and 'PSX_Name.cue'. 'PSX_Name.bin' is a file of the complete PSX game, all the data and audio in one file. 'PSX_Name.cue' is a text file that lets CDRWin know what the '.bin' file contains. It is possible to edit the '.cue' file to alter the way CDRWin works on the '.bin' file, but I will not go into that here. Close the Extract Disc/Track/Sectors' page.
3... Look at the patch file extension. If it has the extension .pdx then continue to the next step. If it has the extension .ppf then use the PPF-O-MATIC program below.
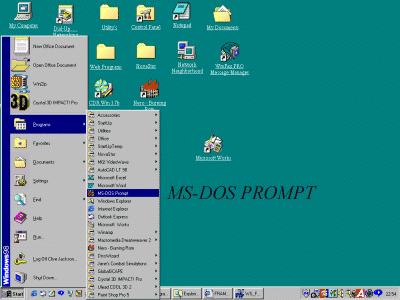
4... Open a 'DOS BOX IN WINDOWS' by clicking on the start button, go up to programs, go across and down to and click on MS-DOS PROMPT.
And a DOS BOX opens
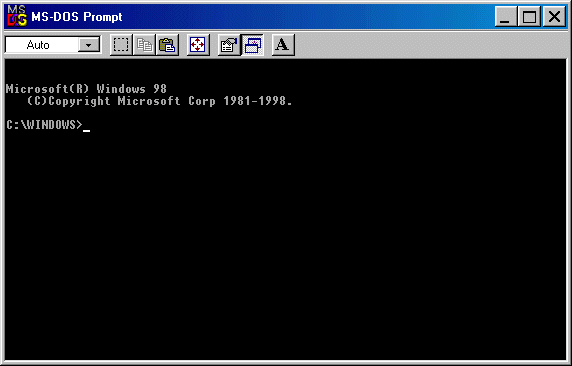
i... Type cd\ press enter (or return) this will get you to the 'root' directory of C.
ii... Type cd psx_image press enter, space between cd and psx_image, (PSX_IMAGE=THE NAME OF YOUR OWN
DIRECTORY) this will bring you to the psx_image directory.
iii... Type patchname psx_imagename.sin psx_imagename.bin press enter.
Thats the name of the patch, space, the name of your psx image with .sin added to the end,
space, the name of your psx image with .bin added to the end, press enter. (PSX_IMAGENAME=THE NAME YOU GAVE THE
GAME IMAGE) Here's an example for Vrally2, vr2crack vrally2.sin vrally2.bin
iv... Look at the dos box as you press the enter key, a text message will confirm that
the patch worked, OR did not.
v... Type exit press enter, to exit the dos box program.
Shown here is the Vrally2 Patch in a Dos Box

5... Now with CDRWin, open the Record Disc page
and burn your image to a new, unopened and clean CD-R disc.
It's always simple if you know how to do it! HAVE FUN
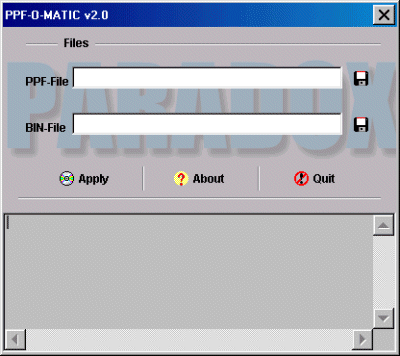
Download PPF-O-Matic v2.0 [size 218kb]
Use the instructions above, steps 1 and 2, to download the patch files and with CRDRWin make
an image file to your hard drive.
1... Click on the icon of a floppy disc to the right of the PPF-File text box.
2... Go to the directory PSX_Image and then double click on the patch file with the
extension .ppf. This will load the patch.ppf file into the text box.
3... Click on the icon of a floppy disc to the right of the BIN-File text box.
4... Go to the directory PSX_Image and then double click on the PSX_name
file with the
.bin extension. This will load the PSX_Name.bin file into the text box.
5... Click on the Apply icon. The patch will now be applied to the PSX_Name.bin image file.
As you press the enter key, a text message will confirm that the patch worked, OR did not.
6... Close PFF-O-Matic
7... Now with CDRWin, open the Record Disc page
and burn your image to a new, unopened and clean CD-R disc.
It's always simple if you know how to do it! HAVE FUN