After much delay while gathering parts and waiting for outside work to be done,
it was finally time to begin reassembling the engine. The teardown was the easy
part as I found out. There is really not much to turning a wrench lefty-loosy
and pull parts off.
After disassembing the engine and getting a good rebuildable core, I took both to
Headworks in Mayo and Hill Machine Headworks in Galway. These shops came recommended
to me - I gathered that most of their work was done on larger engines and smaller
engines were a piece of cake. Hill Machine informed me that he had a worklog of
several weeks. That was not really a big deal so I said fine. Headworks had a
similar story and it turned out to be a longer wait. A much longer wait as I found
out. I made the mistake of saying, "take your time. I'm not in a big hurry." Well,
he took it to heart and it was about six months before my head came back. Mind you,
I'm not really complaining - I really wasn't in a big hurry. My advise on getting
any outside work done is to set a timeline and call back often.
I am mostly satisfied with this phase of the project. It took a little longer
than expected, but it was all worthwhile to hear that engine come to life. Next
will come some tuning so I can pass an emissions test, then on to probably the
brakes and some sheet metal work.
BACK TO TOP

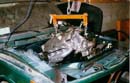
Here is what the engine block looked like when it came back from the machine shop.
They bored the block 0.010" oversize, magnafluxed the crank and rods, micropolished
the crank journals, and pressed out the old pilot bearing. Overall, I'm very happy
with the work they did.
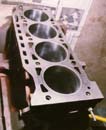
As you can hopefully see in the photos, the bores have a nice crosshatch honing pattern
(as they should). After cleaning any residual oil off the outside of the block, I
sprayed on several coats of gloss black engine enamel to make it look nice. I also
scrubbed out out all the oil passages with long brushes and cleaned out all the bolt
holes with taps to ensure proper torque readings.
BACK TO TOP
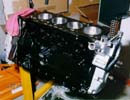
Here is a shot of the engine partially together at this point, the crank and pistons were in,
as well as the front cover and timing gear. I am sort of kicking myself for not taking enough
pictures. It would have been difficult to be photographer and engine assembler at the same
time, but that's life I guess. While I'm making excuses, let me make another -- after having
lost my access to a digital camera last year, it has been much more of a hassle to document
things.
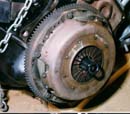
Hey! That looks like the old clutch. Yep, it certainly is. When I started this, I was hoping
to replace the clutch, and do something with the transmission whether it be rebuild or 5-speed
conversion. As it turned out, the old components would have to go back in due to financial
situations. The clutch actually has lots of life left in it, and the flywheel still has marks
on it from the last time it was turned. As I recall from the last time I drove the car (two
years ago?!?), the transmission was tired but shifted ok. I figure that when I get around to
deal with the transmission issue, the clutch issue will be dealt with.
BACK TO TOP
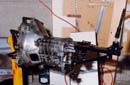
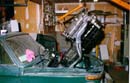
About the only thing I did to the transmission is put it on the stand and do some very light
maintenance. I cleaned up much of 23 years of dirt build-up, and changed the oil. While I had
access, I changed some of the bushings for the shifter (knowing that it is impossible to get
to while in the car), but I don't know if it helped at all. The shifter still feels as wobbly
as it ever has.
I can't believe it! That's all the photos I have from assembling the engine. What a lame person
I am. In summary, the block had to be bored oversize and I decided to get a set of Mahle 9.5:1
CR pistons. I replaced the oil pump (insurance!) and all the timing hardware. On the topside,
I opted for the Korman 300 camshaft with Korman springs and rockers. The head machining and
assembly was done by Hill Machine Headworks and all I had to do was set the valve lash, lube
the cam, and bolt it to the block. I made sure to use plenty of oil on the pistons and crank,
RTV gasket sealer where I need to, anti-sieze on critical bolts, and loc-tite on stuff that I
wanted to stay put. Having done all that, it was time to put the engine back in the car.
BACK TO TOP
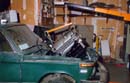
After months of making excuses, it was finally time to put the engine back into the car.
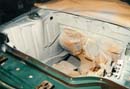
While the engine was out, I took some time to clean and repaint the engine compartment.
After all, I didn't really want to put a mostly shiny new engine into a grungy engine bay.
I selected a two part basecoat-clearcoat paint system by PPG called Deltron 2000. The color
is a metallic green that looks really nice. Yes, I know it's not a factory BMW color -- so
sue me. Right now only the engine compartment is that color but eventually the entire car
will match.
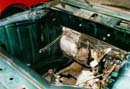
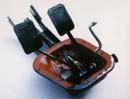

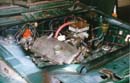
To replace the old rusted pedal box, I got a good workable one from a BMW list member.
I cleared out some surface rust, coated the inside with some Eastwood Company Corollis,
and the outside with Corollis and Hammerite. I will probably also get a replacement foam
cover as well. Visible in one of the photos is the postive battery cable that was routed
from the trunk along the transmission tunnel and throught the firewall.
BACK TO TOP
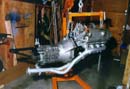
Here is the transmission mated to the engine and ready to go back in the car. I wanted to
bolt on as much stuff as possible now while things were still accessable. I was a little
ambitious with the exhaust. Even thought the Y-pipe is bolted on in this photo, I ended up
having to remove it during the install. It almost worked, but we were just shy on clearance,
and the pipe had to be removed while lowering the engine
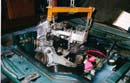
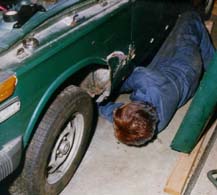
After two long days of work, my brother and I started the 2002 at 5:20pm on Saturday January
23th. It was such a thrill to see and hear that motor run. After varying the running rpm for
about 20 minutes, we dropped it back down to an idle speed and prepared to tune it up. I pulled
out the timing gun and realized...doh! Relocating the battery to the trunk eliminated a place to
plug in the timing gun! the next step will be to get an auxillary power distribution block in
the engine compartment to plug in such things as required.
BACK TO TOP