Datalogging Instructions
A copy of this file is posted in the Documents section of
theEmpowering Minds Website.
These instructions show how to set up a datalogging experiment
using the Datalogger software designed for the project at the NCSR (National
Centre for Sensor Research) at Dublin City University.
These instructions deal with how to set the RCX to take the desired readings
and how to upload the data from the RCX to the computer, when the readings have
been taken.
This software was designed by Rod Shepherd and Rod and Emma O'Brien have
been working with schools to get the datalogging up and running.
A second set of instructions will be posted to show how to
graph the data in Excel.
- To Open Data Logging Software
- Prepare the RCX
- Datalogger Settings
- Number of Readings
- Max.
- Time Delay between Readings
- Sensor Settings
- Logger Options
- Date Stamp
- Time Stamp
- Auto Start Time
- Auto Power Off
- Silent Log
- Clear RCX Memory (Yellow Button)
- RCX Power (Red Button)
- Log Status (Blue Button)
- Comm Port
- Set RCX Time (Top Green Button)
- Download Log Settings (Bottom Green Button)
- Auto Start (Top White Button)
- Start Log Now (Bottom White Button)
- Upload Data Log (Top Orange Button)
To Open Data Logging Software
- 1. Click START.
- 2. PROGRAMS.
- 3. NCSR Datalogger v.1.0
[Top of page]
Prepare the RCX
- 1. You need an RCX with firmware. If it has no firmware go into Mindstorms
and down load the firmware.
- 2. If you are going to take readings over a long time it is important that
you check that the RCX has good batteries.
- 3. Attach the heat/light sensors that you wish to use. Attach the sensors
to Ports 1, 2, and 3. Do not attach them to Ports A, B or C.
- 4. Bring the RCX to the Infra Red Tower and make sure that it is turned
on!
[Top of page]
Datalogger Settings
First you need to decide:
- 1. How long you want the readings to go on for.
- 2. How much time you want to leave between each two readings. e.g. One reading
every 10 minutes for 3 hours equals 19 readings. (Remember that there is one
reading at the beginning!)
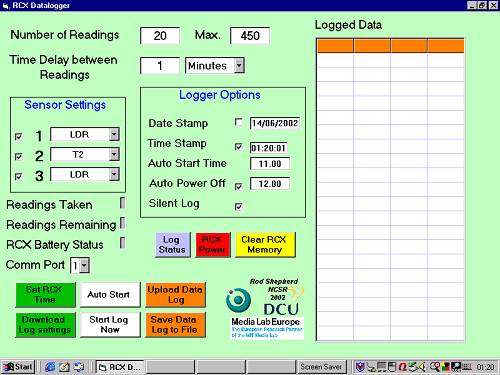
|
|
|
This is what the Datalogger interface looks like.
The logged data columns will contain the data when it is uploaded from
the RCX. It can then be saved to a text file and the text file can be
opened in Excel to graph the data.
|
[Top of page]
Number of Readings
- Type in the number of readings you wish to take. e.g. One reading every
5 minutes for one hour = 12 readings + the one at the beginning = 13 readings.
[Top of page]
Max.
Time Delay between Readings
- 1. There are two windows. The second one allows you to decide whether to
measure the time between readings in Seconds, Minutes or Hours. The first
one allows you to enter the number of seconds/minutes/hours between readings.
- 2. Enter the number you want in the first window.
- 3. Select whether you want seconds, minutes or hours.
[Top of page]
Sensor Settings
- 1. Tick the box in front of the Port or Ports (1, 2, or 3) where you have
the sensors connected.
- 2. If you have just one sensor you can take up to 1800 readings. If you
have two sensors you can take up to 900 readings. If you have three sensors
you can take up to 600 readings. The figure shown in the Max. window at the
top will change depending on how many sensors you are using.
- More info. on Max.
- 3. Choose which type of sensor you want on each Port, using the drop down
menu.
- More info. on Sensor Types
[Top of page]
Logger Options
Date Stamp
- 1. The Date Stamp window shows the date as it is on your computers settings.
- 2. Tick the box in front of the date if you want each reading date stamped.
This means that the date will be recorded with each reading.
[Top of page]
Time Stamp
- 1. The Time Stamp window shows the time as it is on your computers settings.
- 2. Tick the box in front of the time if you want each reading time stamped.
This means that the time will be recorded with each reading.
- 3. If your computer settings for Date or Time are wrong you will need to
adjust the settings to the correct Date/Time.
- More info. On changing Date/Time
[Top of page]
Auto Start Time
- 1. If you want to start readings straight away leave this box blank.
- 2. If you want to start readings at some later time you type in the time
in this box.
- 3. The time is in 24-hour format (i.e. four digits, and dont forget the
decimal point!)
- More info. On Auto Start Time
[Top of page]
Auto Power Off
- 1. Auto Power Off turns off the RCX at the selected time.
- 2. This will help to save the batteries if you are not around at the time
the readings end.
- 3. Tick the box in front of Auto Power Off.
- 4. Type in the time you want it to power off (24-hour time).
- 5. Make sure that this time is later than the last reading!
[Top of page]
Silent Log
- 1. If this box is not ticked you will hear a beep at each reading.
- 2. Tick this box if you do not want any sound.
- More info. On Silent Log
[Top of page]
Clear RCX Memory (Yellow Button)
- 1. Use this button to clear the memory of the RCX.
- 2. This will delete any previous readings and settings.
- 3. Before you do this make sure that any previous readings that were stored
on the RCX have been uploaded on to your computer and saved.
[Top of page]
RCX Power (Red Button)
- 1. Use this button to check the battery level in your RCX.
- 2. The battery level is shown in the RCX Battery Status window on the left.
- 3. It will just show either OK or BAD.
[Top of page]
Log Status (Blue Button)
- 1. When the RCX has started taking readings you can use this button.
- 2. Remember the RCX must be within range of the tower.
- 3. The Log Status will appear in the Readings Taken and Readings Remaining
windows on the left.
- 4. The Readings Taken window will show the number of readings already taken.
- 5. The Readings Remaining window will show the number of readings left to
be taken.
[Top of page]
Comm Port
- This window selects the comm. Port to which your Infra Red Tower is connected.
[Top of page]
Set RCX Time (Top Green Button)
- 1. Use this button to set the RCX time to the same time as your computer.
- 2. This is important if you intend to use an Auto Start Time.
- 3. Make sure that the computer time is correct.
- 4. The time will then be visible on the RCX screen.
[Top of page]
Download Log Settings (Bottom Green Button)
- 1. Use this button to download all the options you have selected above to
your RCX.
- 2. When this downloading starts you will see that the little green light
in the Infra Red Tower is on.
- 3. When the light goes off you will know that the download is complete.
[Top of page]
Auto Start (Top White Button)
- 1. Click Auto Start if you have set an Auto Start Time above.
- 2. If you choose Auto Start you DO NOT have to press the RUN button on the
RCX. It will run automatically at the selected time.
- 3. If you choose Auto Start DO NOT use the Start Log Now button.
[Top of page]
Start Log Now (Bottom White Button)
- 1. Click Start Log Now if you want the readings to start straight away.
- 2. DO NOT use this button if you have selected an Auto Start Time.
- 3. If you click the Start Log Now button you also have to press the RUN
(green) button on the RCX.
[Top of page]
Upload Data Log (Top Orange Button)
- 1. When all your readings have been taken bring the RCX back to the Infra
Red Tower and turn it on.
- 2. Click Upload Data Log.
- More info. On Upload Data Log
[Top of page]
YOU ARE NOW READY TO SAVE YOUR DATA LOG TO A FILE FOR MORE INFORMATION ON
HOW TO SAVE DATA TO A FILE SEE
SAVING DATA LOG TO FILE
[Top of page]
Max. (more info.)
- The maximum readings which the RCX can hold is 1800.
- If you decide that you want each reading Date Stamped, this is like taking
two readings at a time and the Max. will now be reduced to 900. The same applies
if you want each reading Time Stamped.
- If you want each reading both Date Stamped and Time Stamped this is like
taking three readings at a time and the Max. will now reduce to 600.
- If you have two or three sensors in use the maximum number of readings in
each case above will be reduced further.
- Back to Max
- Back to Sensor Settings
[Top of page]
Sensor Types (more info.)
- LIGHT means the LEGO light sensor.
- TEMPERATURE means the LEGO temperature.
- LDR is Rods Light Sensor.
- T2 is Rods Temperature Sensor.
- Back to Sensor Settings.
[Top of page]
Changing Date or Time Settings on your
Computer (more info.)
- 1. Double-click on the time shown on the bottom right of your screen. You
might have to do this a second time. (You can also do this by clicking START,
then SETTINGS, then CONTROL PANEL and then double-clicking Date/Time.)
- 2. The Date and Time Properties window appears.
- 3. Select the correct Year, Month and Date.
- 4. Type in the correct time in the Time Window.
- 5. Click APPLY.
- 6. Click OK.
- Back to Time Stamp.
[Top of page]
Auto Start Time (more info.)
- This is very useful if you will not be around at the time that you want
the readings to start.
- If you wanted to record the light/temperature levels overnight on a summer
evening you mightnt want the readings to begin until, maybe, 8 oclock p.m..
- Back to Auto Start Time.
[Top of page]
Silent Log (more info.)
- Normally the RCX beeps each time a reading is taken. This can be quite useful
as sometimes it is the only evidence that the readings are actually being
taken!
- On the other hand the beeping, especially if several RCXs are on the go,
can be a distraction in class.
- In this case you should use the Silent Log option.
- Back to Silent Log.
[Top of page]
Upload Data Log (more info.)
- 1. The data stored on the RCX will be uploaded to your computer.
- 2. The data will appear in your Datalogger in columns on the right hand
side.
- 3. The column names will show Date/Time if you used the Date/Time Stamps
and will show the names of the Sensors.
- 4. Underneath will be the readings.
- Back to Upload Data Log.
[Top of page]
Return
to Projects and Robots