Cam chain (timing chain).
_______________________________________________________________________________________________
Cam chain tensioner blade.
The tensioner blade is made up of a spring metal blade coated in rubber and a spring.
The side of the tensioner that bolts onto the cylinder head is the "rear" of the tensioner.
The side of the tensioner with the rubber blade is the "front" of the tensioner.
The top of the tensioner has two wedges in it.
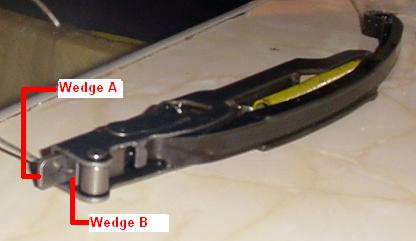
The rear wedge is called "wedge A"
The front wedge is called "wedge B"
To release tension from the cam chain push wedge B down and then pull wedge
A up. Insert a 2mm pin into the hole in wedge A to prevent it slipping back down.
There is a risk that the 2mm pin may fall down into the engine so use a long
pin and bend a large loop onto the end of it so it won't fit into the engine.
If wedge A has recessed so far into the tensioner body that you can't lock a vice
grip onto it then the chain is worn. To grip onto the wedge, gently insert a
long screw driver or something down between the chain and the tensioner blade
while pushing down wedge B, this will cause wedge A to rise more.
Also, there is a rubber pad between the rear of the tensioner and the cylinder
head, when removing the tensioner first lousen the bolts, remove the rubber pad
and then remove the bolts and the tensioner.
_______________________________________________________________________________________________
Cam chain.
Silent multi link chain with 1/4" pitch and 118 links.

Honda endless cam chain PN: 14401-MN1-671
DID endless chain (rivet link available): DID SCA-0409A SDH-118LE
Most manufacturers recommend that you fit an endless chain as rivet links are
less reliable than factory links, I believe fitting an endless chain to the
Bros would require crankcase separation.
The rivet links that comes with the DID chain do not have dimples in them,
so it is more difficult to center the riveting pin.
This chain is very easy to split.
Sprockets
I believe silent chains are not as hard on sprockets as roller chains.

__________________________________________________________
Cam chain replacement using a rivet link.
The main difficulty is finding enough room to use the rivet tool.
For the rear cylinder I took the cam sprocket off the cam shaft, this gave
me enough room to use the rivet tool. I also used cable ties to strap the
chain onto the sprocket at various times. Try to get the camshaft with all
cam lobes facing down before removing the last sprocket bolt as this will make
it easier to set valve timing later.
For the front cylinder I removed the cam shaft.
If you are using a chain rivetter that requires less room them you may
not need to remove camshaft etc.
_______________________________________________________________________________________________
Camshaft removal (NT650 HAWK GT).
Remove the cylinder head covers and carbs.
Remove the timing hole cap and crankshaft hole cap from the
left crankcase cover.
Align the FT mark (rear: RT mark) on the flywheel with the
index mark on the left crankcase cover timing hole by turning
the crankshaft counter clockwise.
Make sure the piston is at TDC (Top Dead Center) on the
compression stroke with all the cam lobes facing down.
If the cam lobes are facing up at TDC, turn the crankshaft
360° counter clockwise, and re-align the mark and notch.
Pull wedge A straight up while holding wedge B down.
Secure wedge A with a 2mm pin.
Remove the end cam holder by lousing the bolts in 2-3 steps.
Remove the cam sprocket bolt, rotate the crankshaft counter
clockwise 360° and remove the other bolt.
Note: Be careful not to allow the cam sprocket bolts to
fall down into the crankcase.
Remove the 3 camshaft holder mounting bolts and the nut
in 2-3 steps and then remove the oil plate and the holder.
Remove the dowel pins.
Hang the cam chain on the camshaft behind the camshaft-
flange and remove the cam sprocket while lifting the camshaft
out.
Attach a piece or wire to the cam chain to prevent it from
being dropped into the crankcase.
_______________________________________________________________________________________________
Installation of cam shaft(s).
The front and rear camshafts are different, do not
confuse them.
There is an index line on the cam sprockets, when the
flywheel FT or RT mark is aligned, the index line on the
appropriate sprocket should be flush with the top of the
cylinder head.
Usually when all the cam lobes are facing down, all
the rocker arms will have a small amount of jog in them.
_______________________________________________________________________________________________
Front camshaft only.(NT650 HAWK GT)
Turn the crankshaft counter clockwise and align the RT
mark on the flywheel with the index mark on the timing hole.
Make sure the REAR cam lobes are all facing UP. If they are
not, turn the crankshaft counter clockwise one revolution so
that the REAR cam lobes are all facing UP. (NOTE: This is the
valve overlap position.)
Continue turning the crankshaft counter clockwise (128°) until
the FT mark on the flywheel aligns with the index mark on
the timing hole (approx. 3/8 turn).
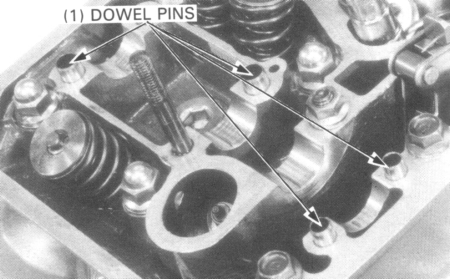
Install any necessary dowel pins.
Grease cam lobes and journals.
Install the camshaft in the cylinder head through the cam chain
and install the cam sprocket on the camshaft.
With the cam lobes all facing down, align the timing marks
(index lines) on the cam sprocket with the top of the cylinder
head.
Place the cam chain on the sprocket.
Install the cam sprocket on the camshaft flange and recheck
that the timing marks (index lines) align with the top of the
cylinder head.
Inspect valve clearance.
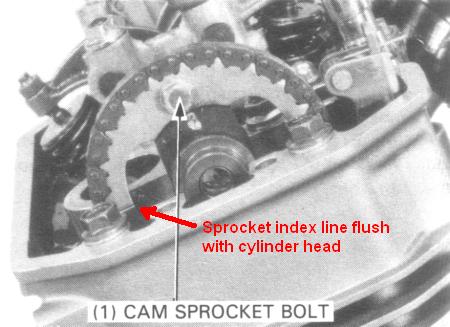 Align the cam sprocket bolt holes in the cam sprocket and
camshaft, install and tighten the cam sprocket bolt.
TORQUE: 23 Nm.
Install the holder, oil plate, 8 mm bolts, 8 mm nut and 6 mm
bolts.
TORQUE:
8 mm bolt: 23 Nm
8 mm nut: 23 Nm
6 mm bolt: 10 Nm
Turn the crankshaft counter clockwise 360° and install the
other sprocket bolt.
Install the end holder.
CAUTION
Note the direction of the camshaft end holder, install the flat
surface on the holder facing in.
_______________________________________________________________________________________________
Rear camshaft only.(NT650 HAWK GT)
Turn the crankshaft counter clockwise and align the FT
mark on the flywheel with the index mark on the timing hole.
Make sure the FRONT cam lobes are all facing down. If they
are not, turn the crankshaft counterclockwise one revolution
so that the FRONT cam lobes are all facing down.
Continue turning the crankshaft counter clockwise (232°) until
the RT mark on the flywheel aligns with the index mark on
the timing hole (approx. 5/8 turn).
Place the camshaft into the correct position with the cam lobes all
facing down.
Install the cam sprocket and camshaft holders using the same
procedure as for the front cylinder.
Inspect valve clearance.
_______________________________________________________________________________________________
Front and rear camshafts.(NT650 HAWK GT)
Turn the crankshaft counter clockwise and align the FT
mark on the flywheel with the index mark on the timing hole.
Install the front camshaft with all the cam lobes facing DOWN.
Align the index marks on the cam sprocket with the top of the
cylinder head.
Continue turning the crankshaft counter clockwise (232°) until
the RT mark of the flywheel aligns with the index mark on
the timing hole (approx. 5/8 turn).
Install the rear camshaft with all the cam lobes facing DOWN.
Align the index lines on the cam sprocket with the top of the
cylinder head
Remove the 2mm pins holding the tensioner wedges.
Note:
Be careful not to let the 2mm pin fall into the crankcase.
Do not forget to remove the 2mm pin.
Inspect valve clearance.