

cylinder (you will need a long extension for
your rachet to do this). Romove the bolt that
secures the exhaust collector box to the right
foot rest hanger so that the collector box will
drop down 1 or 2 mm which will make it easier
to remove and install the down pipe.
criss cross pattern.
it from the engine.
the damper. There is a large metal gear
rivetted to the back of the clutch basket.
There is a damper between the gear and the
basket much like the damper behind the rear
sprocket. The strength of two hands should
not be able to rotate the damper, if there
is free movement then the basket is defective.
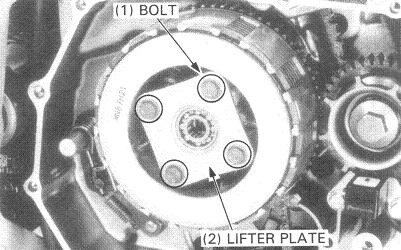
loaded lifter plate bolts, turn each bolt
a quater a turn at a time, in a criss cross
pattern, maintain equal pressure on each bolt.
Once the bolts are half way out you can remove
them quicker.

how the four colums of the pressure plate feel loose.
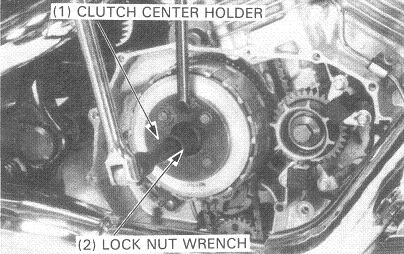
(27mm socket with breaker bar and extension),
use the clutch center holder to hold the clutch
unit OR put the bike into 5th gear and press the
rear brake to stop the clutch unit form turning.
Sometimes this nut is difficult to remove, an impact
wrench and a blow torch might help.

and it's seat should be on this) Check for wear
where the steel plates press on the clutch inner.
plates.
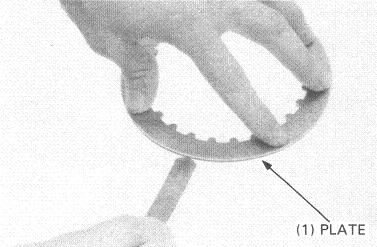
warpage, warpage service limit is 0.3mm.
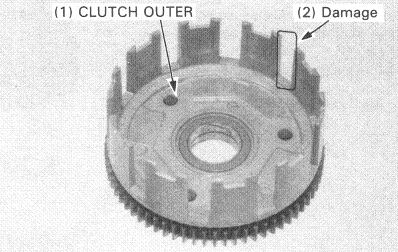
or wear where the friction plate tabs press
on the basket.
- Lay the clutch basket on you work bench
- Install the pressure plate
- Install a friction plate then a steel
plate then another friction plate etc.
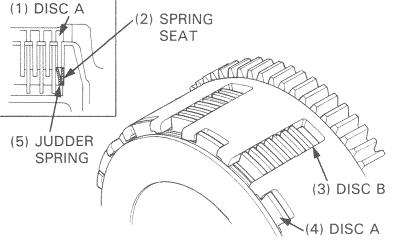
NOTE: There should be one different friction
plate in your set , the one that is different
goes on last. The last friction plates tabs
go into a different slot that the other plates. - Install the clutch inner, rotate it as
you push it in. Make sure it is all the way
in.
NOTE: the judder spring and it's seat should be
in place, look at picture to see how the
Judder spring is orientated.
shaft.
NOTE: If the unit wont go on all the way then
move the oil pump chain to align the bosses
and then push it on.
lock nut.
Note: Before you stake the lock nut check that
the four colums of the pressure plate feel loose
like they did before you removed the nut. If it's
not loose then something is catching and the nut
will have to be reomved.
bolts, before you tighten down the bolts check
that the springs are pressing all the friction
plates and steel plates together. If the plates
are not being pressed together then the clutch
will not work and may break the pressure plate.
plate bolts in a criss cross pattern, turning each
bolt 1/2 of a turn at a time, maintain equal spring
pressure on each bolt, do not tighten the bolts too hard
as this will break the pressure plate, Simply seat
the bolts and tighten them securely (guess: 10Nm).
Note: When the bolts are screwed all the way in they
should tighten suddenly, if they just tighter and tighter
then something might be wrong.
that the friction/steel plates are being pressed
together by the springs.
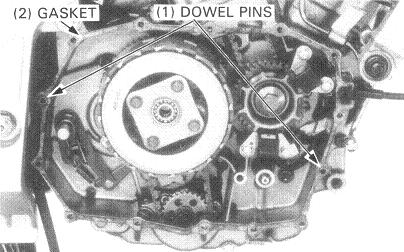
the cam oil feed pipe are in place.
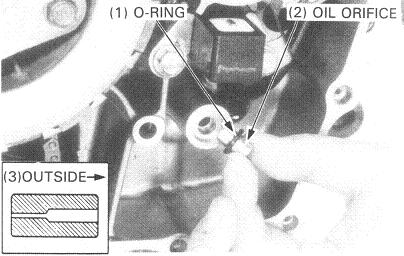
mating surfaces and to the gasket.
in the crankcase cover.
apply the gasket followed by the crankcase cover.
cross pattern.
or nuts.
