
ENJOY SOME 'STICKY MOMENTS' WITH GERARD FEENEY…
Working with polyester resin to attach wooden components inside GRP fuselage shells, and to apply wing centre section glass fibre bandages, is an almost inescapable task that you're gonna have to tackle at some time in yer aeromodelling career! Here are a few basic 'Feeney Zone' guidelines to help make this 'prickly' but often necessary evil a little less irritating…
THE PAIN OF GLASS!
First, a heartfelt warning: working with glass fibre cloth and polyester resin is a potentially dangerous affair! Those noxious fumes and microscopic needle-like glass cloth offcut strands floating about can irritate one's skin and seriously damage one's 'breathing apparatus' if inhaled. So, wear a good-quality face mask to cover your nose and mouth, and slip on some 'latex protection' over your digits, just in case of the worst! Some barrier cream, available in auto-finishing outlets, lovingly rubbed into your hands in the absence of latex or vinyl gloves, is also a sensible measure.
Tight-fitting swimming goggles, coated with spit before wearing to prevent 'em misting up, help keep one's eyes free of nasty particles. Having suffered a horrible eye irritation in 1996, after wet-sanding GRP, I can confirm that this extra optical safety/protective measure ain't just a 'wet' idea!
MIX-UP
Personally, I like 'Bonda' polyester resin, as it offers an easy-mix system using graduated dispensers; it also brushes well and features a comfortable cure time. Whatever brand of resin you choose, ensure that it's really fresh. Follow the resin/catalyst mixing ratios precisely (make sure that the product offers at least a half-hour drying time), and have plenty of cellulose thinners standing by for brush cleaning afterwards.
BRUSH STROKES
On the subject of brushes, ordinary 1/2" hardware shop 'domestic' brushes and 'low-grade' 1/4" artists' brushes are fine for resin application. The ferrules of cheap and cheerful artists' brushes, which are best suited to resin application in confined areas, may need crimping with pliers to prevent hair loss. The ferrules of these cheapo artists' brushes can be bent at angles also, to stipple tricky internal corners, with the brush taped to a length of square-section 1/4" spruce strip. I have to admit that I frequently 'sacrifice' such crap-quality DIY brushes on 'single use' resin applications; but, as already stated, if you're fastidious about cleaning, they'll last longer!
SHELL SUIT!
Kit ply firewalls come approximately 1/8" over-size to allow for precise trimming to shape, to fit snugly within the GRP fuselage shell nose areas. The firewall edge 'erosion' is a low-tech exercise involving a sharp Stanley knife, followed by 80-grit glass-paper stuck to a hard sanding block. Don't 'fret' if the reduced-area firewall is wavy around its circumference; so long as a good overall friction-fit is achieved, even noticeable localised gaps are easily fixed later on with epoxy, surplus resin, or Deluxe Materials' specialist adhesives.
The exact firewall location within the GRP shell is determined with the engine/mount package attached to the firewall. Bolt the mount to your pre-fitted firewall anchor nuts, then feed the firewall/mount 'module' (with all the plumbing/tank neck holes already drilled by you if they're not pre-cut!) in through the radio bay opening, and jiggle it into its approximate final position. Now, screw or bolt the engine to your pre-drilled mount arm holes, through the fuselage shell's pre-excavated 'powerhouse' nose side/top opening. Some GRP fuselage shells may arrive with the engine opening factory-cut, but this is very rare! Normally, you do the job personally with a drill and Junior hacksaw blade - or a Dremel tool.
A scrap 1/16" ply nose-ring, placed 'twixt the fully-tightened prop-equipped spinner rear, and the GRP fuselage shell front face, maintains a snug but healthy 'operational' engine/fuselage gap. Only tack-glue the firewall solid when totally satisfied that the spinner/fuselage centring and cylinder head/silencer fuselage opening 'protrusion' angles are exactly correct. A mildly under-size firewall will, in fact, aid the overall hardware/fuselage shell alignment procedure, I find.
With the spinner taped securely to the GRP fuselage shell, and the nose-ring doing its spacing job in between, and with everything lined-up nicely, drop a few dollops of five-minute epoxy, 'Super Crylic', or 'Fusion' onto the firewall rear corners where it touches the nose shell most tightly. Let the tacking adhesive blobs cure with the fuselage stood nose-down against a wall so that the glue will 'pool' against both the wood and GRP surfaces in the most effective way possible. Tack-gluing one half of the firewall border at a time, and allowing the glue to form smooth fillets by angling the fuselage as appropriate, is another effective spot-holding technique. When the tacking blobs have cured, remove the engine and mount again. Seal all plumbing/tank neck holes, all captive nut threads, plus the entire front firewall/GRP shell joint area, with lots of well-kneaded Plasticine. The remaining firewall/GRP shell tank bay gaps are now filled from the radio bay opening with any of the adhesives already mentioned; again, the model is placed nose-down as curing takes place.
Now, the actual resin/bandage work begins! One's fibreglass tape width is chosen to suit the model's internal nose dimensions. The tape length is pre-cut to allow a 1/2" overlap onto the GRP shell, and bandage application patterns are as shown in Fig. 1.
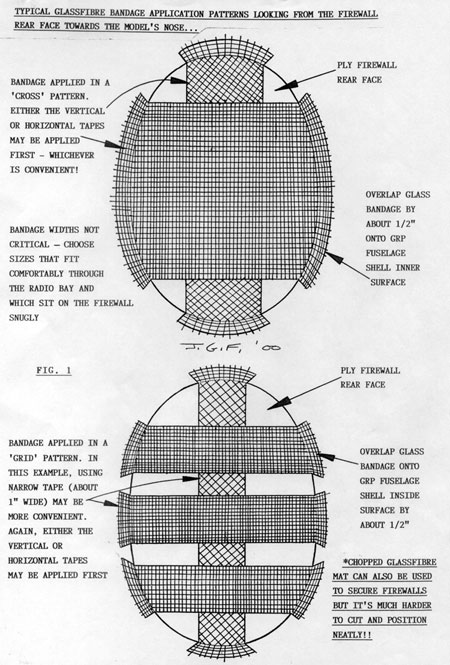 |
Pour a generous amount of resin in through the radio bay opening, onto the firewall rear face. Slosh it about so that the entire wood surface, and the GRP shell contact areas, look smooth and glossy. Now, gently feed pre-cut strips of glass cloth down onto the firewall back and coax 'em fully into contact with glove-protected fingers, and also with that brush attached to the stick. Dabbing the bandage with the brush will saturate the weave nicely, the already-applied resin forcing its way out through the weave again.
Get the firewall sorted first, then stipple the bandage overlaps onto the GRP shell, being careful to expel air pockets and to fully wet out dry patches with more resin as you proceed. Yet more resin is now brushed over the whole firewall/GRP shell interior 'border' so that every surface is properly 'basted' with beautiful polyester gunge! Brush out any resin runs carefully, and again stand the fuselage nose-down whilst the polyester resin sets really hard.
When the resin has cured, de-bung the firewall plumbing holes, captive nut threads, and the firewall border front edge, using a strong modelling pin and/or a metal meat skewer tip to pry the Plasticine free. Drill under-size holes in through the captive nut centres to break through the glass bandage. Then abrade the nut holes from inside with a small round file to allow bolt passage once more. Now, 'fillet' the firewall front border/GRP nose interior with epoxy, Super Crylic, or Fusion. When this circumferential adhesive fillet is dry, brush the firewall front face and all plumbing hole edges with more polyester resin. A couple of resin applications, sanded with 180-grit glass-paper between coats, gives a sensational fuel proof hard finish! You now have a superbly-sealed/bonded firewall that'll most likely outlast your model's life-span. Enjoy!
BAY WASH!
Polyester resin, either brushed, or poured and swilled around inside the cowl, engine and tank bays, makes an excellent wooden structure fuel proofer! Plan ahead and use surplus resin for fuel proofing purposes; that way, you'll enjoy maximum grunge-protection for minimum cost! Remember to prepare all firewall plumbing holes to a smooth edge-finish before applying any resin at all.
TELLING TAILS…
Unrelieved tailplane slots in GRP fuselage shells are easily removed using the standard Feeney Zone 'drill all around the edges, then hacksaw the interior waste free' technique! A Dremel tool is even better, if you've got one. (Remember the face/eye protection, as a lot of dust is generated!) Some 80-grit glass-paper, stuck to a wooden ruler, gets the slot edges silky-smooth prior to tailplane insertion. The horizontal stab slots will probably need more sanding on one side than the other, to correct minor misalignments. Just make sure that the horizontal tail and fin sit straight as you stick 'em! Pre-cut tailplane slots usually call for a lot less preparatory alignment sanding work - though some exceptions always pop up!
GRP fuselage tail-seat edges can offer little in the way of supporting/gluing area, so it's a good idea to cyano a scrap balsa seating platform inside the fuselage rear-end just beneath the horizontal tail slot opening. Now, using straight resin as the adhesive, or Super Crylic/Fusion, there's more anchorage area to play with! The fin also benefits from having a soundly-bonded horizontal stab to hang on to! Get the horizontal stab fixed permanently before attaching the fin.
Prevent resin or glue from spoiling the horizontal and vertical stab surfaces by marking off the tailplane gluing areas with masking tape strips. Now, when the surfaces are fed in through the fuselage slots, any adhesive deposited outside the GRP shell will land on the tape, thus saving both uncovered and covered tail parts from a really 'sticky end'! Remove the masking tape gently from film-covered tail parts, or the film could be pulled loose! (If this happens, just re-seal with a tacking iron.)
Lightweight filler, sanded smooth and covered with doped tissue strips, hides the fuselage/tailplane intersections on dope/tissue-covered tail feathers. Film-covered balsa tails can also be faired-in with filler before covering takes place; doped tissue/self-adhesive trim strips hide the joints again.
POST-SCRIPT
Fin stern-posts are easily stuck into hollow fuselage shell rear-ends with straight resin, brushed-on, or one of the Deluxe Materials' specialist adhesives. Just get the fin-post a smooth friction-fit beforehand, by carving/sanding its edges as required. Centreline-scribe and cut all hinge slots before final post insertion. Glue the post in fractionally proud of the GRP fin shell, so that it can be block-sanded to a really flat smooth surface when the glue dries. The stern-post can be done in a dope/tissue finish, to allow for painting with the fuselage shell later on.
BEARING UP
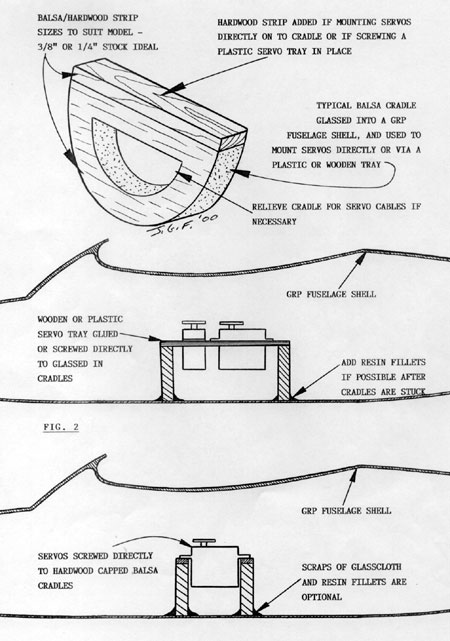
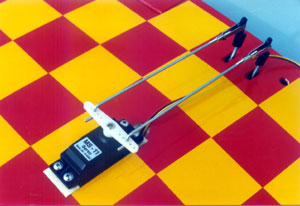
Servo tray or individual servo supports may be resined securely in place in GRP shells too. First, ascertain the precise fuselage shell interior contours by trial-and-error, using cut out pieces of stout card. Transfer the finalised card templates to 1/4", 3/8", or 1/2" sheet balsa, and cut out the 'half-moon' shapes (or whatever) in the amount required. Top the balsa cradles with hardwood strips to take the servo/servo tray mounting screws. Hardwood topping strips are not required if gluing a ply servo tray directly to the balsa cradles. Remove/relieve the cradle centres before fitting, to enable the servo cables to pass through.
Straight resin, brushed onto the balsa/GRP shell contact areas, is fine for close-fitting cradles; Super Crylic or Fusion will handle slightly gappy-fitting specimens. When dry, beads of poured-on polyester resin (possibly reinforced by glass bandage or chopped mat patches) add amazing strength to the cradle bases. Resin or adhesive fillets alone are fine too - just angle the fuselage whilst the stuff cures, to control the fillet shape.
Now, simply screw your servos directly to the cradles, or glue/screw your servo tray in place. Either way, you'll have a tremendously secure servo mounting system! All the ideas just discussed are shown in Fig. 2.
 |
JUGGLING PLATES!
Hardwood wing bolt, wing dowel, and undercarriage anchorage ply plates are all resin-bonded into GRP fuselage shells once their mating faces have been sanded, and a precise dry-fit achieved. Some plates need holding with small G-clamps or SLEC plastic clamps as the resin cures; other plates can simply be placed in a resin 'puddle' and left alone! In the latter case, the resin is poured in through the radio bay with the moulding held to control the flow. Place the plate into the resin puddle, and gently move it back-and-forth whilst pressing it firmly into contact. The pooled resin will now coat the wood mating face and surround the plate edges. Maintain plate/GRP shell contact with some small heavy object until the resin has cured.
HEART OF GLASS…
Centre section glass fibre bandages on built-up or sheeted wing structures are applied as follows…
First, the chosen bandage width - plus an extra 1/2" either side - is masked off with paper tape above and below the wing surface. Next, the entire upper and lower centre section area is brushed generously with resin - the masking tape will a nice crisp edge when it's removed. On non-aileron wings, your pre-cut bandage is first bonded to the lower trailing edge, using just finger-pressure. Then, it's smoothed along the wing bottom towards, and around, the lower leading edge, employing a 'centre-outwards' finger-stroking action. The masking tape and central root rib joint-line will assist the bandage alignment as you proceed. You may have to lift and reposition the bandage a few times to get it looking straight. Try to remain calm and focused - and have some Valium if needed!
When taut and reasonably well stuck by finger-work, from the bottom trailing edge and around the lower leading edge, finger-smooth the bandage from the upper leading edge to the upper trailing edge. Again, work that bandage from the centre outwards, smoothing the weave and expelling air pockets in the process. If you've applied sufficient resin beforehand, adequate bandage adherence will be possible whilst still allowing easy bandage repositioning.
Now, using a well-charged brush, work more resin into the weave. Again, start at the lower trailing edge and follow the initial bandage-smoothing path as you go. Really wet out that weave, paying particular attention to the bandage edges which often remain raised on one side due to weave-pattern distortions. The bandage is well bonded when it looks clear all over, with no dry patches or resin pools, but with a discernible weave-pattern still visible.
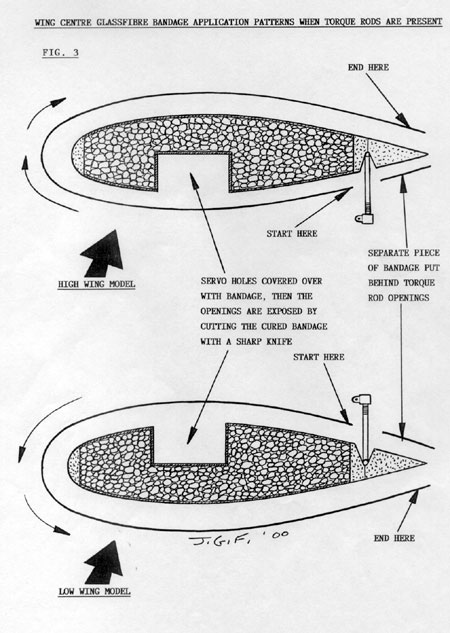
The presence of torque rods adds a slight variation to the bandage application patterns. Apply your bandage to both high- and low-wing torque rod-driven aileron wings, as shown in Fig. 3. You can also apply the bandage to torque rod-equipped wings in one go, from the lower trailing edge around the leading edge to the upper trailing edge as for non-aileron wings, but you'll have to part the weave around the torque rods which is slightly tricky! You could also pre-cut the torque rod holes in the bandage before application; remember in this instance to soak the spots in cyano first to aid cutting the bandage holes. Torque rod wing structure exit holes can be bunged up with Plasticine to stop resin gumming up the works. However, with care, this measure ain't necessary. The wing centre servo hole is easily coped with; just cover it over with the glass cloth, resin the bandage as normal, then cut away the cured weave when all is fully dry.
Over-long bandage is cut away when the resin has cured. Arrange for any overlap to hang over the top trailing edge. Better still, pre-cut the bandage slightly under-size chord-wise (say 1/8" too short) when fully wrapped around the aerofoil section. This route applies mostly to non-aileron wings; torque rod aileron wings get the bandage overhangs controlled as illustrated in Fig. 3. Before application, frayed bandage end-weave can be tamed with cyano before resining takes place. In some instances, fine-weave 1/2" bandage can be bonded entirely with cyano. A polythene glove-protected finger rubs the cyano in/presses the bandage down in steps. This method is often employed on glider and sailplane wing dihedral breaks.
 |
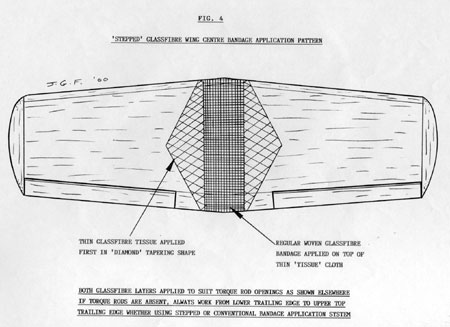
The 'multi-layer' wing centre section bandage is another approach. Here, a thin layer of glass fibre tissue, cut to a tapered plan-view profile, is first applied and allowed to dry before adding a 'normal' thickness narrower-width outer bandage. Better distribution of imposed airborne stress is the idea behind this layered and 'blended' bandage application technique, as detailed in Fig. 4. The pieces of glass cloth tissue may have to be applied in separate lower/upper wing surface panels, rather like a film-covering job, before the thicker bandage goes on. In fact, any grade of glass cloth may need this 'panelled' application sequence, if wings feature excess dihedral and/or pronounced sweep-back/sweep-forward angles.
 |
GLASSED AND BURY!
Leading edge dowels are epoxied in with the wings joined, before the glass bandage wrapping is stuck in place. The bandage weave is just parted around the in-situ dowel(s) as you go around the bend! Any ply plates recessed into wing centre skins are snugly epoxied flush with the wing skin surface before any 'bandaging' commences also! External trailing edge ply wing bolt load-spreading plates are just resined and clamped on top of the bandage. A very strong bond is possible here.
CUTTING BACK
Smoothing off wing bandages is a real pain in the centre section! However, unless you like rough midriffs, it's unavoidable! New sharp 180-grit wet 'n' dry paper, used dry on a sanding block, seems the best way to go. Watch out for grit clogging (tap the block and scrape the paper with a scalpel often), and for surrounding wing skin damage during sanding. Some people leave the masking tape on during bandage sanding, but I can't 'feather' the resin edges properly with it in place! The bandage edges need special attention to smooth down rough, raised borders. Be gentle but firm here! Keep the sanding block within the bandage 'body' area as you wear away the hardened weave edges using a circular and/or 'alternating 45-degree' back/forth rubbing motion. A small sanding block (say 1"x 3"x 1/2") works best over the bandage, especially around the torque rod holes. Just finger-holding the glass-paper is 'fine' too!
Lightweight model filler, applied liberally to the finish-sanded bandage weave, then sanded away again when dry, helps fill up/disguise that damn weave-pattern! More than one filler application will be required to fully smooth out the bandage surface. Feather the bandage edges into the surrounding wing skin during this filling session. A well-resined and hard bandage really helps the cutting back/filling tasks, I can tell you! If yer resin hasn't cured properly, you're in for a 'rough ride' which can become a real 'drag'!
Even when film-finishing a wing, I often dope a wide tissue strip over the 'done and dusted' (and filled) glass bandage before covering. This tissue paper layer, when well doped and sanded between coats with 300-800-grit glass-paper, further refines the bandage area above and below the wing centre section. Apply a light coat of dope over the filler initially - too much dope too soon can soften the filler and/or cause the filler to crack!
I wish you all good glassing with future models!
PICTURE CAPTIONS
 |
 |
|
1
|
2
|
 |
 |
|
3
|
4
|
 |
 |
|
5
|
6
|
 |
 |
|
7
|
8
|
 |
 |
|
9
|
10
|
 |
 |
|
11
|
12
|
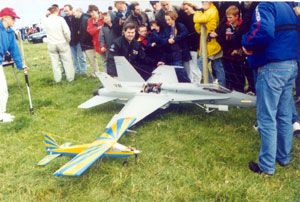
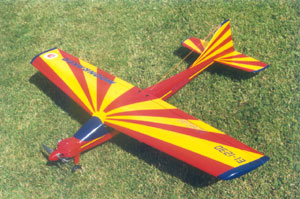
1: No matter what type of R/C model you build, it's likely that some glass fibre work will be needed at some point! David Matthews' impressive Yellow Aircraft FA-18 'Hornet' (at rear) and Gerard Feeney's 'Calypso' sportster (in the foreground) both utilise this material to varying degrees. The models are pictured at the 1999 Abbeyshrule Air Show.
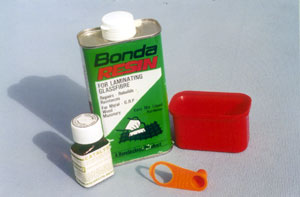
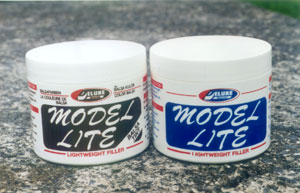
2: Bonda polyester resin, made by 'Bondaglass', is Gerard's fave product for wing bandage and moulding reinforcement/fuel proofing work.
3-4: Don't forget to wear latex or polythene gloves when working with resins and glues! After over twenty years' contact with such noxious products, minus hand protection, Gerard has now developed eczema on his hands, so he's gotta use the gloves now. Take heed while you're still okay!
5: Typical glass fibre bandage, available in various widths, for wing centre and general reinforcement purposes. Ultra-thin glass fibre tissue is also available.
6: Stick the firewall and other wooden components into GRP fuselage shells as directed here, and you too could have a 'body' like Gerard!
7-8: Get that wing centre section glass fibre bandage sorted Feeney-fashion for max satisfaction! Gerard's HMM 'Moonraker' sports/aerobatic model shown here also features a tissue/dope bandage overlay.
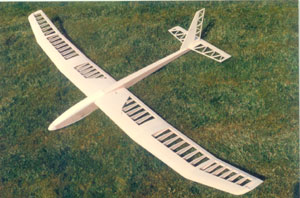
9: Thin fine-weave glass fibre tissue is often supplied in sailplane kits (especially American ones) to reinforce the dihedral/polyhedral wing joints.
10-11: Specialist lightweight model filler or fine-grade DIY filler is ideal for stuffing up that glass fibre bandage weave pattern! At least two filler applications, sanded smooth between coats, will be needed. The blended filler/bandage is just about visible on Gerard's Calypso before covering.
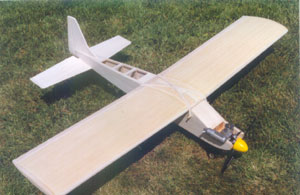
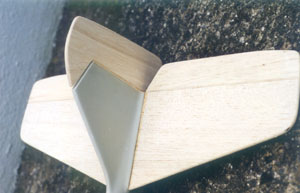
12: Stick in balsa tails to GRP fuselages as advised here to avoid a 'bum' deal! (Filler yet to be applied to fair in the gaps on this model.)