
THE 'LETTERMAN' SHOW!
ACHIEVE THE 'PERFECT MODEL FIGURE' WITH GERARD FEENEY'S STEP-BY-STEP HELP…
People often ask me how I manage to produce such gosh-darn crisp lettering on many of my 'Fliers'. Well, the answer is simple really - self-adhesive Solartrim sheet, graph paper, 'guesstimation' and lots of careful cutting to shape. Here's wot I actually do…
ON A ROLL!
Self-adhesive Solartrim is my favourite letter-producing material. These rolls are produced in oodles of colours to match Solarfilm and, as well as letters, you can of course cut all sorts of trim patterns from it. I mostly use it in concert with Solarfilm as intended, but I've also used it over glossy paintwork or 'shiny' fabric finishes. Basically, if the model surface is slippery, it's ideally suited to Solartrim embellishments. Solartrim attachment to matt surfaces is also possible, but staining of matt paints by the 'lubrication solution' and/or lack of adhesion are potential problems you may encounter. Once the Solartrim is stuck permanently, fuel proofing is unnecessary - though one has to admit one does seal the edges with Clearcoat or clear polyurethane varnish!
Before use, follow carefully Solarfilm's 'de-wrinkling' procedure and then store the Solartrim as flat sheets ready for action. Basically, you have to re-roll the Solartrim 'in reverse' around its cardboard tube (coloured side against the tube) to prevent it constantly curling up whilst doing a trim job. Trouble is, this action promptly causes a series of 'short-direction' creases along the Solartrim sheet which look yucky and which may actually lead to crookedly cut letter edges in extreme cases. Get over this by separating the Solartrim from its backing sheet and rolling it flat with its inner cardboard tube. This 'crinkle-extraction' exercise goes as follows…
Tape the Solartrim to a smooth flat surface (coloured-sheet up), anchoring it centrally each side and at each end-corner with Sellotape or masking tape. The central tape pieces are applied to the Solartrim outer (coloured) sheet edges; the corner tapes go on the backing sheet only. Now, finger-separate and fold back the stabilised Solartrim from its backing sheet along one end-edge by about 1"-2"; attach a length of 1/4" square strip balsa to the exposed folded-back adhesive edge and lift the whole trim sheet vertically away from the taped-down backing sheet. Lift one 'half-panel' of the Solartrim vertically to the mid-point taping positions - then, maintaining trim sheet 'vertical tension' all the time, use the cardboard tube to roll all the creases away from the centre to the end-edge. A few 'lift-and-separate' passes may be needed to thoroughly de-crease the trim sheet. Repeat the process on the other half-panel and you have a beautifully flat Solartrim sheet ready to use. (This technique is illustrated on the Solartrim wrapping paper.)
'FIGURE' IT OUT!
I really only produce Solartrim letters for the semi-scale R/C models I build. I try to model the aircraft on a full-size version which features simple angular registration letters if possible, as this makes the cutting-out task so much more straightforward. I've tackled rounded letters occasionally too; more details about that later. But, let's stay on 'the straight and narrow' for now.
My method of scale registration letter 'proportion determination' is incredibly low-tech - I just study a photo and/or drawing of the full-size aircraft in question and then I guesstimate the letters in pencil directly onto graph paper. Because of the grid pattern, it's a relatively simple exercise to sketch the letters to the approximately correct sizes. The letters start life as 'boxes' within which the horizontal and vertical 'bar lines' are plotted. For instance, 'H' would just be two vertical bars joined centrally by a horizontal bar. An 'O' would be just basically a 'hollow-box' shape. Sloping bar lines connect opposing box corners on letters like 'N' and 'Z'. I mark out the entire registration code in this manner (including the 'dash'); then I concentrate on marking the chopped-off corners if need be.
Getting balanced looking angled letter corners can take some 'experimentation'! A few attempts with a pencil and eraser may (will!) usually be needed to set up the 'construction lines' on which the canted corner bars are centred. Having pre-drawn vertical/horizontal letter bar centrelines helps a lot; these, along with the graph paper 'repeating' metric grid pattern, allow proportions and corner angles to be juggled in a balanced manner. You may have to introduce 'unusual' construction lines also - from opposing letter corners, for instance - to 'build' the corner bar angles on. You'll soon discover that letters with only the outer corners chopped off are much easier to deal with!
Letters with curved top/bottom edges are tricky to plot out minus specialist measuring equipment. However, in the past, I've cheated on the exact curvature required and I've just used saucers, plates, French curves, sardine cans, and even coins (often all together to join up the different bits of the curvature) to guide the pencil around the various bends. This admittedly primitive marking-out system works quite well - certainly for sport-scale jobs. Take your time and concentrate, rubbing out mistakes with a pencil eraser, and reasonable letter templates will result.
Right then, that's how I initially mark out the letters; here's how those perfectly formed graph paper characters are turned into Solartrim letters…
LETTER MAN
The piece of graph paper containing the marked-out letters is cut from the main sheet with a 1/4" - 1/2" overlap all around the characters. Usually, only one character set is required for each letter template - but of course you'll need separate templates for differing letter sizes and styles. Solartrim rectangles in the amount required for each 'grouped' letter character set are now taped in turn to a large cutting mat. These Solartrim rectangles need to be only about 1/2" larger all around than the graph paper rectangles containing the letter templates.
First tape the Solartrim rectangle(s) snugly onto the cutting mat with Sellotape/masking tape strips. Next, tape the graph paper letter template over the Solartrim. Now, you're ready to start cutting directly through the top graph paper template through the Solartrim layer(s) beneath. A small and/or medium-size clear plastic set square or steel straight-edge are ideal knife-guiding tools.
SHARP PRACTICE
With angular straight-edged letters, always cut the inside edges first. Concentrate entirely on either horizontal or vertical cuts in one session before doing the opposing cut directions. If the inner edges are angled, those small portions should be cut first. Next come the outside edges - again do the chopped-off bits first, if present. One needs an extremely keen scalpel blade for this cutting work as more than one layer of Solartrim provides resistance when attempting inside-corner cutting. Invariably, after doing multiple letters, small uncut corner 'tabs' will remain intact. These tabs are easily cut through 'free-hand' when the 'outside' letter set is removed, but before removing subsequent duplicated lower letter layers.
Curvy letters will need the round portions cut first. This is tricky because the 'make-do' blade-guiding edges may not produce perfectly symmetrical results all around; but, if you take care, acceptable results will follow. Cut the inside edges first and do the tightest-radii curves at the very beginning. Link these to the less severe curves, and finally do the mildly curved/straight main areas last of all. It's possible that several cock-ups will occur with curvy letters on early attempts, so (unlike the angular letters) do have several graph paper templates standing by for repeat performances!
WATER MARKS…
Before using the 'soapy water' letter positioning method, lightly draw an airframe 'alignment line' in Biro to help guide yer character horizontal placement and spacing; this line can mark either the letter tops or bottoms. Estimate where the first letter will go, tick the 'outside corner' location on the airframe line and mark a right-angle vertical line (the height of the letter) from this point. Now, with yer finger, agitate the warm water/washing-up liquid solution into a good froth and immerse the first letter - I use a lunch box for the job. Peel the backing paper off under water and ensure that the adhesive side of the Solartrim is thoroughly wetted. Use a wad of cotton wool or tissue paper to flood the airframe area to be lettered with the 'sliding solution' and be careful to control the water so that it doesn't dribble where it could do damage!
Now place the letter in position; the wetter the area, the easier the positioning will be. Use a scalpel tip and/or fingers to position the letter exactly, as dictated by the Biro lines. Use the long horizontal and vertical portions of the letter bars to establish exact alignment. Mop up excess water with tissue and gently pat the letter dry. At this stage, the letter won't be stuck properly, so be very careful that it doesn't slip out of alignment as you dry it off! If it goes crooked, sufficient lubrication should still remain to reposition it. If too dry, remove it once more, re-lubricate the letter and airframe, and try again. When the letter and the surrounding area are carefully dried off, allow the letter to 'sit' for a few minutes, then gently pat/press it more forcefully, working carefully along the various arms to expel remaining trapped water pockets. A smooth new plastic spatula is also good for this - but be careful not to damage the airframe finish! At this point, the letter is well held; 24-hours later, it will be immovable.
The remaining letters are done in a similar manner, one after the other, from left to right. Use a plastic set square to Biro-mark the letter spacing as you go. I always add the dash last of all, having first got the main letters as straight as possible. The dash (also floated on) can usually be centred 'visually' quite accurately between the bonded spaced letters. With practice, the finished product can look quite professional!
DRYING OUT
Can
one apply Solartrim letters dry, you ask? Well, personally, I'd strongly
discourage the idea! Unless the characters are small (say less than 1/2"
high - in which case they can be 'hovered' into place on a scalpel blade
tip) it is almost impossible to achieve correct alignment without premature
grabbing and bubbling. Feel free to try it - but I have a feeling you'll
be needing some of my Valium supplies afterwards! The exception to the
large-size 'dry-letter' positioning exclusion are letters like 'I'. Having
just a single bar to contend with, there are less 'flailing arms' to wobble
about, so dry-sticking can work after a fashion. But, without reservation,
I'd always recommend the 'waterworks' approach for a 100% success rate!
I wish you all good 'letter writing' with future projects!
 |
 |
|
1
|
2
|
 |
 |
|
3
|
4
|
 |
 |
|
5
|
6
|
 |
 |
|
7
|
8
|
 |
 |
|
9
|
10
|
 |
 |
|
11
|
12
|
 |
 |
|
13
|
14
|
PICTURE CAPTIONS
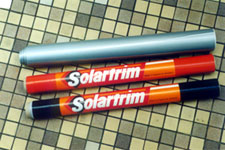
1: Solartrim - it's available in a myriad of Solarfilm-matching shades, and it's absolutely ideal for making model aircraft lettering as described.
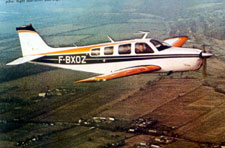
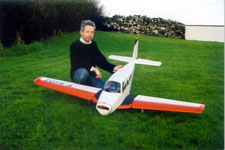
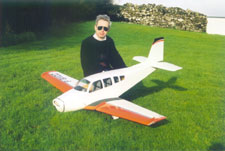
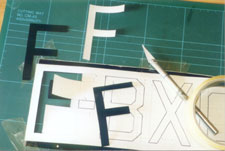
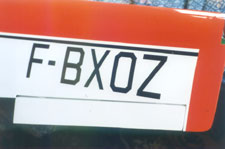
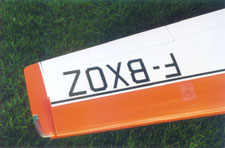
2-4: Gerard's latest (protracted!) labour of aeromodelling love, the Top Flite Beechcraft 'Bonanza', is loosely based on a full-size example pictured in a 1977 aviation publication. Those 'French letters' make a nice change from the oft-encountered American variety! The model lettering was determined by guesstimation for acceptable sport-scale standards.
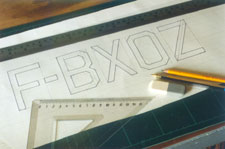
5: Registration letters guesstimated onto graph paper - the pencil/Biro 'construction lines' are visible in the original photo. These are the wing letters; the smaller fuselage codes will need doing separately.
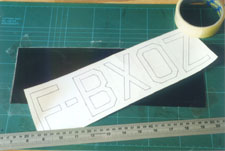
6: Solartrim rectangles taped to a cutting mat, awaiting the graph paper registration letter template to be taped on top…
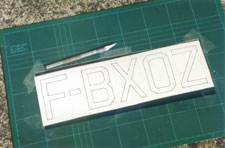
7: …And here's the graph paper template taped over the Solartrim layers; now it's just a matter of cutting through all the layers.
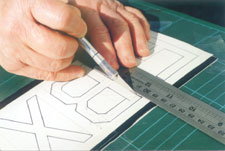
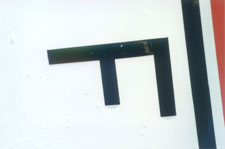
8: Cut that out! A steady hand, a straight-edge and a keen scalpel blade removes the letters cleanly. Use curved 'around the house' blade-guiding tools as described in text for rounded letter edges.
9: 'F' off! The first part of the registration code cut out, with the remaining letters yet to be removed.
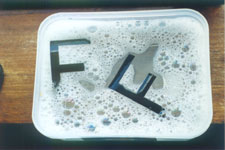
10: Alphabet soup! That soapy water solution is great for lubricating letters and model surfaces during letter placement. A few squirts of washing-up liquid (and finger-agitation) gets a nice lather going.
11-13: The wing registration letters being positioned; the faint Biro alignment lines may not be visible. The finished product is worth the effort!
14: More wet letters being positioned on the Bonanza fuselage.
![]() Return
to Home Page
Return
to Home Page