
Wing Tips:
'WING
TIPS'
GERARD FEENEY GIVES SOME 'TIPS' ABOUT TIPS!
I've been blabbing extensively elsewhere on this illustrious and 'uplifting' aeromodelling web site about many aspects of model aircraft wing make-up. But, thus far, I seem to have forgotten the actual wing tips themselves! Time to rectify that situation right now…
Flat Rate:
The flat sheet balsa tip is the easiest wing-extremity-capping idea ever! Quite simply, a piece of sectionally over-size thin or thick sheet is glued on to the wing panel ends, then the sheet is trimmed, carved and sanded to blend in with the wing panels. The tip sheet/wing panel corners may be rounded to varying degrees depending on the sheet thickness used - or sharp tip corners can look good on some designs. The 'flat plate' wing tip is a great idea in terms of ease of fitting and subsequent blending; it looks good too, despite (or, perhaps, because of) its relative simplicity. The flat plate tip is eminently suitable for both built-up and foam wings.
Blocked Out!
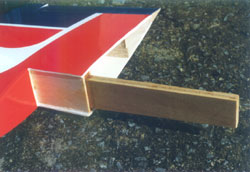
Block balsa tips, as the name implies, start off as great lumps of raw timber. After some shaping work, they produce gorgeously contoured wing panel 'end-caps' on both 'solid' and 'framework' wing panels - but you gotta work hard at making 'em look beautiful! Some people take the trouble to hollow out block tips before fitting, but I've never bothered - there's enough work shaping the outer surfaces for my liking! Don't let me put you off hollowing block tips out internally, however. All flying models benefit from light tips; it's just that I'm too god-damn lazy to do the job!
The block tip 'blanks' are glued on about ¼"over-size all round. When the glue is dry, they're shaped to match the wing section with a razor plane and/or heavy-duty carving knife, followed by progressively finer sanding to blend in with the wing panel. I always razor plane the tip blocks sectionally in side-view from the approximate 'mainspar' point forwards and backwards top and bottom first. Then I razor plane-chamfer the tip upper and lower corners, looking in from the wing front-view, to introduce the front-view convex compound curvature as dictated.
At this stage I leave the razor planed tip about 1/16" over-size, then I attack it with some new 180-grit glass-paper. The block-sanding process first blends the tips in to the wing panel upper/lower surfaces without any attempt to harmonise the front-view compound curvature. When the top/bottom faces are blended nicely, I 'go around the bend' still using the 180-grit paper to 'join up' the tip-edge compound curvature with the rest of the tip block. Block-sanding does most of the blending work but, just before the final fine-sanding, I may use the glass-paper freehand as it seems to level out any slight remaining contour undulations better.
Getting block tips contoured properly and reasonably 'symmetrically' on each wing panel is a time-consuming and tiring process, but it's worth the effort involved - though I personally don't think so at the time! Sectional templates, if available, or Biro-lines on the blocks, may be of some use - but I always rely on the 'Mk. One Eyeball' for reasonably accurate-looking results!
One needs to be very careful when handling the thinned-out trailing edges of block tips - I've lost count of the amount of times that 'impact damage' on these areas needed repairing before covering! This usually involves water-swelling the area and re-sanding or, in extreme cases, balsa inserts need grafting on followed by re-sanding to shape. Soaking thin balsa tip trailing edges in cyano, then gently sanding smooth before any damage occurs, followed by careful subsequent handling, is the best bet. Ultra-thin glass bandage, gently layered over the weak tip ends with cyano or epoxy, can also be useful.
Those dreaded fancy-looking 'anti-vortex' model wing tips, often employed on 'cropduster'-type designs and some sailplanes, are formed from imposing block balsa lumps too. Some meticulous sculpting work with an Excel Number 7 wood carving knife, followed by coarse glass-paper wrapped around a broom handle and/or a Dremel router tool, seems the most effective way to tackle these intimidating items. It helps to a degree if tip section templates exist to guide you - although the concave lower surfaces and 'normal' top/outer sides can be shaped fairly well by eye with practice. Some of the more expensive 'moulded' aircraft may have these 'curly' tips pre-formed - and, how I envy the modellists who own such exotic aeroplanes!
'Solid' tips can take a couple of other forms. On flat plate wing designs, they're just pieces of sheet butt-glued on at right-angles to the span-wise grain direction. On fun-scale models, dummy tip tanks can be carved from block or made from hot wire-cut white or blue foam, which is subsequently sheeted with sheet balsa or obeche veneer.
Open Ended
Built-up tips come in several forms and they're suitable for both skinned foam and open-structure wing panels.
The solid or lightened sheet balsa 'plan-view' profile, with upper and lower surface triangular gussets linking it to the tip ribs at the spar positions, is a very popular tip configuration that's employed on absolutely oodles of flying model aircraft designs. Here, the flat sheet wing tip plan-view 'central core' sheet just glues at right-angles to the tip rib. The varying-size sheet balsa 'stabilisation gussets' are then inserted above and below this core profile where they perform an 'anti-flopping' action by linking the core sheet to the wing tip rib via the glue joints. On many occasions, the plan-view tip core butts up behind the leading edge strip; at other times the leading edge is cut off to allow a 'full-chord' sheet core to go on. In this instance the leading and trailing edge pieces usually laminate on, above and below the central core.
A 'segmented' built-up tip is next on the list. Here, several (sometimes laminated) pre-curved sheet segments are glued up to form the outer tip plan-view 'rim'. This rim then butt-glues to the wing end rib in a similar manner to the sheet core already mentioned. Again, several triangular vertical stabilisation gussets link the tip rim to the end rib; in this case they tend to interlock onto the outer rim whilst just butt-gluing to the tip rib.
A laminated strip tip can also be used; this seems popular on scale models. Several lengths of flexible 1/16" (or thinner) balsa or ply/spruce strips are soaked in a hot water/ammonia solution overnight. Then, they're gently bent by hand to follow the model's plan-view tip rim profile; lots of strong modelling pins driven in all along the tip rim inner and outer surfaces guide and hold the wood strips as you manoeuvre 'em 'around the twist'! Now, they're simultaneously glued together over the plan drawing with PVA (ensure polythene sheet is laid beforehand!) and allowed to dry fully, whereupon a very rigid lightweight 'pre-bent' tip rim profile is created. This may be linked to a central core and/or gussets as previously explained.
Built-up tips, like those just described, can also be partially or totally sheeted in 1/16" balsa - or even 1/32" ply. These sheet areas are applied in panels and it's likely that some sheet pre-soaking, followed by lots of 'cut-and-try' trimming, will be needed to get the various panels placed. The underside of the tips are usually easier to sheet because of less pronounced compound curves to negotiate. On some of the more severe top surface tip compound curves, you may have to employ a 'planked' approach to close up some of the gaps. Alternatively, you can let in soft light balsa block to close up these areas and combine it with the sheeted areas. Regardless of whether tip sheeting is applied or not, the central cores and solid/laminated tip rims will probably need their top/bottom edges chamfered to produce a slim and trim-looking finished result.
Tube Station
The 'tubular
alloy' tip is a rare creature, however some models do use it - like the DB
'Piper Cub' for instance. Basically, a length of thin-wall alloy tube needs
to be bent to match the wing tip plan-view outline; this usually is just done
by hand, using the plan as a guide.
Begin with a gradual 'curving' action of the straight tube using both hands,
then work gradually to the full curve, stabilising the tube with well spread-out
fingers in the process. If yer not careful, things can get 'kinky' and a length
of flexible net curtain plastic-coated spiral wire inserted inside the tube
before bending can help here. Remember to withdraw the wire before the alloy
tube curvature gets too extreme!
The curved 'half-hoop' alloy tube tips get butt-glued to the wing tip ribs fore and aft; the usual compliment of leading/trailing edge strips and intermediate gussets/sheeting steadies the fixture. I've only encountered this tip type once, but it did give a scale-like finish when covered with Solartex. You need to 'prime' the alloy tubes with brushed-on Clearcoat (after first gently sanding them) to ensure adequate iron-on covering adhesion.
Sanding Course!
The wings of the increasingly popular (usually electric-powered) 'foamies' need little in the way of preparation. However, those myriad little circular moulding 'dimples' and edge joint-lines are annoying things to look at! The remedy is fairly simple though: just get 'rough' with 'em - in the nicest possible way, of course!
Some 180-grit glass-paper, wrapped around a medium-size sanding block, gets those unwanted 'surface relief outcrops' faded away reasonably well. The joint-lines disappear a bit better than the dimples but, if you keep at it, all surfaces will smooth out fairly well. One thing this sanding session won't remove is the larger (and, thankfully, much less frequent!) circular depressions which punctuate the surface between the smaller dimples. One can only leave these 'as is' and hope that nobody notices! Or, you could cover 'em in contrasting/matching Solartrim circles! A Number 11 scalpel blade is also good for removing the foam wing (and other foam surface) joint-lines; just shave the bulk of the raised 'lips' away before attacking 'em with the sanding block.
Pre-moulded plastic wing tips live largely in the realm of the ARTF model. Deal with these as outlined in the 'Wing Waffle' section of this site. Should you get the opportunity to actually fit 'em yourself, just ensure that they are a good snug dry-fit, then sand their inner wing-meeting lips thoroughly before sticking 'em in place.
And, talking about sticking wing tips…
Gluing Tips
Sheet and block tips may be attached with either PVA or 15-minute epoxy. Epoxy is ideal for tip attachment to either framework or foam wings; the white glue is best kept for built-up structure work, because the curing time can be slowed up slightly where large adhesive areas meet air-impervious foam cores. Built-up tips can be pieced together with any adhesive really; personally I use white glue or thick slow-acting cyano, if the fits are good. Epoxy is unnecessary on built-up tips, except to bond those tubular alloy tip rims in place, where 15-30-minute is best; thread binding at the leading and/or trailing edges may be called for here too. Plastic tip mouldings are best adhered with 15-minute epoxy or cyano.
Strips of masking tape or Sellotape are ideal for clamping sheet and block tips in place. A few modelling pins let into the leading and trailing edges first will stabilise the tip alignment before the taping begins. You'll need to wipe away excess expelled adhesive with a tapered piece of hard balsa strip as the tape 'clusters' take hold. You may have to remove some tape strips to get at oozing glue; just re-apply some new tapes, having ensured that the area has been 'squeezed clean' beforehand.
I usually cyano the central sheet core of built-up tips to the end rib first then, when this is held well, the top and bottom triangular stabilisation gussets are eased into place after careful trimming and fitting. If the fits are good, cyano will get it all sorted; PVA will work well if fits are less than perfect. If using PVA exclusively to assemble built-up tips, some pins will be required to anchor the central core to the tip rib first, and subsequently to fix the gussets.
Any skinning added to built-up tips is best fastened using PVA glue. This allows adequate 'juggling time' and mistakes can be rectified. Quite a lot of pins are needed to hold tip skins in place as the glue dries. However, after a good overnight curing session, the finished product turns out really rigid. Thin ply tip skins could be attached using impact adhesive if compound curvatures are mild, but the PVA and tape route is probably a safer bet in most instances.
That's it regarding wing-ends; I'll 'tip off' for now!
Picture Captions
 |
 |
|
1
|
2
|
 |
 |
|
3
|
4
|
 |
 |
|
5
|
6
|
 |
 |
|
7
|
8
|
 |
 |
|
9
|
10
|
 |
 |
|
11
|
12
|
 |
 |
|
13
|
14
|
 |
 |
|
15
|
16
|
 |
|
|
17
|
1-2: The simple flat plate sheet balsa wing tip is used on innumerable flying model aircraft designs to good effect. It's simple, light, durable and easily covered - wot more could one desire?
3-5: Built-up tips come in many forms - with and without central cores and fully or partially sheeted. Whatever 'hollow' tip form is employed, it will provide a great wing 'end-capping' system, so long as it's well constructed.
6-7: The Flair 'Pulsar' bipe uses hollow built-up tips, which are then fully sheeted.
8-10: The caved/sanded solid block balsa wing tip is Feeney's fave method of producing classy-looking wing extremities! Trouble is, they need a lot of finishing work to contour 'em properly - and the ends can be easily damaged! Still, the 'end-product' is worth it!
11: The hand-curved tubular alloy wing tip is a rare creature which David Boddington utilised effectively on his large Piper Cub design. Here's Feeney's example of the model, which turned out very well when the Solartex covering was applied. (Picture taken in 1990!!!)
12-13: Moulded plastic wing tips usually come pre-glued on ARTF models - but there can be exceptions! Stick 'em as suggested and you'll have no problems.
14-16: A good rub down will sort out the moulding imperfections on electric-powered foam models; the scalpel blade works well as a precursor to sanding.
17: Dig the psychedelic 'anti-vortex'-type winglets on Francis O'Hara's low-wing 'Web' sports/aerobatic model!