
The ARTF "Trap"
Some recent problems with ARTF coverings prompt me to write a few words on the coverings that are designed more to catch the prospective buyers eye rather than to be practical when the model is in use and flying regularly.
The more traditional film coverings such as Solarfilm, Solarspan, Profilm etc. all have a heat sensitive adhesive applied to the back of the material, in general terms they are fuelproof at the seams when applied in accordance with the manufacturers instructions, in addition the application of "Balsalock" to the model prior to covering will increase the adhesion of the film to the model. Most of these coverings will also accept a fuel proofer such as Humbrol "Hot Fuel" or similar if the film is lightly abraded with a scotch pad or very fine wire wool, although, in general terms, this is not required if you have applied the material correctly, i.e.: ironed down all of the seams at the correct iron temperature. Even a clear oil based varnish will produce a good fuel proof finish.
When it comes to the latest generation of ARTF models, especially those in the more popular cheaper range, they tend to be covered in self adhesive polyester film which is pre decorated, this allows for a cheaper production cost, which all aids the price you, the modeller, pays at the shop counter. Unfortunately the seams, where the covering overlaps, tend to be susceptible to the ingression of fuel from the very first flight, so what can we do?
Before assembly of your new ARTF check that ALL seams and joins are stuck down, run along the seams with a clean cloth applying a little pressure to ensure that they are all stuck down as well as possible. Take the time and trouble to apply a fuel proofing medium to all of the seams prior to final assembly, ensure that the proofing medium will nor react with the covering before application, some polyester films will react violently with cellulose based proofers, do a few tests in an inconspicuous area of the covering to ensure that no reaction occurs. (Humbrol "Hot Fuel" is an oil based proofer which I have found extremely good for this and have yet to find any material which it will not work on) If you take the time, and trouble, to perform this simple operation, the chances of fuel getting under the seams, and spoiling you new model, will be greatly reduced.
Prior to flying that new model.
A recent e-mail from my good friend Colm Kelly prompts me to write a few words regarding preparation of a model for its initial flights. Once you have finished your new airframe, the first consideration will be the installation of the radio equipment.
Consider the location of the centre of gravity, as stated within your instructions, in most instances this will be approx a third of the chord measured from the leading edge of the wing, try to plan the location of the various components of your radio within the model to keep this point of longitudinal balance.
Pay particular attention to the location of the battery pack which should always be located in front of the receiver and servo's wherever possible, in the event of a crash the nicad, which is the heaviest component within the model, will do considerable damage to the other components if it can move forward into the other "bits". Thoughtful installation of the radio will mean that you will not have to add additional weight to balance the model, care and planning at this point will save you a lot of potential future problems, if you have to add weight to the nose in order to achieve the balance point consider installing a larger, and heavier nicad, you can never have to much battery power therefore this will be "useful" added weight.
Pay particular attention to the protection of your valuable radio gear use a quality, purpose designed, foam such as "Armour Guard" to protect you receiver and battery pack and ensure that these will not move about within the airframe, again I say plan your installation to achieve this. In the "good old days" radio interference could be experienced by running the aerial alongside a servo, nowadays it is not so much of an issue, nevertheless I still avoid running the aerial too close to the servo casings wherever possible, it is also good practice to ensure that no pressure is put on the aerial where it exits your receiver, I usually tape my aerial to the sides of the radio bay before it exits the fuselage.
Your servo's should be installed so that no part of the casing of the servo is in contact with the airframe, the purpose of the rubber mounts supplied with your servo's are to act as a buffer between the airframe and the servo, make sure you use them along with the brass ferules supplied, and don't over tighten the retaining screws which would diminish the anti vibration effect, another common mistake is to insert the ferrules upside down, the flange of the ferrule should always be at the bottom and in contact with the servo tray.
Avoid the use of Snakes wherever possible, especially if they are not well supported within the airframe, the reason being that they will flex under load and limit control surface movement, the old, tried and proved method of balsa and steel rods is still my preference, snakes need to be supported every three or four inches on elevator and rudder linkages especially on larger models.
A major point missed by the inexperienced is the absolute avoidance of metal to metal contact, this has caused many models to crash on the maiden flight, when installing your various linkages, many kits these days include a piece of piano wire for the throttle linkage I would suggest that you always use a plastic clevis where the throttle linkage meets the engine rather than the often recommended "Z" bend in the end of the wire.
Check that your engine is mounted in such a way as to minimise vibration, make sure that you have measured and checked the mounting holes in the engine mount, prior to drilling, so that the engine fits the mount properly and always balance your propellers!
Lateral balance is often ignored but attention to getting this right will mean improved flight characteristics, you will need some assistance to check this. With the model upside down tie a length of string to the prop shaft and another length of string to your tail wheel, with your helpers assistance lift the model by the two pieces of string and observe if one wing tends to drop, if it does add weight to the opposing wing tip until the model balances perfectly, you can use the sticky lead weights as used by your local garage for wheel balancing to do this, for small adjustments you can use a wood screw securely glued into the wing tip.
Check that all control surface deflections are within the range stated in you instructions, remember that 3/8" means exactly that and not 1/2" you can always increase the throws if required after the initial test flights, you can, of course set the model up with increased throws, for use later on, by utilising the dual rate function on your transmitter. At the very least make sure that the elevator and aileron deflections are correct to the manufacturers specification, rudder is not quite so critical. If you find that the model is not as responsive as you require when climbing or diving you can move the centre of gravity back in 1/8" increments once you are confident with the model, moving the centre of gravity rearwards increases the aerobatic capabilities of most models, some models are very critical on the subject of C of G others not quite as much, but make sure you have it bang on where it should be for your first flight.
Double check all of your control surface linkages before you get to the flying field, make sure that your controls function in the correct plane and pay particular attention to the ailerons!!
Make sure that you know exactly which radio frequency you are on and never, never switch your transmitter on until you have the correct frequency peg clipped to your transmitter aerial, many crashes have been caused by people assembling their model in the car parking area then switching on to centre the flying surfaces, DON'T do it!!
If the proposed "master class" takes place then there is much more to be considered and discussed, then again it's up to you, the members, to decide whether or not we organise this for the winter evenings.
Thank you for your "thought provoking" e-mail Colm.
The Birth of a Workshop.
Some twelve years ago I left my native Kent to live and work in Co. Kilkenny, having brought my radio controlled models over from England I found that there was no one to enjoy the hobby with, as a result I gave up and practiced my other love, angling.
I moved to Co. Leitrim some six years ago, I have witnessed the decline of the Shannon and its lakes due to the pressures of pollution, which our esteemed government seem to be completely ignoring and doing nothing to reverse. As a result I put away my rods in absolute disgust some two years ago, I'm not being very keen on spending my time fishing in what are fast becoming open sewers!!
I made contact with Gerard Feeney who, in conversation, advised me of the existence of a small club in Longford, I contacted the secretary, David Furneaux and joined the club.
Sitting in my garage, come turf shed, was a rather nice Orkney 520 fishing boat, this was receiving less and less use, a seed was growing in my mind that this, if sold, it would finance the building of a workshop where I could spend my retirement building models, this had been a long established dream since I started modeling in the early fifties, I well remember all of the problems associated with the hobby at that time, balsa cement was virtually the only adhesive available to us and the quality of balsa was all the same, rubbish! Prior to moving to Ireland my workshop was a very cold and damp garage where I managed to produce my models, a blessed respite from my work as a technical sales director for an engineering company.
It seemed like an eternity before I found someone to purchase my past pride and joy, but finally the great day came when the boat finally left the premises, I was now sitting with the cash to commence my project, I started by contacting local builders to quote on the conversion, it appeared that they were also looking forward to their retirement judging by the prices I was quoted, I'm sure that an English accent is a distinct disadvantage when dealing with Irish builders!! The cost was totally prohibitive and the project looked as if it would have to be shelved, to give you an idea I was quoted over six thousand to get the basic work done!
A substantial amount of cash had to be set aside for the purchase of tools, radio equipment etc, therefore I decided that the work would have to be done by myself, after all if you can build a model, why not a workshop? I started by removing the metal doors on the garage and, with the help of a close friend, blocking up the aperture with building blocks, I secured a quote from a well known double glazing company for windows and doors, then the real work started.
It was decided that my wife, she who must be obeyed, who is an amateur artist should have one half of the available space as a studio, you have to lay your plans carefully don't you! I then proceeded to manufacture a substantial partition to separate the two halves of the area, as there are no windows on my side I had to use a lot of glass to get light into my area. The ceiling involved a lot of work strengthening the structure to take the weight of all the plaster board, this was achieved within a period of about three weeks.
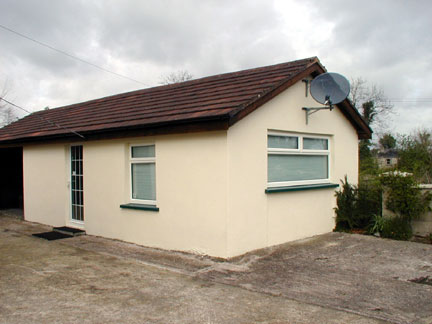
The (almost finished) Exterior
There then followed much reading up on the installation of ring mains and the other electrics I would require, one moment of drama occurred during the installation of the ring main, the loft area of the garage is quite small and required me to crawl on my back into the eaves to run the cables down the cavity wall, it was a few weeks later that I found that, on one occasion my head was about two feet from a hornets nest, it was not until I started to fit soffits boards and guttering that the beasts were discovered, and despatched!
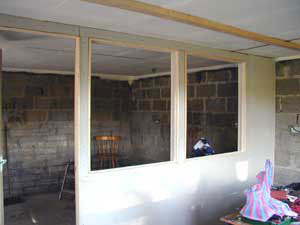
The basic partition
The double glazed windows and door were then professionally fitted and from the outside it all started to come together, another "friend" who just happened to be a plasterer came and plastered the walls and ceilings for me then it was time to turn my attention to the "interesting bit", scouring the internet for the best deal on tools etc, I found that Draper were hard to beat.
The purchase of a bench drill, Dremel sander, bandsaw and jig saw plus all the other items such as soldering irons, drill sets, taps and dies etc along with a visit to a local kitchen manufacturer for base units was an interesting, but budget busting experience.
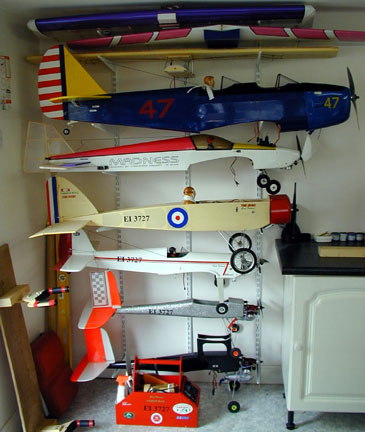
The fuselage "Rack"
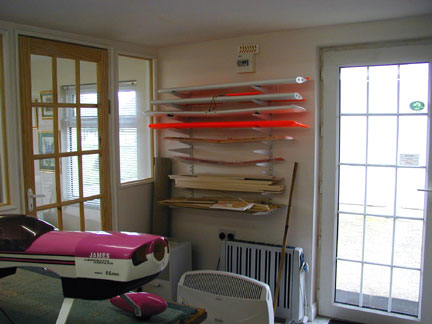
The "Wing" Rack
Having got everything installed, along with heating and lighting, the whole lot was decorated and a vinyl floor covering laid, suddenly there it was, the dream formulated over many years, a proper modeling workshop (and Art Studio). Then the big shock!! Everyone is into ARTF models these days, searching for suitable projects became a problem, I started with a really old kit which I managed to get, a Svenson Duke, followed with a Panic and Moronic from my old mates at Avicraft in Kent, since that time last year, I have succumbed to a few ARTFs as well, so far I have built and flown the following:
Duke-Panic-Madness-PT19-Giles120-Dragon Lady-Bird Dog-Acrowot
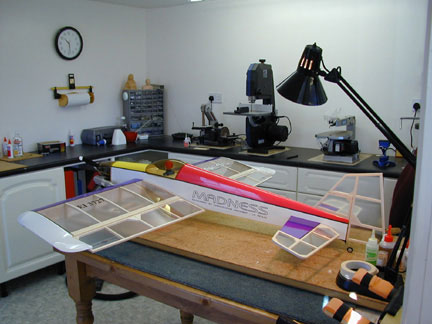
The "Madness" under construction
The club, which I joined, goes from strength to strength, our membership has trebled in the last year, and we also have the privilege of six disabled members who enjoy the club immensely, we are currently seeking another site which will be more suitable for development as a permanent home for the club, we need better facilities if we are to encourage our less fortunate friends with disabilities to take up the hobby.
So to sum up, you too could look forward to those heady days when you retire and perhaps realise the dream of a proper, light and warm place to build your models, if I can do it you certainly can, yes the cost was complete madness but then again you only live once and have to take advantage of every opportunity which presents itself to you, so start saving now all of you younger aeromodellers, one day your dream will be realised as mine has now been, my only problem now is remembering what my wife looks like!!
Radio Installation.
In the good old old days radio installation was a veritable nightmare, servo's were much more prone to vibration than the modern units we have today, anything, even looking as if it was touching, could well lead to failure in the air, routing of the aerial alongside the servo's would also lead to disaster!!
Today's
modern sets are far less prone to failure, nevertheless it is important
to ensure that everything is isolated from vibration and potential "noise".
Always ensure that your servo's are not in contact with each other, ensure
that the rubber grommets are used as intended to isolate the servo from
the mount, another point is to insert the brass sleeves so that the curled
over lip is in contact with the mount, i.e.: upside down, and don't over
tighten the screws!! Mount the bearers for the servo tray using silicone
adhesive, this is very good on balsa to balsa and balsa to glass fibre,
try it!
When installing the nicad make sure that the connection is accessible, disconnecting the battery during storage will help to prevent "Black Wire" problems.
Use a good quality, purpose designed, rubber sleeve packing for your receiver, the ordinary yellow foam sponge is very much inferior to the correct stuff..
Another useful point to remember is that the signal from the transmitter is at its best forty five degrees from the base of the aerial, it therefore follows that pointing your aerial directly at the model is not the best idea!
Remember that attention to detail when installing your radio will pay huge dividends.. Happy Flying...
NoisePollution.
Many flying sites have been lost to modellers over the years through excessive noise created by models in flight, it is the responsibility of every club member to ensure that we don't place our site at risk by flying noisy aeroplanes.
There is much we can do to reduce the noise factor in our hobby.
1. If your wheels are a sloppy fit on the axles try bushing them with brass tube until they are a good fit.
2. Ensure that your props are well balanced.
3. Experiment with different size propellors, increasing the pitch will often result in significant noise reduction.
4. A silicone exhaust extension will give a reduction in noise.
5. Consider the use of rubber mountings for your engine.
6, Ensure all airframe components are firmly fixed.
It's in all of our interests to cause as little noise as possible, so check out your models and see what you can achieve.
Intelligent Use of the Throttle
One
of the biggest problems with a large flying site is encouraging members
to actually land on the patch, many excellent models sustain damage, especially
to delicate undercarriages, through impromptu landings in uncut grass.
We should all endeavor to "hone" our landing skills, if we spent
a little more time practicing our landing approach, rather than just blasting
around the sky, I'm sure that we would all benefit in the long run.
Intelligent use of the throttle is a key element to a nicely structured
landing approach, learning to "Blip" the throttle on the final
approach to the patch may sound very simple, however you would be surprised
just how many pilots fail to really learn the simple techniques of accurate
landings, practice it often and your flying pleasure will increase as
you become more proficient at throttle control.
![]() Return to Home page
Return to Home page