1. Ask the children to draw a simple outline of a design in the centre of the A3 sheet with pencil. Some examples are a flower, a box, a star, a ladybird etc...(any simple shape, the simpler the better).
2. Colour the design with crayons of different colour (Make sure you are using wax crayons). Darker colours usually work best. The crayon must be vry heavy, and the children should spend lots of time going heavily over their work.
3. Colour the background with a contrasting colour crayon. Again this must be very heavy, so go over the crayon heavily.
4. When the sheet is completely coloured in heavily with crayon, crunch the paper up in a tight ball. Push it, squeeze it, punch it, stand on it. ( The children like this part, but they get an awful shock if you do it first with one of their pictures!!)
5. Open the picture back up carefully an open it out flat. If some of it tears it will add to the charatcer of the finished product (or so I tall my pupils!). The crayon should have many, many cracks in it.
6. Make up a very watery wash by mixing a one colour with lots of water. Dark coloured washes usually work better with lighter colour backgrounds, and vice-versa. Apply the wash to the picture with a sponge making sure it seeps into all the cracks. Wipe off the excess from the picture. Allow to dry for the rest of the day.
7. The following day bring in your iron from home. Place the picture face down on another blank A3 sheet (to protect the table) on a table, and iron it slowly, making sure the crayon has time to melt a bit, and the paper becomes flat.
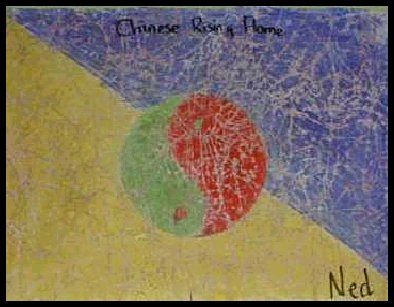
8. The finished product should be a very old-looking batik type piece of art.
Conor Doyle