By Glenn Saunders
Introduction
When TalonSoft's East Front was released last year, I became very interested in all the different unit types and finding a best purpose for each. From the lowly Russian ATR (anti-tank rifle) platoon all they way up to the speedy armored cars, I felt each unit had a time and a place where it could function and contribute to the game. This led me to an interest in reconnaissance aspects of the game system.
Battlefield reconnaissance in TalonSoft's Campaign Series is an art that has taken on a new meaning with the release of West Front.
In this article I will explain why this is the case. I will examine the mechanics of how the NEW Concealment works in West Front. I will classify and discuss various recon mission types and the factors which control them. I will provide tips and techniques I use when performing battlefield reconnaissance. Finally, I will provide a practical example using the West Front recon techniques I advocate to summarize my thoughts.
I will NOT provide details on any undocumented issues or program tricks that may be used by a player to beat the game system or the Programmed Opponent. Nor will I comment on any designer techniques that are used in making each scenario the most challenging experience for you the game player. These, I believe, are some of the fun aspects of the game you will learn for yourself while playing. The tips I provide will be along the lines of how to make best use of the units at your disposal using conventional methods of deployment. Factors Influencing Recon
There are three factors encompassing geography, history and game engine enhancements that together contribute to the new found importance of reconnaissance. First of all, equipment used by the nations included in West Front favored recon. From early war Humber Scout Cars, to Honey Stuart light tanks in the desert, up to US M8 Scout Cars and late war Staghounds, the Western Allies bring new, varied and capable recon equipment to this game. Of course, the Germans had the equipment all along. But in East Front, the weather and ground conditions were often not as accommodating to this kind of operation or equipment.
This leads to the second factor - better ground conditions. The seasons and the nature of the climate in the battle areas covered in West Front favor a wide-open style of play. Whether you are racing panzers across the countryside in France 1940, roaming the wide expanses of the desert or running for the Rhine River to end the war; you will often find the action more freewheeling than East Front. But the simple fact is that a whopping 38 scenarios - or 67 %* of those in West Front - take place on "Dry" ground conditions, while the remaining 18 combined account for "Soft, Mud or Snow." By comparison, only 40% of East Front scenarios take place in DRY ground conditions. (* the West Front scenario numbers and percentages do not reflect scenarios from the NEW Linked Campaign Games).
The major factor influencing the new importance of recon has to do with the NEW "Concealment" rules and how they have been implemented in the game engine. In the original East Front release, you could usually see units at any range, regardless of the size or cover. This led to situations where small anti-tank guns hidden in the woods themselves became easy targets, lucky to get a shot off, rather than ambushes for an unsuspecting enemy. This all changes with the implementation of the NEW Concealment rules that are introduced with Fog-of-War in West Front. This feature will also be a part of East Front Deluxe as well as the East Front v1.08 patch. Concealment - How it works!
With the NEW West Front Concealment model, the following factors are considered: 1) The size of the target unit,
2) Concealment value of the terrain the target unit occupies, and the 3) Modified Range, which also takes into account actual range and factors in any intervening hex sides such as hedges and (low) stone walls. Such hex sides affect the ability to spot a target but do not block the line-of-sight.
After all factors have been considered, a die roll is performed to determine if a unit is spotted. The limits on the die roll make it never a certainty that a unit will be seen or remain hidden. The result of the Concealment rule is that you never know if you are seeing the whole picture. Depending upon the variables, I have seen scenarios where at start, an enemy was unseen in an adjacent hex(es). I have seen other scenarios where different units are seen at start. This is due to the game performing the concealment die roll as the scenario commences. The upper limit on spotting these units at a long distance is, of course, based on the visibility set in each scenario by the designer.
Below I will present the Concealment formula and explain each element in the Concealment calculation. I will keep the theory to a minimum and will relate the formula back to practical examples. Please note however, that I've been playing an awful lot of West Front with only the basic concealment knowledge. That is
1 : that anything is possible
2 : that size does count
3 : that cover and 4 : distance are all factored into what you can and cannot see while playing West Front. This is really all you need to know. Feel free to skip to the start of the next section if you wish to pass on the math.
The formula for Concealment is presented in the West Front Player Guide on page 65. But the discussion on "how it works" is brief and there is no example used to illustrate it. The formula is: (UC# + #SP of the unit [1/2, FRD if non-vehicular] + TC#) - (modified range/2 [FRD]) where...
|A UC# = Unit Concealment, a value from 0 to 5 assigned by TalonSoft in the internal unit tables. This value is not readily displayed in the game information, but can be found in Craig Foster's West Front Unit Database (located at http://redarrowproductions.com/WResours.htm.) The smallest sized units in the game, such as a light anti-tank gun, have been assigned a 0 value, while the largest tank has a value of 5. (An Army Group HQ is the largest unit at size 6, but I can't recall ever having seen one of these in play).
#SP = the number of Strength Points in a unit. For those not familiar with the game scale, each Strength Point (SP) represents one vehicle, one artillery piece (or tube), or half a squad of infantry. Note in the above formula, non-vehicular units SPs are halved to account for the fact that half a squad of infantry can hide more easily than a tank.
TC# = the Terrain Concealment number as listed for each Terrain Type in the West Front Players Guide. Larger negative TC#s are better for concealment purposes. Woods are -3's while an open beach offers virtually no cover and is assigned a +1.
Modified Range takes the actual range in hexes and then factors in any intervening hex side features such as hedges and (low) stone walls.
In the formula, FRD stands for Factors Rounded Down.
The factors are all entered into the formula and the concealment value results. This value is "bounded" by 0 and 8, meaning that no value can be less than 0 nor greater than 8. A 10-sided die roll is performed with possible values ranging from 0 to 9. This random die roll result is compared to the value calculated in the formula. If the number is equal to OR less than this value, then the unit is spotted. So, the larger the number in the formula yields, the greater the chance the unit will be seen.
Now let's consider a practical example. You are the Germans and the enemy has a Sherman tank in the woods at a range of 5 hexes (1250 metres) with no hex side terrain features between the target and the viewing unit. Can you see it? What are the chances of it being spotted? Of course, basic Line-of-sight considerations take precedence - you must be able to see the woods hex first. This can be readily checked by pressing the visibility button on the tool bar or using the "Hot Key V" to darken any hexes that a sighting unit cannot see.
The UC# assigned by TalonSoft for a Sherman tank is 4. You're going to have to take my word on that. This is a tall and fairly large tank. The troop or platoon size for Allied armor can vary, and in this example I am using a unit with a Strength of 3.
The TC# for any hex can be found in the Players Guide, with Woods described on page 55. The TC# for Woods is a -3 (or a negative three).
So the calculation looks like this: (UC# + #SPs + TC# - Range or
(4 + [ 3 ] + [-3] ) - ( 5 /2 ) = 2
The Concealment value calculated for this example is 2.
The die is rolled (or the random number is generated) and if the number is 0, 1, or 2, the tank unit in the woods from a range of 5 hexes is spotted and revealed to the opposing player. There are three chances out of 10 that the tanks will be seen. Now lets modify the example to see how the variables work.
If the target unit was a physically larger tank, say something with an assigned size of 5, then the chance of spotting it is increased by one. Add more tanks to the platoon and the chance of spotting also increases by one per additional vehicle.
However, if the target unit was a platoon of Infantry with 5 Strength Points, then non-vehicular units SPs are halved. Thus, the #SPs used in the calculation would be five divided by two (5 / 2) = 2, with fractions rounded down. Furthermore, the UC# for Infantry would also be less than the tank and this would also lessen the concealment value. Change the terrain from Woods to Orchard (TC# -1) and the unit's chance of being spotted increases.
In fact, a unit containing 4 anti-tank guns, using an Orchard hex for cover that is two hexes away from a spotting unit only has a 1 in 10 chance of being seen as long as the hidden unit does not fire.
If there were two or more units in the same hex, for example, an infantry unit accompanying an anti-tank gun, then you'd have a better chance of spotting some unit. You get one die roll to check concealment for each target unit, so you have two chances of seeing something. So you see, in practical terms, the formula is quite simple and yet effective. Recon Mission Types and Controlling Factors
Before embarking upon a recon mission, you must first consider the mission's goals. Then you need to evaluate any other controlling factors. Recon units do not possess any inherent capabilities that allow them to spot the enemy better than any other unit. They simply move faster and further so that they can be positioned to provide information more effectively. If you try the "Frontal Attack Approach" to recon using lighter recon units, the result in many instances will be sudden death for the units involved. This gives rise to the phrase that some players use, "Recon by Death." The problem is that many game players fail to understand that sending a fast moving light armored car (or unarmored jeep) into the most obvious area of "harm's way" for the purpose of finding the first enemy position is a waste of a valuable asset. We'll discuss further "what you can do to avoid this" in the next sections, but for now I would propose that there are two main types of recon missions in West Front:
1 : FORCE or "Recon-in-Force" - This is an offensive technique on one's front or main axis of advance for the purpose of finding and immediately destroying the enemy units with powerful assets at hand. This mission may involve the light recon units, but often is the function of primary combat units. You must presume your recon units have previously done their job and alerted you of the likelihood of the enemy being present.
2 : FINESSE or "Intelligence Gathering Recon" - Performed by either the attacking or defending side, this mission has the purpose of locating enemy units, and providing an early warning of impending attacks or counterattacks from an unseen quarter or warning of the enemy's reinforcement situation: unit type, strength, direction of advance. On defense, this may involve simply placing a unit to watch your flank. The purpose is not to fight or hold, just to observe and warn you of any activity. On Offense, this mission becomes a bit more involved and will be discussed below.
The techniques used in both FORCE & FINESSE missions are similar. It is only the choice of units and the execution of the task that differs. The lighter, faster recon units in the game are much better suited for the Intelligence Gathering Recon role. By keeping the nature of the mission in mind, you will often avoid the "Recon by Death" syndrome. Not all types of recon are practical in all situations or scenarios. In fact, some scenarios may have little or no recon elements. In any event, matching the correct unit to the task that matches its capabilities is fundamental in getting a proper start. Having done that, you can consider other practical factors that impact the recon execution. These include:
1 : Visibility - Each scenario has a visibility that is measured in number of hexes. This information is available from the scenario selection screen or from the Status | Scenario Information while a game is in progress.
2 : Ground Conditions - Both the scenario selection screen and the Status | Scenario Information menu contain the game ground conditions. Snow, Mud or, to a lesser extent, Soft ground conditions tend to reduce mobility and make recon a more difficult task. Being more difficult does not make the task any less important.
3 : Time - The number of game turns related to the overall objective of the scenario plays a large part in what you can attempt to accomplish and the amount of time you have for finesse.
4 : Terrain - This factor is much more subjective than the first three, and involves the judgement of how friendly the terrain is to a fast, freewheeling, light element. Terrain analysis will be covered in more detail in the next section.
5 : Equipment Available - As recon units have no inherent special spotting ability, their advantage lies in speed and, more specifically, their longer range of movement. This is where the new Allied recon units really shine. Keep in mind that some recon elements are armored targets as seen by the red defense value on the unit info box. There are, however, some unarmored recon units in the game, and these are particularly vulnerable if fired upon.
I must also mention that Half-tracks, despite being relatively fast and armored, are often not as effective in a recon role for reasons that I intentionally will not discuss. They can be used if required, but often these units can be better employed for other game functions. I'll leave it at that! "Talking the Talk" - Tips & Techniques for West Front Recon
The primary rule never to be lost sight of in this section is "There are NO RULES." These are only guidelines to follow to keep you from taking excessive risks which would offer few rewards. Know the Ground
The first step in any scenario is planning your battle. To evaluate the potential value of recon you must know the ground over which you are going to fight. I usually study the map carefully using both 2D & 3D to get the "lay-of-the-land." During this "Terrain Analysis" phase, I consider my axis of advance and possible alternative plans. I try to visualize how the battle will unfold, and how I can execute my plan. Then I consider how recon can fit into my situation using the points previously discussed in the section on Mission Types and Controlling Factors.
After that, I turn ON visible hexes to spot check what can be seen from where, looking for good observation posts for my recon assets. Sometimes it is best to see lots of ground, while other times the goal is to observe just a key road hex. I look for opportunities to check out the ground over which the main force may advance. I consider the likely avenues I could use to approach these observations posts. I always look for ways to minimize the risk of exposing the recon units to fire.
Maximum flexibility is important in any plan. But plan in advance, so that the main body can bypass stubborn points of resistance using a safe alternative route with a minimum delay. Look at where you are, where you want to go and what the best route may be to take you from one to the other.
The Hail Mary - Going Long and Deep OR Preventing It. "To see and in some cases NOT to be seen. That is the question!" Whether 'tis nobler in the mind to suffer the Anti-Tank Guns and Panzergrenadiers in outrageous "Recon by Death....." ...well, you get the idea! And I promise to cut the Shakespeare, too, but I just couldn't resist! (and I hope you see the humor)
Rather than risk recon units in a "frontal attack style recon by death," some people use recon units like "Long Range Desert groups." They go long and deep with the intention of hunting HQs. I, too, look for opportunities to go long and deep, but have learned to respect HQs. They pose real danger to light vehicles. However, a single recon unit can wreak havoc with an unprotected column of trucks - especially loaded trucks. The very threat of such action can force a player to take historical countermeasures.
These measures will dictate that loaded trucks not be densely packed into a single hex. Rather, they should be spread out to avoid great losses from a single assault. These measures will force a player to move his vulnerable transport conservatively in order to ensure it remains safe. As well, it can cause a player to tie up assets on rear area security. An opponent can be forced to think he must take these precautions either by the actuality of a few recon units in his rear or even simply by the threat that they might be there. These menacing units are the same ones that some people continually sacrifice using "frontal attack recon by death."
To effectively carry out a successful Intelligence Gathering mission, find a location hex that is not adjacent to the road or the normal paths of travel. Often it is not necessary to observe large amounts of ground. You should also look for key road choke points where you believe you may see enemy activity. This works best if your opponent does not know you are there.
If you pick the right spot, you may observe a whole column of enemy units moving up. Thus you can gauge the enemy's strength, know where he may be going in force, and also when you will have to fight him. The ability to plan and react to enemy intentions a turn or two earlier because of this information can often be the difference between winning and losing. Therefore, the chance of gaining this valuable intelligence is usually worth the risk to the recon unit involved. At this point I have to tell you a war story!
I was testing a scenario with a human opponent in PBEM recently. The procedure in a test is to play it once, report our findings and then reverse sides and play again. In the first match, my opponent was the attacker. I hadn't played him before and was unaware of his style. After the first couple of turns, I became concerned that I could not see where his main effort was coming from. I could hear him, but had no idea where he was in force and what he was up to.
By the third or fourth turn, I became unnerved. I had a key road hex under observation on one flank, but I had failed to notice a route on the other flank was wide open. I convinced myself he had to be there, and was going to rip through me. So, I rushed all my available reserves to this sector only to find nothing. If I had deployed a single spotting unit out on that flank, I could have handled my forces much more effectively. As it turned out, my opponent was forming up for a set piece frontal attack and I had to scramble from my now "out of position" placement to counter him.
We reported our findings to the designer and switched sides to play again, this time with a revised scenario. I could no longer be certain where the other side's units were, or how the concerns I had reported with respect to my flanks had been handled. That is to say, it was the same scenario but with new twists.
As the attacker this time, I did, however, know the ground, and I knew it well! I remembered that key road hex on one of the defender's flanks. I felt that if I avoided that hex, I might slip past him undetected. I almost did. But he spotted me before all the force could get through. On the other flank, I gambled that my opponent might make the same mistake I had made. And, so, I went LONG & DEEP, with the recon elements leading. It worked quite well. In a message to me later in the game, my opponent wrote:
"Now I don't even try to figure where you'll pop out....I know you will eventually be everywhere!" Surprise was complete!
I had even located the perfect elevated woods hex in which to hide a tiny unarmored recon jeep. From this position, I could watch every new unit arriving up a key paved road. I figured I was pretty smart for a while, too. That lasted only until my recon unit opened fire on a large caliber towed anti-tank gun. I had forgotten to set the OP Fire for this *individual unit to None for all targets. (*The ability to set Op Fire for Individual units is a new feature in West Front.)
The perfect plan was spoiled. But, even then, another key part of the plan fell into place. As my unit was in an elevated woods location, it survived the fire and retreated. I am certain that had the terrain been clear, the unit would likely have been eliminated.
This war story, which really happened in game play illustrates:
1 : Good terrain analysis resulted in a sound recon plan.
2 : The defender was taken completely by surprise because an enemy was able to advance
unobserved on his flank. Therefore, he simply didn't know where his foe was or what strength was present.
3 : The attack plan worked perfectly and was aided with knowledge provided by a light recon jeep located close to - but, not adjacent to - the road in a position that could observe a key road hex. 4 : That even when a mistake spoils the perfect plan, the value of the information supplied by that unit cannot be measured simply by victory points, even if the unit is destroyed.
5 : Unarmored units can survive fire if they seek the best protection offered by the available terrain. Look for opportunities to execute your own "Hail Mary's." Do not fight, though, unless "targets of opportunity" present themselves, such as vulnerable artillery units or loaded, unarmored transport. Consider that, if you are using the optional Command and Control Rules, you most likely are beyond the effective Command Range of the Company CP. So, if you start a fight and become disrupted, you will have a decreased chance of recovering and running away.
Think carefully before jumping upon HQs as these units often will Op Fire before you can assault and are capable of disrupting the lighter recon units before they can cause any damage. However, if they do not see you, try calling down indirect fire or an air strike.
Fight only the battles you can win, those where you stand to destroy more than you will lose yourself. In essence - don't go to a gunfight when the other side has more guys, especially if you are armed only with a knife.
How "I" do - What "I" do!
Having considered the terrain overall, I now look at the ground immediately to my front. I look for places where I myself would want defensive positions if the sides were reversed.
I avoid the road where possible, especially sections that I can't see at the start of my turn. Coming down the road is how the enemy expects me to move, and, thus, it is often the focal point for the defense. You should particularly avoid roads passing next to woods or other cover where enemy units are more likely to be positioned.
I use a recon unit's speed to go the longer, but, usually, safer route. Having made the above statements, however, I accept that I can't go everywhere on the map, never see the enemy, and still be successful in the recon mission. At some point I must risk being fired upon. Part of the "Art" is to minimize the risk of damage by selecting where to move and the hex in which to end the move. I plan the move to use my extra speed to end the turn in favorable defensive terrain such as Woods or Orchard. If I must end on clear terrain, I try to occupy higher elevations. I accept the risk of being fired on by enemy Opportunity Fire as I move through clear terrain to reach my destination. But, I consider the path the unit will take so as to keep the possible fire at as great a range as possible.
Fire levels from these lighter recon units are not usually very effective. So rather than saving action points (APs) for firing, I expend the APs to occupy the best possible defensive position at the end of my move. Live to fight or observe another day, not for the glorious death by saving APs in hopes of getting a weak shot at an enemy positioned in his choice of defensive terrain. Action Points for recon units are usually best spent moving and ending the turn in a hex that offers whatever cover is available.
As I plan my move, here is what constantly goes though my mind, once I have set upon a goal. I cycle through these questions repeatedly.
1 : What can I see now from all my units?
Press the "Visibility" button or V Hot Key with various units selected, to check this.
2 : What can I reach?
Press the "Reachable Hexes" button or H Hot Key with a unit selected. This procedure defines what I think of as "the safety zone." It is not perfect however. Remember that nothing is certain with the Concealment Rules.
3 : Next I ask myself "What can I see from those hexes I can reach? That is, are there good observation points that I may reach with less risk?"
These three questions I ask over and over again as I look at my units.
When I select a possible destination hex (or hexes) I move to the next three questions.
4 : What is the likely route my unit may take to get to the location I have selected?
5 : What unseen enemy can possibly see this route?
6 : Where may I possibly move on the next turn?
And finally, I consider:
7 : Is it worth the risk?
Try to look at least one turn past your current objective. Ask yourself;
8 : Where are you trying to go this turn?
9 : How does it help you to reach your next position in the following turn?
Having answered these questions, I begin to move.
"Walking the Walk" - One way to do it in One Situation!
Up to this point we have discussed a great deal of recon theory. In this section we will examine an example, and as the section heading suggests, it is only one way to approach the situation. Remember that there are no hard and fast rules, only judgement calls where risk is weighed. Examine the below map and study the terrain for a moment, without looking at the notations. We are going to consider the actions of three units; a Main Battle tank, an Unarmored Recon jeep and an M8 Armored Scout Car.
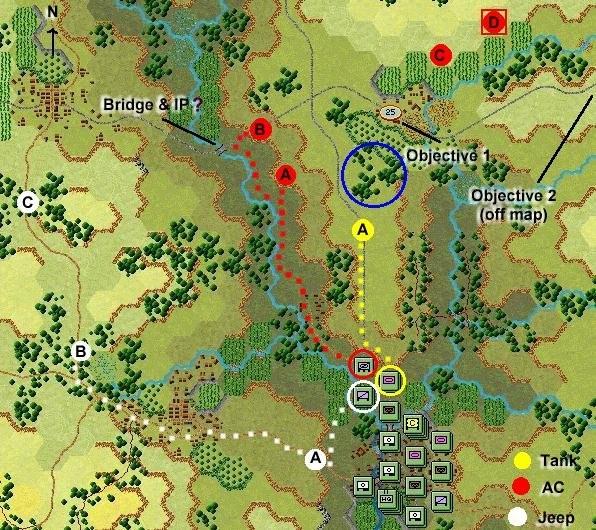 |
You can see the first Objective is the town dead ahead, straight up the paved road behind the clump of woods. The next objective is off the map, down the paved road to the right. In this situation, I consider that preliminary recon has been done and the enemy is suspected to be in the general area of the objective. The woods marked by the blue would be a good defensive position. So, I would act on the assumption that the enemy will be present here. Of course, I may be wrong too!
The yellow dot "A" marks the first location that I would use to evaluate enemy units in the woods. I suspect I will be fired on, so I stay two hexes away to limit the risk of loss. For this task, I do NOT select the recon unit. I choose the main battle tank as it has the best defense strength and I am expecting to be shot at with no cover. This is "recon-by-force" and, thus, I classify this move as a FORCE mission.
Moving either recon unit blindly down the road past the woods would be "recon-by-death", often with the predicable result that I try to avoid. Let's look for a more effective use of these units. With the speedy but unarmored jeep, consider a lower risk "Intelligence Gathering" mission. I have NO knowledge of possible enemy formations on my left flank. As I attack toward the first objective, it would be useful to know if my left flank is clear. This is the jeep's mission! The jeep can reach the first two white dots, "A and B," in the opening turn. The dot marked "A" is a fairly safe move, but time is a factor; so, you may wish to consider pushing on to the white dot "B." But, much of this route is unseen and could be mined. How far are you going to move? There is no correct answer given the information you have. You must weigh the risks. Ultimately, you wish to reach the vicinity of the third white circle, C, and beyond in later turns. I classify this mission as FINESSE.
Either of the first two red dots, "A or B" are good locations for the armored scout car. But, the bridge in this area may be guarded. To reach dot "B," you might be passing an enemy Infantry unit in an IP at the bridge. Or you might not be! But, dot "B" puts you in a better location for the next turn. Is it worth the risk? Only you can decide!
In any event, do NOT just click on the destination hex as the scout car will likely move up the paved road and not use the dirt road into the low ground where the risk of being fired upon is lower. The low ground is unseen at start and could be mined. But it is more likely that the paved road is mined. Hence, if the tank you moved first got that far without running into mines, then it is a good risk that this lower ground is safe.
From either of the above-mentioned positions, you can skirt around the top edge of the town. From the red dots "C and D" you can evaluate the stream valley above the road that heads off the map to the right. This should help check out the next axis of advance ahead of time. This mission is also FINESSE, but as it has higher risk it is better suited for the scout car. The scout car is an armored target with a better defense factor should it be fired upon while on the more dangerous of the two FINESSE recon missions. Moving these three units as discussed above illustrates how I "Walk the RECON Walk" using the recon methods I explained above and practice when I play West Front. Summary
I believe the concept of "Recon by Death" is real but really unnecessary. It is a costly waste of valuable assets by players who fail to understand the reconnaissance mission or the art of performing it in West Front. Furthermore, players often do not utilize recon units to their fullest capability and take unnecessary risks with these valuable assets. Using the above techniques as a guideline to the "Art of Battlefield Reconnaissance" will yield better results and further your enjoyment of the game system.
There you have it Gentleman. Staff College is over for the day. Back to the West Front! Good Luck in your reconnaissance. Keep your wits about you. Watch out for ambushes and I'll see you in Berlin when it's all over.
Glenn Saunders
![]()