|
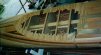
This was the most troublesome part of the whole boat but in the end turned out nice. I had earlier drawn the shapes of the recess and opening on a piece of hardboard from the offsets given in the book. I used this to mark out the shape of the recess on the deck, cut this out and cleaned it up. Then it was time to add the recess itself, which consists of glueing strips horizontally across the opening in the deck. I would have preferred to use a very dark wood for this as I thought it would look nice, but I had none so I made do with what I had. The process was a little boring, but easily done. I applied a blob of hot-glue on the end of each strip, and some Evo-Stik on the edge. Then I pressed the hot-glue end onto the edge of the recess with the glued side of the strip tight against the previous one. The hot-glue sets in seconds, and is easy to use. Just don't get it on your fingers as it sticks and is extremely hot !! I found this out the hard way. You can see from the photograph that I glued several full-length strips across the gap. These helps prevent the whole shebang from sagging. It also is a good check that the strips are horizontal. Although a plus here, if using bead-and-cove strips for the recess, means that they support each other, an advantage of not using them is that you get a nice square joint between the strips. This I like. When everything had set, I marked out the outline of the cockpit opening itself and cut this out with a jig saw. My original intention was to leave the upright strips until I had glassed the outside of the deck as I thought it would be awkward draping the cloth over them, but I was too impetuous and so went ahead and added them. ( As it happened, they didn't prove to be a problem at all when I was glassing the deck ). I went for what seems to be the traditional method, a coaming of alternating dark and light vertical strips. However I did add five extra little strips on each side of the cockpit... Willow, Ash, Larch, Spruce and Holly. This spells out my name... sad, I know ! Once the uprights were done, it was time to apply the glass cloth to the outside of the deck. When this was done, I sanded down the coaming and started on the cockpit rim. I was aware that this rim has to be very strong, so I cut ten strips ( 7/16" x 1/8" ) from some oak my friend Sean had given me. The strips were 42" long so would only reach along one side of the coaming. I epoxied one strip each side of the coaming. The next day, I epoxied two more strips. The next day, when I removed the clamps, there was a gurgling noise and the two outer strips fell off. I assumed I had mixed the epoxy/hardener incorrectly, so I mixed a new batch and reglued the strips. The next day, they fell off. I decided that epoxying oak to oak could not be done, so I ripped some ash ( given to me by another friend, Willie ) and glued these as every second strip. This worked perfectly and as an added bonus I ended up with a nice light/dark stripe effect for the rim. Why the oak/oak didn't work, I don't know. When I clothed the underside of the deck, I had extended the cloth about half-way up the coaming. Then I applied strips of cloth from underneath the deck and around the coaming. The idea is to get them tucked in under the coaming. This turned out terrible. I had forgotten that the cloth doesn't like sharp corners, so it all came away from under the coaming and set hanging downwards. There was nothing for it but to sand the whole thing down and re-apply the cloth. |
 |
|
Although the pumps I bought measured out accurate amounts of epoxy/hardener, I wanted a way to mix smaller amounts. I used some plastic measuring spoons, the kind you use in the kitchen. I filled one spoon exactly level five times, emptying it into one of those plastic containers used for holding 35mm film, and then added one level spoon of hardener. These worked perfectly and were easy to clean when the epoxy had set. You need a lot of clamps for the cockpit strips... I tried using sections of plastic rain-pipe, but this doesn't work with oak ! You need a firmer grip to ensure that the strips lie flat against each other. Do not clamp the strips on too tight as you will squeeze the epoxy out, the pressure of a tight fist is enough. |