My two logs were 6" x 4" and my table saw could not handle this thickness. So what I did was this...

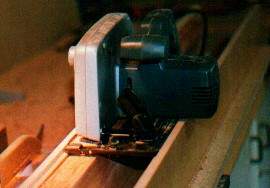
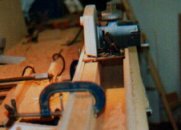
I have a hand-held electric saw ( a Black and Decker ProLine P40 with a 7 1/4" ripping blade with a 1/8" kerf ). It easily cuts through 2" of cedar. My plan was to use it to rip a 2" deep cut down one side of the log, then reverse the log and rip again from the opposite side. Hopefully, the two cuts would meet and a nice clean slice would fall off !

I tried using the saw fence ( with a long strip of wood attached to it ) but it was difficult to hold the saw steady so this produced a very wobbly cut.  So I tried another approach with a U-shaped jig. I cut a piece of MDF seven foot long and approx 12 " wide. I attached two uprights along this base  ( approx 7" apart ) with rebates along their inside top into which my hand-held saw fitted snugly.   The blade of the saw was 3/4" from the inside edge of one of the uprights.  The log was placed in between the uprights, clamped in place with wedges and I ran the saw along the rebates in the MDF. Then I turned the log over and repeated the cut.

This was not 100% successful. Although the log faces were fairly smooth they were not exactly parallel so the cuts did not meet perfectly. However, as I was planning on cutting the new pieces down the middle,  this would remove the slight step !  I then ripped the pieces into strips on the table saw.


Finally I ended up with...

Timber Cross Section Length Number of lengths
Western Red Cedar 3/4" X 1/4" 7' 93
Western Red Cedar * 1/2" X 1/4" 7' 30
Pine 3/4" X 1/4" 8' 31
Mahogany (Pencil Strips) 5/8" X 1/4" 8' 15


* I planned on using the 1/2" strips round  the chines, where they would handle the sharp bend more easily than 3/4".  I cut too many but I used the left-overs on the cockpit coaming.

This stash, I thought, would be enough timber for the kayak ( the book suggests around 1000' of 3/4" strips ), but in fact I needed a slight bit extra. Luckily I found some extra cedar being thrown out from a building site behind our offices so I ripped this up also and used it when completing the deck. I did not bead and cove the strips. I would have liked to, but I did not have a router. This did not turn out to be a problem, just some extra work planing the edges to get a good fit lengthwise, but an advantage is that you use slightly less strips.

I scarfed the lengths together using a simple scarf-jig to cut the scarfs and another jig to hold the pieces when glueing.  These jigs were a worthwhile investment.  They made scarfing extremely easy and accurate.


Lessons learnt

It was probably not worth the effort to rip the cedar logs using my limited tool set. Next time I would seriously consider having a saw-mill ripping them to managable-sized planks and then finish them off myself.

All of the scarfs which I glued together on the jig turned out beautifully neat, practically invisible on the boat.  While stripping, I glued some scarfs in situ ( being lazy ) and these turned out horrible. I had to chisel them out and glue in a new piece of timber.  Next time, I won't take the lazy option !.

As I don't have an electric  plane, I cut the strips slightly oversize with the intention of running them through the table saw again and trimming to final size with a 48-tooth blade which leaves a very smooth finish. This proved unnecessary as the strips are all eventually planed/sanded on both faces when finishing the hull and deck. I should have cut them exactly to 3/4" X 1/2".  This would have saved time in cutting/trimming and also would have given me more strips and less sawdust !