 The Mark 3 Unit
showing the PMC Mic/Earphone unit and the Power Supply Unit from CPC.
The Mark 3 Unit
showing the PMC Mic/Earphone unit and the Power Supply Unit from CPC.
Bikers Workshop Series
Part 5; Making DIY Goldwing Intercom Headsets.
By Ron Wylie.
A good Goldwing Intercom can cost £200 per headset and being an ex professional DJ, I thought that I would investigate making my headsets and after many months of experiments I can share my experiences.
Most Goldwings have a built in Radio and Intercom system. My current Goldwing, a 1993 GL1500SE has a radio cassette unit with intercom and had been fitted with the 5 pin din adapters by its previous owner. All I needed to do was get the wiring diagram for the 5 pin din plugs and the specifications for the microphone and headphones. Steve Saunders, who as usual, came up with the answers to one of my many questions, provided this. I use open face helmets but this article applies to closed face ones as well.
There are essentially two types of microphone, Dynamic and Condenser. Dynamic microphones have a magnet, which can move within a coil of wire. As the sound hits the microphone capsule it causes the magnet to move within the coil and induces an electric current. This current can then be sent along the cable to a mixer or amplifier.
Condenser microphones use a pair of charged metal plates. When the sound hits, the distance between the plates changes and this produces a change in an electrical characteristic called Capacitance. This can be converted into an electrical signal and sent off as before. However, condenser microphones require an electrical current to charge the plates. This is normally provided either by a battery inside the microphone or is sent down the cable to the microphone from the mixer. This latter method is known as Phantom Powering. Dynamic microphones tend to be the cheaper of the two types and do not require powering. Condenser's, however, are more sensitive and are usually chosen when quality of sound is important.
The Intercom on the Goldwing, and indeed many other motorcycle intercoms were designed to use the dynamic type of microphone. Many of the currently available headsets use the dynamic microphone but I did some experiments and decided to use the condenser type. The main reason for this was the value for money aspect. To use a dynamic type microphone you really need to purchase a good quality “close talking” type unit which eliminate unwanted wind noises. They also tend to be larger, heavier and require a substantial windshield (round piece of foam that covers the microphone head and reduces wind noise).
To find out which type of microphone you have there are two ways of doing it. If you have a test meter, just read the impedance on the ohm setting, which for a dynamic microphone will usually read 500/600 ohms. If you do not have a test meter you can test it in another way but you MUST be careful otherwise you will destroy the microphone. Get a radio or your PC and make sure that the volume is turned OFF. Plug the microphone into the HEADPHONE socket and very carefully and slowly increase the volume. A dynamic microphone will act like a speaker whilst a condenser will not. DO NOT turn the volume up or prolong the test any longer than absolutely necessary.
A headphone is really a small speaker and there are numerous types on the market ranging from a few pence to hundreds of pounds in price, but they all do the same job, obviously some better than others. Whilst some are “in your ear” type others are completely enclosed in material (usually plastic) and now the majority consist of a small speaker with a foam surround. You do not need exceptional high quality stereo sound from your headsets, besides which, the Goldwings radio, whilst good for the purpose, does not produce top quality hi fi sound. The “in your ear” type are unsuitable as they have to be put in your ear (obvious?) before you put on your helmet and tend to be very irritating. Impedance is important when dealing with headphones and the Goldwing works best on 32-ohm speakers which fortunately is what most headphones are.
My first foray into the world of intercoms on motorcycles was with a £20 intercom unit, which are available at most motorcycle shops (and on eBay). These consist of a single headphone, designed to fit in your ear, a microphone which clips onto the helmet and a small control unit into which fits the batteries. For the money, these are great. The downside is the horrible little earpieces, which you have to stick in your ear, before you put the helmet on and usually I forget to remove it when taking my helmet off which resulted in a very sore earhole. The microphone, a dynamic one, is small an tends to be very noisy above 40 mph. However they do the job and are worth considering for town work.
I them progressed onto a PMC 3, a terrific little intercom with a built in FM radio costing about £70. These have a combined earpiece and microphone which is fitted inside the helmet and again a control box into which the batteries fit. The FM radio, in my opinion, is useless and there is a PMC 2, which does not have the radio and costs about £15 less. The PMC does the job extremely well and the microphone is excellent. It does however have two downsides. First, it does not have quite enough volume for high-speed riding, and secondly, someone has to carry the control unit and connect the other person on the motorcycle.
Armed with some wire, a soldering, some 5 pin din plugs and an array of headsets, microphones and “old” intercoms I started my experiments;
This was simply the “el cheepo” intercom unit as described above. I cut off the mini stereo jack plugs on the original and soldered on a 5 pin din plugs. In my driveway, whilst stationary, they worked a treat. Good quality sound although the earpieces were still annoying and a little “squeaky” in reproduction.
Still with the same microphone, I replaced the earpieces with a cheap pair of headphones, which were modified (butchered) to fit inside the helmet. It was on the road test that I discovered that the microphones were totally unsuitable. Above 40 mph and the wind noise was unbearable. Back to the drawingboard.
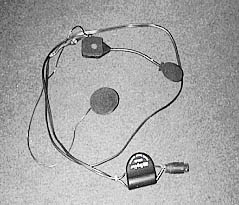
At this stage I did not really want to “destroy” the PMC units as they were working quite well but needs must. I took apart the earpieces and removed the existing wires and put them safely to one side so that I could re-assemble them should I need to. So now I had a microphone and earpiece unit, with no wires. It was then that I discovered that the microphone was a condenser type. As previously stated, the condenser microphone requires a Phantom Supply, or to put it simply, a DC voltage, a battery. They will work very well on just a 1.5v AAA. The easiest way to provide this power is buy a power supply unit (PSU) specially made for such jobs. Maplins, CPC or other electronic suppliers do a very good unit at a little over £8. I rewired the headset unit and put a power supply in line with the microphone cord (see Pic) and installed them into the helmets. These worked fine on the Goldwing Intercom although only in mono (it is safe to join the left and right signal together on headphones) although the music quality was poor. I used these units for several weeks and they were good for a time until the speaker unit in the headsets started to “rattle” before eventually burning out. This is because the output from the Goldwing is too much for a single unit.
The Mark 3 Unit
showing the PMC Mic/Earphone unit and the Power Supply Unit from CPC.
Finally deciding that the PMC microphone was the one for the job I started on the final design. The parts required are :-
Cost (each)
2 x Small Projects Boxes £0-60
2 x Prs Battery clips £0-60 (for pack of 5)
2 x 1k Resistors £0-05
2 x 10mf Capacitors £0-10
2 x Prs Headphones £3-95
2 x 5 pin Din to Din Leads £2-99
Basic tools including a soldering iron, solder and a Glue Gun (not essential)
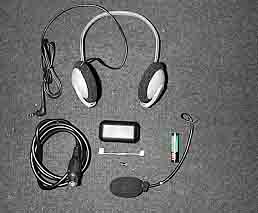 The components
showing the headphones before “modification” and the PMC Microphone.
The components
showing the headphones before “modification” and the PMC Microphone.
I had decided that the best way was to attach the “works” to the helmets thus eliminating the need to have the PSU in the lead. After installing the battery clips, using epoxy glue, into the projects box I inserted the microphone in one end and glued it in place using the glue gun, I then attached the box to the side of the helmet, again using the glue gun. It is important that you DO NOT DRILL the helmet as this could weaken it. I removed the actual headshells with speakers from the headphones and kept the wiring for further use. When buying the headphones choose some with thin headshells as these are easier to fit into the helmet.
When wiring, it is important that you follow the circuit diagram carefully as per the connection table below.
For those who have trouble with circuit diagrams :-
Battery Positive (+) to 1k resistor (one side)
Battery Negative (-) to Pin 1 on Din and Mic Screening (earth or - )
Resistor (other side) to Positive (live or +) of Mic and + side of Capacitor
Capacitor – side to Pin 4 on Din
If you make an error it maybe possible to have 1.5v DC on the input of the Goldwing Intercom This is not advisable although I have not tried it to see if it causes any damage (and I don’t intend to!).It is a good idea to test the din plug connections, on pins 1 and 4 with a test meter, just to make sure there are no voltages.
The exact wiring as is per the table below :-
Din Plug Pin Connected to
1 Microphone Screening (-)
4 Microphone Live (+) (via Capacitor)
2 Earphones Screening (-) on Both Left and Right
5 Earphone Left (+)
3 Earphone Right (-)
Using Velcro strips which are available from most clothing stores (CPC do also have them) I attached the headshells into the helmet. I actually customised my headshells to make them thinner but this is not essential. If they are curved on the back surface it maybe an idea to file a flat on them to enable a larger surface area for the Velcro. I chopped off one end of the Din lead leaving a cable length of just over 1.2 metres, which I find ideal for my Goldwing. I then wired the 5-core cable and the headphones into the project box, carefully checking that the wiring was correct. (as per the details above). After inserting the battery (it is important to observe polarity so I colour coded my battery clips using red and black tape), I checked that there were no voltages at the Plug end, using a test meter. Satisfied that everything was correct I plugged in and “WOW”. Stereo music and crystal clear communications. Well worth the effort and although I have not actually tried an original Goldwing unit, mine will be hard to beat and they are lighter and cheaper.
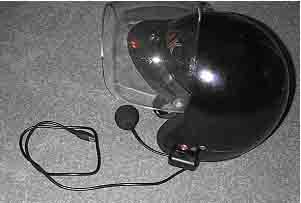 The finished
article, showing the “box of tricks” attached to the helmet.
The finished
article, showing the “box of tricks” attached to the helmet.