
Goldwing Tips
By Steve Saunders
Steve Saunders Goldwing
Page brings you a tips page dealing with how to make Honda Goldwing motorcycle maintenance easier or less costly.
Tips include listing aftermarket parts for your Goldwing that can be got cheaper from
sources other than main dealers. Some of the following
tips are based on my experiences and others have been given or e-mailed to me.
Tips that have been contributed will be acknowledged on this page. If you would
like to contribute anything useful you can contact
me and I will add it as soon as possible. Disclaimer; The contents of the
Goldwing Tips page are given freely and with the best of intentions, in the true
spirit of the Internet. If you have doubts or problems carrying out a task then
go and pay a professional to do the job because I
or my contributors won't be held liable for any errors, damage or
loss to life, wallet, limb or property.

Unusual GL1800 Battery Charging Problem.
Jim Sadler from Australia tipped me off about this. No charge was going into his battery, even though the alternator was giving full output and the regulator checked out okay. Turns out his cruise control fuse had blown and when this fuse blows the battery won't charge.Sticking Trunk Lid Cure. If the trunk or saddlebag lids on your Goldwing won't open in frosty weather, try applying some Teflon spray to the sealing rubbers on the lids before the frost appears. The frost makes the rubbers stick, Teflon will prevent it. Car dealers have used this trick for years with great success.
Waterproofing Speakers. When fitting speakers to any of my Goldwings, I usually take the "Waterproof" badge with a pinch of salt. Before fitting, I usually spray the speakers with clear lacquer (the type used to spray cars). Two or three light coats (front and rear) makes sure they really are waterproofed and there is no noticeable difference in sound quality. You don't need to have access to spray equipment to do this small job, just buy an aerosol can of clear cellulose or acrylic lacquer for a few Euros and do it yourself.
GL1100 & GL1200 Starter Motor Spinning Problem. Lots of people have e-mailed me to say that when cold, their GL1100 starter motor spins fine but will not turn the engine over. From personal experience I have found that using 20-50W oil is a major cause of this problem, especially in cold weather. Changing to a lighter oil such as 10-40W usually fixes this problem.
GL1800 & GL1500 Headset Pin Layout.
Lots of folks contact me wanting to know the layout of their headset pins, presumably so that they can purchase cheaper components and have a go at making the sets themselves. To save me having to reply to countless similar e-mail requests, here is a picture of the HS pins layout on the lead that is permanently plugged into the Goldwing (this is the lead that your headset plugs into);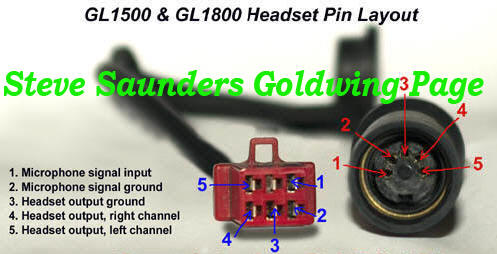
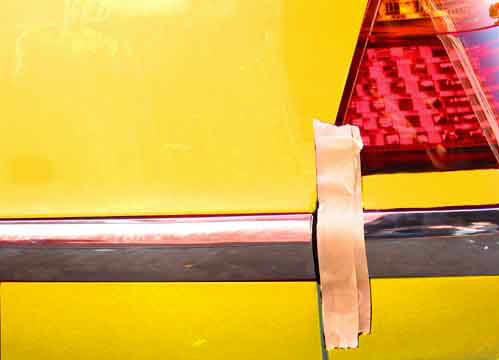
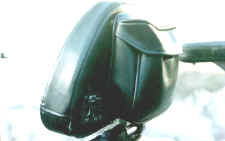
Hondaline Saddlebag Trims For GL1800. These are the nice chromed ABS plastic trim strips that are available for the GL1800 saddlebags and trunk. The ones for the trunk fit without any problems, but the saddlebag ones need a bit of extra help. Lots of owners have informed me that the square of double-sided pad that holds the side edges to the trunk just won't stick properly, making the trim stick out. I've looked at a few of these and found that the pad on the accessory trims is a shade thinner than the tape on the original painted trims. Just put another DS pad on top of the existing one and when you refit the strip with the screws, push the taped part in and some masking or insulating tape over where the DS pad is to hold it for a few minutes until it sticks, as in the picture below.
Disabling Front Running Lights.
The orange running lights fitted into the front indicators on the GL1800 & GL1500 (US spec) add more visibility to the bike. Unfortunately, this can cause confusion to cagers in countries where vehicles that don't use orange running lights and might lead to problems in the event of an accident where the blame is hard to pin on either driver. To disable the orange running lights on the GL1500 (1998 on) and the GL1800, just remove the capless type bulb and break off the MIDDLE pin from it. This avoids having to cut any wires.Spare Keys For GL1800. The Honda Accord key blank is the same and can be used as a backup key for emergencies. This only applies to US GL1800's, the UK GL1800's have the Honda HSS chip in them.
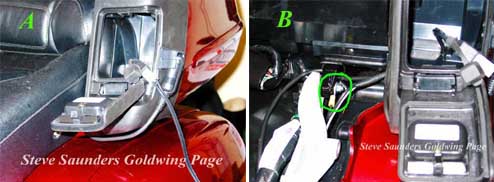
Trickle Charging A Goldwing. Using an Optimate, Accumate or similar charger when your Goldwing is not used for long periods ensures that your battery maintains an optimum charge and won't let you down. The Optimate is supplied with an adapter plug that you can leave attached to the battery permanently, you just remove the side cover and connect the charger to the plug. Most of us don't want to remove the side cover all the time for this and the supplied plug is usually just long enough to peep out of the side cover for easy access. Personally, I don't like the plug being so close to the ground or exposed to the weather (even with a waterproof cover on the plug) and I locate the plug in a better position. One of the little cubby holds under the rear speakers is ideal for locating the connector plug. The connector supplied with the Optimate is very short and I had to make the wires longer. Then I fed them through the little drain hole in the cubby hold, under the seat (I had to make the hole a bit bigger) and connected the positive wire to the battery. You can connect the earth/ground wire to the frame on the Wing, rather than adding another wire to the battery or accessory terminal earth. On the GL1800, the frame is alloy, so you need to connect to a steel part and the ideal spot is where the saddlebag & trunk carrier bolts onto the alloy frame. You can see the earthed wire circled in picture B.
GL1800 Turn Signals, Disabling the Self Cancelling feature. Lots of people have expressed their frustration at the way the self-cancelling turn signal feature works on the GL1800. Turning off too soon is the usual complaint. Personally, I just hit the switch again. For those who would like to turn off the self-cancelling altogether, all you need to do is cut the speedometer input wire. It is the white wire with a black stripe and is located under the right side glovebox. It passes through the small connector to the left of the larger connector (the one with about a million wires going to it). This wire goes down through the steering stem to the SC unit on the bottom of the steering head. If you cut this wire the cancelling feature will be disabled altogether. You can fit a switch to the wire instead and bring it through to the glovebox, which will allow you to turn the cancelling feature on or off whenever you want to.
Repairing Plastics. Some of you have probably had the misfortune to damage one or more of your motorcycle panels. Using fibreglass to try and repair cracks in Goldwing panels is no use, it just cracks after a short time. Some plastics cannot be successfully welded either. U-pol have released a product, Plast X Plastic Repair Kit which actually works! It's a two part mix supplied in a syringe type dispenser and is available for hard or soft plastics, the hard plastic type being fine for wing panels. It hardens very quickly and is a real pig to sand down, although a sanding disc on your power drill will do the job fine and you can use a skim of bodyfiller to finish it off before priming. The finished repair is really strong, the material feels just like real plastic.
More On Repairing Plastics. Marc-Andre Bedard, from Quebec, Canada e-mailed me with a new plastic repair tip and says; For repairing the plastics. I repaired a part with glue for synthetic nails that women use. It works quite well and dries in 10 seconds.
Importing A Used Goldwing Into Ireland? Then you will need to know the amount of import duty (VRT) that you will have to pay. The good news for 2002 is that the duty payable has been reduced, as the figures remain the same but the lower rate of the Euro-Punt means an effective reduction of over 20%. Nice gesture by the government this time round. Please note that a motorcycle under one year old and with mileage under 3000 miles is classed as new when calculating VRT. I have worked out the rates for all of the Goldwing models and the table below gives the VRT amounts;
GL1800 (new),
€2,182.
GL1800, 1-2 years old,
€1746.60.
GL1500, 2-3 years old, €1,122.
GL1800, 3-4 years old,
€1,092.
GL1500, 4-5 years old,
€748.
GL1500, 5-7 years old,
€561.
GL1500, 7-10 years old,
€374.
GL1500, over 10 years old, €187.
GL1200, any age, €153.20.
GL1100, any age,
€143.90.
GL1000, any age, €134.90.
GL1200, 1100 & 1000 Engine Removal Tips. One shortcut I use is to unbolt the carb manifolds from the heads and just leave the carbs & air filter housing in place (saves about half an hour). When refitting, a smear of grease will hold the manifold "O" rings in place. Remove only the right side cambelt pulley (Honda say remove both) for the engine to clear the front frame. You will need a helper to wheel the engine out of the frame on a trolley jack (easier than lifting) and you should order a set of exhaust studs beforehand as they will be rusted and a few always break. The stumps can then be removed with a vicegrips. If the bike is your own machine, consider replacing the clutch at the same time, or at the very least replace the seals in the clutch slave cylinder (GL1200 only) because if they go later on, the engine will need to be taken out again.
GL1800 CD Player Installation Timesaver. When fitting the Hondaline CD player (the early type), you have to remove the saddle and the trunk. The saddle is easy enough but the trunk can take a while to remove. The reason for removal is to drill a hole (with a holesaw) in the lower right (back of the saddle) of the trunk for the wiring grommet to be fitted. You can save lots of time by performing this shortcut; You still need the holesaw, but after you remove the saddle, just heat the holesaw with a butane blowtorch and melt through the trunk where the grommet is to be fitted. I did this and it worked a treat. If you don't have a blowtorch you can heat the holesaw on your cooker and run out to the bike. You will probably have to heat it a couple of times because the holesaw steel will cool down before the job is done. Please note that the later CD player kit (with the mounting kit sold separately) will still need the trunk to be removed as the new mounting brackets have to be bolted to the sub-frame.
Motorcycle Credit History? If the used motorcycle (or car) that you want to purchase has outstanding payments owed, you can contact HP Autodata in Dublin on 01 2600905 and they will put you in the picture.
Engine Painting. The engine paint on motorcycles is easily damaged by petrol, the layout of Goldwing engines and carbs makes it easy for petrol to pool on top of the crankcase when fiddling with the carb drain plugs. The alloy engine surface then slowly oxidises and before you know it the surface becomes pitted. If you have the engine removed for another reason (shot alternators spring to mind) remove the rest of the paint with Nitromors or similar, get some 220 grade wet & dry paper and finish the paint removal (scotch pads are great too). Buy a tin of aluminium paint and brush or spray lots of coats on (leaving at least one hour between coats. This paint is very thick and after a few coats will fill in the pitting, leaving a nice smooth surface. If you think the paint is too shiny for your engine then before you start the job, buy a small tin of heat resisting black paint and mix a small amount with the aluminium paint until you think it looks right. I've successfully repainted several engines like this. the only thing is if your engine is air cooled, it is difficult to get the paint into the finned area and also the heat there will break the paint down sooner.
GL1500 / ValkyrieAdjustable Timing. Everyone must have heard of the famous wheel for adjusting the ignition timing on the six cylinder engine. Click here to visit the homepage of a Ross Spoonland, who found a cheaper alternative.
GL1500 Fork Oil Change. This applies to the GL1500 Goldwing, American spec SE & Aspencade from 1994-5 on. Thanks to Kevin Reynolds for this tip: You will need an empty plastic gearbox oil bottle. You also need something to measure the oil for each fork leg, a baby's bottle is ideal as it will have measurements marked on the side (a very large syringe would be even better, if you can get hold of one). Put the bike on the side stand. Remove the front disc covers. Release the air from the valve in each leg, leaving the valve in place. Remove the drain bolt in one leg. Have a container handy to catch the oil. You may want to tape a piece of card shaped into a funnel to the fork leg in order to keep the fluid away from the brakes. Place a piece of wood in front of the front wheel to act as a chock, or just put the bike into gear. Pump the forks until one leg is empty of oil and replace the drain bolt. Repeat the procedure for the other leg. Remove the inner air valves from both legs. Measure the oil and put it into the gear oil bottle. Fit the tube from the bottle over the valve stem and squeeze the oil into the fork leg slowly. Replace the inner valves when finished.
GL1500 Footwarmers.
These are the black fibreglass items that fit under the engine guards. 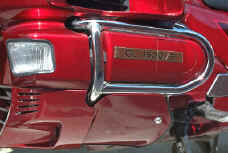 You
can get rid of the rough finish and spray them the same colour as your bike,
like I did on my last ' wing. Note the engraved brass plates in the guard
insert. I had them made to replace the plain plastic ones. This setup really
works and the warm air from the SE foot vents actually reaches your feet.
You
can get rid of the rough finish and spray them the same colour as your bike,
like I did on my last ' wing. Note the engraved brass plates in the guard
insert. I had them made to replace the plain plastic ones. This setup really
works and the warm air from the SE foot vents actually reaches your feet.
GL1500 CB Radio fitting. If you want to fit a Hondaline CB radio (as fitted to US and Canadian spec GL1500SE's) to a European spec SE or Interstate Goldwing, the simplified colour wiring diagram is here. This will save a lot of frustration. If you want to fit a Honda cb radio to an American Aspencade, no problems. The connectors for the unit and the ptt switch are already fitted to the loom. If you have a European spec SE (and that includes British and Irish machines and older GL1500's), the connectors are not fitted. This means that you will have to get hold of a wiring diagram and spend a lot of time wiring the whole thing up. I have fitted two this way, the first taking a full working day and the second, because I had become familiar with the wiring - about four hours. Compare this to about one hour installation time on an American model. I still get nightmares about this! Bear all this in mind when buying a non-US model, if having the Honda CB radio is important to you.
Backrest Audio
Controls. Another tip from my GL1500's.
 I bought a J&M audio
controller and instead of cutting holes in the pocket under the rear speaker -
as per the instructions, I fitted it into the rear of my backrest. I soldered
some six-core telephone wire to the DIN connector and ran it through the
backrest tube, so that the wires are not visible at all. Pillion passengers can
hook up their helmet cord and access the controls without shifting around so
much and there is no loss of quality at all. Well worth the effort.
I bought a J&M audio
controller and instead of cutting holes in the pocket under the rear speaker -
as per the instructions, I fitted it into the rear of my backrest. I soldered
some six-core telephone wire to the DIN connector and ran it through the
backrest tube, so that the wires are not visible at all. Pillion passengers can
hook up their helmet cord and access the controls without shifting around so
much and there is no loss of quality at all. Well worth the effort.
GL1100/1200 Alternator Failures. Yes, the old bogey alternators again. The truth about this is that most of these failures can be attributed to the connector block under the left side cover. It is the one with the three yellow wires going into it and it has to be kept clean, dry and ideally stuffed with dielectric grease. If the connector on yours looks past it, you will be better off cutting it off and soldering the wires together, then taping them up separately with heavy duty insulating tape.
GL1500 Windshield Garnish. That's the item that sits in front of your windshield and over your headlamp. You will also require an extra bracket to secure the base of the unit, if fitting to a pre-1995 model. Part number for the chrome garnish is 64120 - MAM - OOO and for the bracket 64135 - MAM - OOO . You may have to order the items through your local dealer as Honda Ireland, with a few exceptions, won't deal with members of the public directly.
Candy Red and Wineberry Paint. If your ` Wing has either the R114cu wineberry or the R176c candy red paintwork, you will probably have had difficulty obtaining a supplier for it. McPherson's in the North Strand, Dublin, can mix this paint for you. Their code for the wineberry is 317 and for the candy red, 332. You will need to ask for the base coat to go with the paint also. Telephone them on 01- 8743369.
GL1500 Front Fork Cap Removal. It's easy to make a tool to open the cap. Get a bolt with a 17mm head and a nut to match. Thread them together and then put a weld on to keep things solid. One end of the tool will fit the cap, the other end will fit your socket.
Transfers/Pinstripes. If you are respraying a Goldwing panel that has a pinstripe which needs replacing, a word of caution. These stripes go on the base coat of paint, before the lacquer. The adhesive on these stripes is really strong and if you get it wrong you won't be able to pull the stripe off for repositioning, it will either just break or the paint will tear off or both. I defy anyone to prove me wrong. The way around this is easy enough. Before you apply the stripe, wet the panel ( make sure that the base coat paint is dry ) and slide the stripe into position. When you are happy with the positioning, gently press the stripe down with a soft cloth and leave to dry. After the water has dried fully, press the stripe down again and spray the lacquer coats as normal.
Windshield Scratch Removal. We all seem to have this problem at some stage. There are kits available to remove the not too deep culprits, but they take forever to work. An easier way to get the same result is to use car rubbing compound and a polishing machine. Remember to use plenty of water as well, to prevent burning the plastic. Now I know that everyone doesn't have access to a polisher, but don't despair, because you can use a mutton cloth to the same effect, It will take longer but will still be very much faster than using a kit.
Aftermarket Parts For Your Goldwing
GL1100 & GL1000 Aftermarket Wheel Bearings. Front wheel needs two 6302-2RS bearings. Rear wheel left side needs a 6304-2RS, right side needs a 6204-2RS.
GL1800 Aftermarket Oil Filters. Purolator ML16817, Napa gold 1358, Carquest 85358, Wix 51358, AC Delco, PF2135, Fram PH6017A and K&N KN 204.
GL1500 Aftermarket Oil Filters. Napa 1358, AC PF2135, Castrol 73117 or Purlalator ML 16817.
GL1100 Aftermarket Radiator Hoses.
The Napa 7733 will replace both top and bottom radiator hoses.GL1500 Aftermarket Radiator Cap.
Two aftermarket radiator caps are available for the GL1500. They are the Stant 11233 and the NAPA 703-1406. They are about 50-60% cheaper than the Honda item.GL1100 Oil Filter.
A Fram CH 6009 oil filter will replace the Honda item.Goldwing aftermarket Timing belts
GL1100 & GL1000 Timing Belts.
If you don't fancy the idea of forking out €90 for a pair of Honda timing belts for your GL1100 or GL1000 Goldwing, then fret no more. Gates do a match for this belt (two in fact), just drop into your local car motor factor and ask for two Gates 5119 or two Gates T274 timing belts. They are about €15 each. Other manufactures supplying their equivalent belt are Moprod with the MTB71, Quinton Hazell's QTB184, NAPA 250274 and Goodyears G1076. Note; Gates 5119 timing belts are only available in Europe, thanks to Richard Jones of the U.S for informing me of this.GL1200 Timing Belts. A similar solution. This time ask for two
Quinton Hazell QTB142 belts. They are about €8 each. I have fitted these belts and the ones for the GL1100 to many Goldwings and never had any problems or failures, so the cheapskates among you can take heart in this information! Gates also supply the 5043 for the GL1200, thanks to Nigel Jones for that piece of information. Mike Pelletier tells me that another Gates belt for the GL1200 is their T070. Dayco do the 95070 for the 1200 too. Another compatible belt is the Napa 250070. Remember that though the GL1200 belts are the same width and pitch as those for the GL1000 & GL1100, the 1200 ones have one more tooth. Don't be tempted to fit a 1200 belt to an older model as even with the tensioner fully adjusted, the belts will flap about when the engine is running and eventually chafe through from rubbing off the belt covers. GL1500 Timing Belts. From May 2001, Gates have been supplying the T275 timing belt for the GL1500. Also available is the Napa 250275.
Please DO NOT contact me to ask where in your country you can buy aftermarket
timing belts for your Goldwing. I live in Ireland so obviously don't know where your local dealer is, outside of my own part
of the world. I get too many e-mails asking the same question and I won't waste
time replying to timing belt questions, except perhaps to give abuse!! All hope
is not lost however. Ken Knopp, from Gres "HAM", Oregan has given me two US contact numbers for
Gates;
For product help; 1-800-677-3478. This gets you to somebody in Utah, and
can probably steer you to a dealer for their products. For Tech help; 1-303-744-5651.
GL1500 Front Wheel Bearings. One-third of the price of the OEM item if you go to your local bearing suppler. Ask for Naachi 64003 or equivalent, you need two for the front wheel.
GL1500 Alternator Bearings.
The rear bearing on the Goldwing (1500) alternator can
wear prematurely, the first sign of this is when a wobbling noise comes from the
engine at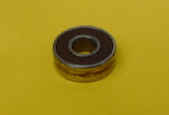 around 2,500 rpm. This is a distinctive sound which if ignored can lead to the
whole bearing spinning and wearing away the alloy in the rear cover, leading to
costly replacement. The bearing is a NSK 6000DU and it's equivalent only costs a few pounds from
your bearing supplier. When fitting the new bearing, a drop or two of thread
locking compound on the outer area will prevent spin, assuming that the cover is
not already scrap. This picture shows a knackered bearing and you can see the
burn marks where it spun in the cover. The cover in this case had to be
replaced.
around 2,500 rpm. This is a distinctive sound which if ignored can lead to the
whole bearing spinning and wearing away the alloy in the rear cover, leading to
costly replacement. The bearing is a NSK 6000DU and it's equivalent only costs a few pounds from
your bearing supplier. When fitting the new bearing, a drop or two of thread
locking compound on the outer area will prevent spin, assuming that the cover is
not already scrap. This picture shows a knackered bearing and you can see the
burn marks where it spun in the cover. The cover in this case had to be
replaced.
GL1200
Rear Wheel Bearings. These are available from most bearing suppliers a lot cheaper than from Honda dealers. Ask for the equivalent of 6204RS (driveshaft side) and 6304RS (disc side).GL1100 Clutch Cable. Honda have discontinued the clutch cable for the GL1100 Interstate & Aspencade, part no; 22870.463.600. This is the 62" cable (the standard GL1100 uses the 58" cable). The good news is that Bill at Goldwing International, Knutsford, UK may be able to help with an aftermarket cable for £11.95. Telephone 01925 75 75 04 (don't forget the international code) or e-mail info@goldwing.co.uk Their web site is www.goldwing.co.uk Thanks to Rodger Byrne for this information.
GL1100 Thermostat. Henry Casey sent me this info from South Africa; The
Stant 13868 or Napa 101 are direct replacements for the GL1100 thermostat.GL1800 Aftermarket Oil Filters.
Why anyone would want to save a few Euros or Dollars on an oil filter by fitting a cheaper non-Honda one is beyond me, but here the more commonly available ones available in most countries; Napa Gold 1358, AC Delco PF2135, Fram PH6017A, STP SMO17.EBC Brake Pad & Disc listing for Goldwings.
|
Model & Year |
Front Pads |
Front Left Disc |
Front Right Disc |
Rear Pads |
Rear Disc |
|
GL1000, 1975-77 |
FA29 |
MD1074LS |
MD1074RS |
FA32 |
MD1064 |
| GL1000, 1978 |
FA29 |
FA32 |
|||
| GL1000, 1979 |
FA29 |
MD1036LS |
MD1036RS |
FA32 |
MD1064 |
| GL1100 & I, 1980 |
FA30 |
MD1036LS |
MD1036RS |
FA29 |
MD1071 |
| GL1100 & I, 1981 |
FA29 |
MD1036LS |
MD1036RS |
FA29 |
MD1071 |
| GL1100 & I, 1982 |
FA69/2 |
MD1036LS |
MD1036RS |
FA29 |
MD1082 |
| GL1100 & I, 1983 |
FA69 |
MD1036LS |
MD1036RS |
FA29 |
MD1082 |
| GL1100 Asp, 1982 |
FA69/2 |
MD1133LS |
MD1133RS |
FA69 |
MD1082 |
| GL1100 Asp, 1983 |
FA69 |
MD1133LS |
MD1133RS |
FA69 |
MD1082 |
| GL1200 I & Asp (5mm thick front disc), 1984-85 |
FA69/3 |
MD1083LS |
MD1083RS |
FA69/3 |
MD1082 |
| GL1200 I, Asp, Ltd & Sei (10mm thick front disc) 1985-87 |
FA69/3 |
MD1125LS |
MD1125RS |
FA69/3 |
MD1082 |
| GL1500, 1988-89 |
FA124/2 |
MD1126LS |
MD1126RS |
FA69/3 |
MD1127 |
| GL1500, I, Asp & SE, 1990-00 |
FA124/2 |
MD1126LS |
MD1126RS |
FA69/3 |
MD1077 |
| GL1500 Valkyrie & Tourer, 1997-98 |
FA142 |
FA196 |
MD1077 |
||
| GL1500 Valkyrie & Tourer, 1999-03 |
FA142 |
FA196 |
TBA |
||
| GL1800 A1 & A2, 01-04 |
FA261HH |
TBA |
TBA |
FA261HH |
TBA |
GL1100 Radiator Cap. The Stant 102293 does the job at substantially less cash than the Honda one.
All intellectual property rights reserved. The contents of this web page may not be reproduced either in part or in full, in any way whatsoever without the prior permission of Steve Saunders, webmaster of Steve Saunders Goldwing Page. You can contact the webmaster by using the e-mail link on the home page.