Bikers Workshop Series
Part 12;
Polishing Goldwing Wheels.
By Steve Saunders.
I always hated cleaning my Goldwings and other
motorcycles. That's a crude way to open an article about wheel polishing , but that's the way it is. I've
always found it a chore to keep my bikes clean, but I do it anyway in order to
keep them looking right while I ride them and for when the time comes to sell
them. I also find that it's easier to inspect for damage or potential problems
while cleaning. You can't keep Goldwings clean for long in Ireland as the
chances are that it will rain (or at least shower) within a few days at the most after you
wax the beast, then it's out with the cleaning materials again.
Many Goldwing owners tend to neglect the wheels when cleaning the bike.
The large amount of painted plastic panels (almost 40 on a GL1800 and more
than 50 on a GL1500 Goldwing) means that most owners tend to clean the bodywork
like they would a car and (apart from a cursory wipe with a rag) reserve little
effort for the wheels. On the GL1800, the un-lacquered wheels need attention in
order to keep the dreaded white fungus (from damp and water) and black spots
(caused by brake dust) get a chance to settle in and cause damage.
Over almost 30 years of riding motorcycles, I (like many
others) have used various products to clean the aluminium, alloy or chromed
wheels on my bikes. Very few of these products lived fully up to their claims,
but some of them did and nowadays I tend to stick with the products that I know
will work for me. The following article shows me in the process of cleaning
wheels on two Goldwings.
Click the thumbnails for a bigger image.
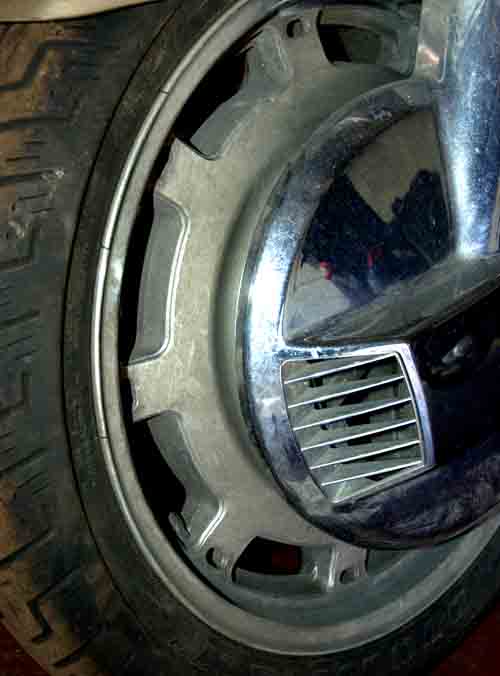
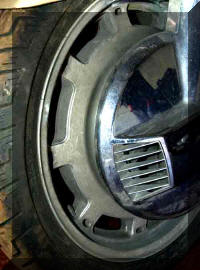 Here is the front wheel of a GL1500 which had been laying idle out in the
weather for about 15 months. The Goldwing was covered but the wheels were
exposed because the cover was a shallow one. This picture is of the wheel
after washing! The lacquer coating has been weathered off and the wheel has
oxidised (the aluminium has dulled severely) and some pitting has occurred as
well.
Here is the front wheel of a GL1500 which had been laying idle out in the
weather for about 15 months. The Goldwing was covered but the wheels were
exposed because the cover was a shallow one. This picture is of the wheel
after washing! The lacquer coating has been weathered off and the wheel has
oxidised (the aluminium has dulled severely) and some pitting has occurred as
well.
 This is what I use on my wheels. It's called "English Custom Polish"
and the three bottles you see in the picture are (from left) Metal Restorer,
Showmans Finish and Custom Blend. The Metal restorer is the first
step for badly neglected wheels like the one you seen in the first picture. The
Showmans is the finishing touch for use after the Metal restorer, or for wheels
that just need a bit of help. The Custom Blend is the finest of the lot and will
give an almost mirror finish on your aluminium. I tried many other metal
polishes before I found this stuff and most of them gave a good finish, but I
always felt that good wasn't good enough and there should be more shine there if
only I used something different (most bikers will know what I'm on about here).
English Custom Polishes contain no ammonia, anhydrous chemicals or acids, which
can cause harm to your metals. Note; I have no
connection with the English Custom Polish company or it's agents and I have not
been bribed, coerced, forced, cajoled or otherwise persuaded to do this article.
I'm just happy to share my findings with the visitors to my web site.
This is what I use on my wheels. It's called "English Custom Polish"
and the three bottles you see in the picture are (from left) Metal Restorer,
Showmans Finish and Custom Blend. The Metal restorer is the first
step for badly neglected wheels like the one you seen in the first picture. The
Showmans is the finishing touch for use after the Metal restorer, or for wheels
that just need a bit of help. The Custom Blend is the finest of the lot and will
give an almost mirror finish on your aluminium. I tried many other metal
polishes before I found this stuff and most of them gave a good finish, but I
always felt that good wasn't good enough and there should be more shine there if
only I used something different (most bikers will know what I'm on about here).
English Custom Polishes contain no ammonia, anhydrous chemicals or acids, which
can cause harm to your metals. Note; I have no
connection with the English Custom Polish company or it's agents and I have not
been bribed, coerced, forced, cajoled or otherwise persuaded to do this article.
I'm just happy to share my findings with the visitors to my web site.
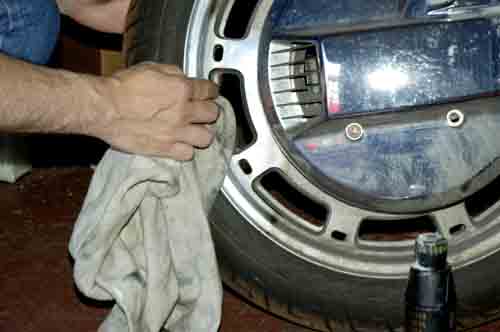
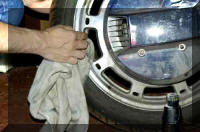 This is a section of the grubby GL1500 wheel after using the Metal Restorer
for a few minutes. Not bad for a start!
This is a section of the grubby GL1500 wheel after using the Metal Restorer
for a few minutes. Not bad for a start!
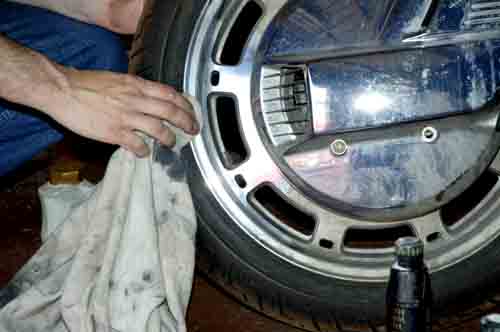
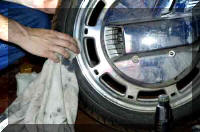 Next I used the Showmans Finish. I spent about 15 minutes rubbing this in
until I was happy with the shine.
Next I used the Showmans Finish. I spent about 15 minutes rubbing this in
until I was happy with the shine.
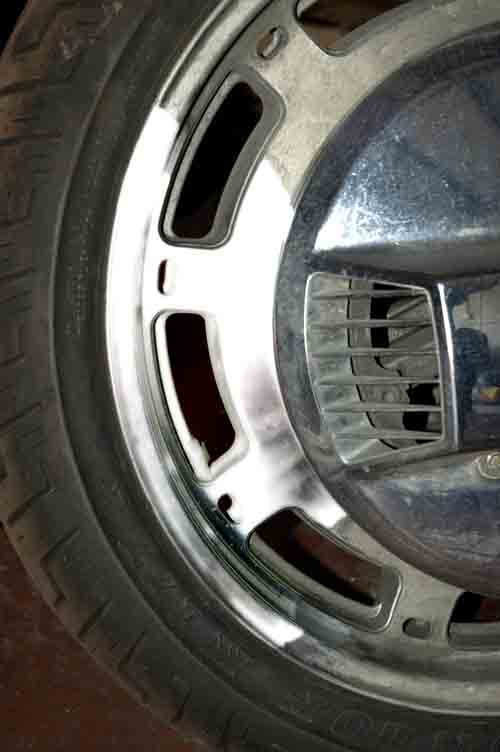
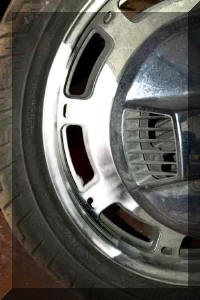 The wheel after the Custom Blend. The difference between the Showmans and the
Custom Blend is subtle but worth the extra effort. It's the difference between
very good and excellent! I had to turn the cameras flash head away a bit as it
was overexposing the image and you couldn't see the detail in the wheel. This
whole wheel would have probably taken hours to do properly, some parts were so
gouged from pitting that I would have had to sand them down.
The wheel after the Custom Blend. The difference between the Showmans and the
Custom Blend is subtle but worth the extra effort. It's the difference between
very good and excellent! I had to turn the cameras flash head away a bit as it
was overexposing the image and you couldn't see the detail in the wheel. This
whole wheel would have probably taken hours to do properly, some parts were so
gouged from pitting that I would have had to sand them down.
If you have a wheel with severe pitting, you will need to sand it down before
even attempting to use any polish. You need to start with around 400 grit wet &
dry paper (used wet with some Fairy liquid or soap). If this doesn't remove the
pitting you will need to try a coarser grade (220 or 180 should do). Then when
the pitting is gone you should use finer paper in stages (400, 800, 1200, 1500)
until all the sanding marks are gone and you have a uniform dull and smooth
appearance. Only then should you use your polishes.
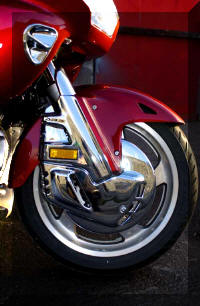 This is the front wheel of my GL1800 Goldwing before I cleaned it up. If you
look closely you can see the dreaded white fungus that gathered on the wheel
(even in the dull evening light). The shiny aluminium surface also started to go
dull. This was in spite of the bike (10 months old) being kept in a garage with
a de-humidifier. The fungus kept coming back after I wiped it off so I used 400
wet & dry on the whole wheel. I then just used the Metal restorer and Custom
Blend polishes. The wheels are now almost shined to a mirror finish ( I had to
stop polishing before I got too carried away) and are definitely better than
when they left the factory new!
This is the front wheel of my GL1800 Goldwing before I cleaned it up. If you
look closely you can see the dreaded white fungus that gathered on the wheel
(even in the dull evening light). The shiny aluminium surface also started to go
dull. This was in spite of the bike (10 months old) being kept in a garage with
a de-humidifier. The fungus kept coming back after I wiped it off so I used 400
wet & dry on the whole wheel. I then just used the Metal restorer and Custom
Blend polishes. The wheels are now almost shined to a mirror finish ( I had to
stop polishing before I got too carried away) and are definitely better than
when they left the factory new!
All done (for now anyway)!

For more information on the English Custom Polish range, click their
graphic below to visit their site;

Bikers Workshop
Menu
Home
 Here is the front wheel of a GL1500 which had been laying idle out in the
weather for about 15 months. The Goldwing was covered but the wheels were
exposed because the cover was a shallow one. This picture is of the wheel
after washing! The lacquer coating has been weathered off and the wheel has
oxidised (the aluminium has dulled severely) and some pitting has occurred as
well.
Here is the front wheel of a GL1500 which had been laying idle out in the
weather for about 15 months. The Goldwing was covered but the wheels were
exposed because the cover was a shallow one. This picture is of the wheel
after washing! The lacquer coating has been weathered off and the wheel has
oxidised (the aluminium has dulled severely) and some pitting has occurred as
well.