This is a quick selection of pictures taken in a rush so the quality of some of the images may not be too good.
_________________________________________________
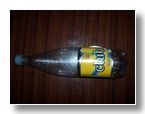
This has to my favourite bottle at the present. It’s a 1 litre tonic water bottle that can take 140psi repeatedly. If have pushed these bottles to 200psi and they still haven’t blown, even though the manufactures state that the max pressure is 180psi.
_________________________________________________
This has to be one of my favourite rockets to play with. If you have the fins ready made you can put one together in a matter half an hour. Normal launch pressure for these is 100-120psi and you will get several flights out of them before you have to change the nosecone. When we have visitors they love to see how quickly and easily they can be made, and then launched.
________________________________________________
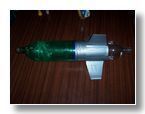
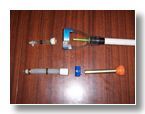
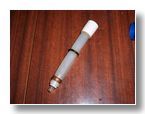
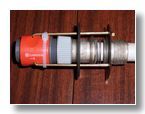
The booster is 2 x 2 liter ‘Robinson Coupled’ which takes interchangeable crushing sleeve stagers. The sustainer in the middle is a 1 litre 10mm nozzle. The sustainer at the bottom is 500ml with 5mm nozzle. More information below on these sustainers.
_________________________________________________
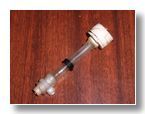
This is a general view of the 500ml sustainer. Body dia is 20mm. The fin acts as a sprink to help force it of the booster. I need to take the rocket up to 130psi plus to launch this as the crushing sleeve tends not to let go properly at lower pressures. I still have more work to do on this. Recovery is by back sliding.
Detail of the fin and nozzle.
If you look closely at the nozzle you will see were then name comes from.
The nozzle is made using a very stiff plastic cocktail straw. It fits exactly into the white cap off a sports top. The inside of the cap is filled with precision epoxy to hold the nozzle and allow for exact alignment. The epoxy takes over 6 hours to set so you have plenty of time to get it exactly square. The nozzle assembly is then glued into the pipe.
_________________________________________________
These are the interchangeable crushing sleeves. Top is the 5mm sleeve and bottom is the 10mm sleeve. For those of you who remember my posts about taking my kids toys to pieces, the 10mm sleeve is the one that has the none return valve in it from one of my sons water pistols.
Detail of the 10mm sleeve
And the 5mm sleeve
_________________________________________________
This is the one the moderately intact prototypes that will be entered in the “2005 1 Litre International Water Rocket Competition”. This, or something like it will be entered in the unmodified stock class. It’s made from the stock bottles at the top of the page. I still have a little bit of fine-tuning to do on this to make it backslide because at the moment it makes an incredibly effective lawn dart. At the moment it’s flight times very between 12 and 15 seconds, so if I can slow it’s descent a bit this should be a contender. When this thing lawn darts it sounds like an incoming artillery round with a high pitched whistle followed by a loud thudddddd.
The second image is a close up of the fin unit, which was designed to be reusable. It simply slides on and off the bottle and is held on with tape.
_________________________________________________
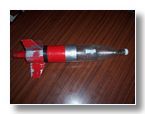
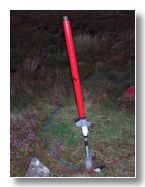
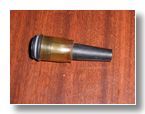
This is the one that every one seems to be interested in at the moment. The ‘RP1’ is made from the red cable conduit pipe that we use on the wind farms for signal cables. The nozzle is a standard 21.5mm pet bottleneck glued in with epoxy. The first image is after it’s maiden flight where it did a pretty good impression of a lawn dart. The nose is a full 6 to 8 inches underground and was destroyed.
Picture 2 is her sitting on the launcher after I retrieved it, hence no nose cone. I thought it might be a good idea to take a picture just in case it gets destroyed next time round.
Picture 3 is a close up of the fins and nozzle.
The next test on the RP1 will be with the use of the ‘T’ nozzle below.
_________________________________________________
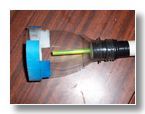
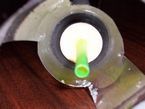
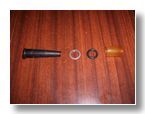
This is the strengthened ‘T’ nozzle for use with the RP1.
From left to right
Chalking Nozzle cut to 8mm
Strengthening washer. This reinforces the top flange of the chalking nozzle to stop it bending and blowing out of the bottle neck.
3mm O-ring to help seal the nozzle.
Nozzle guide and shock absorber. This is made from a 27mm length of 20mm OD 16mm ID soft silicone tube.
_________________________________________________
This is a selection of other pictures just for general info.
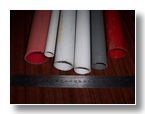
This is some of the stock piping I use. The red pipe on the right is the conduit for the RP1.
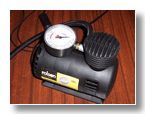
The wonderful little 12 volt, 200psi compressor that I use. I have a 300psi version of this as well but the read valve has gone on it. These things cost €8.00 over here put do tend to die after about 100 or so high pressure launches. The gear box is usual the fault, and the motors do run a bit hot after 10 mins of use.
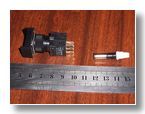
The new momentum switch Mk 3. This is just a single switch with an RC delay circuit to time aprox apogee. Next to it is one of my new high power ex-caps. Yes that is a .22 round. Most of the powder is removed so that there is just enough to get touched of by the xmass bulb and in turn fire the rim fire cap. There is allot more power in this than just using standard powder.
These things are dangerous and not for children or the lite hearted.
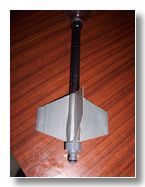
The LT2. This is a project that is on the back burner for the time being. The LT1 used then same fin set and pipe but had a 1 Litre bottle on it. The LT2 uses a 2 Litre bottle, but still needs a bit of fine-tuning.
I love the gentle sustained launch and flight of this rocket, with its reduced Gardena nozzle.
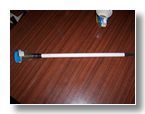
Then Gardena launcher with spring release system for use with the LT range of rockets and anything else that I put a Gardena nozzle on.
_________________________________________________
_________________________________________________
More images will come as and when I take them, and find time to update the site.
_________________________________________________