A Chanter Reed Method
What follows is a handy method for making a fairly standard reed for a 14.25" Consert Pitch Chanter with a normal bore.. It is a little slow for commercial reed making but pretty sure for an inexperienced maker. Do not be afraid to vary the dimensions a little but note each change you make and the performance of the finished reed. This method is a variation (because I could not remember the original description exactly) of a method shown to me by Dinny Quigley of Aughrim, Co Wicklow.
Read Dave Hegarty’s Reedmakers Guidance Manual for descriptions of suitable cane. I generally use the fingernail test to determine hardness (i.e. the cane is soft enough if it is easily scored with a fingernail). I dont worry about colour or markings unless it is very matt and grey (too dry) or has a very pronounced shining hard surface.
Reed Dimentions The Staple The Reed Blades
Binding the Reed Shaving the Blades Fitting and Tuning
Reed length 80mm Depth in Chanter 15mm
Exposed blades 25mm Blade width 12.5mm
Staple 25mm inside the blades
Staple 4.2mm i.d. x 48mm Eye 1.8mm flattened over 25mm
Everyone knows the diameter (internal) of the staple can affect the tuning of the top octave. However, the life of a Piper is never that simple. The staple eye, the taper, the flattened length, the staple length, and the depth sunk into the blades each have an effect (if you keep things in proportion these effects are mild).
The tubing supplied by Na Piobairi Uilleann is 4.2 mm internal diameter for consert pitch staples. This is fine for many chanters with 5 mm throats and a near conical bore. I find diameters up to 4.7 mm are required for some modern chanters.
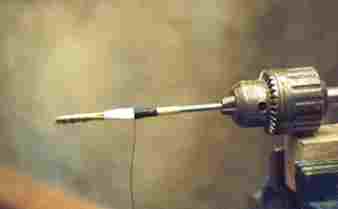
The 4.2 mm tubing can be spread to 4.3 or 4.4 by pushing it onto a spinning mandrel (the friction will generate enough heat) or similar method. If you want bigger / smaller sizes it is best to form the staple from 0.5 mm sheet (copper or brass).
If you have problems with tuning your chanter, particularly high A and B being sharp it is best to make tapered staples with i.d. of 4.2 reducing. Another problem which can partly be addressed by staples is a slightly sharp/flat G.
See Dave Hegarty’s Reedmakers Guidance Manual for details on forming a staple from sheet metal. Otherwise, here are a few quick tips :
Width of sheet for staple = Pye x (internal diameter + thickness of sheet)
For a staple with 4.5mm i.d. using 0.5mm sheet = 3.147 x (4.5 + 0.5)
` = 3.147 x 5
= 15.735 (which you can round off to 15.7mm)
If you are tapering the staple remember to allow for this.
Open the jaws of the vice to about 6 mm, place the cut sheet over the opening, hold the mandrel on the sheet over the opening and tap with a hammer until the sheet begins to bend around the mandrel. Continue to form a tube by hammering or use a pliers to squeeze the sheet closed.
Use a file to burnish the closed edges.
I make consert pitch staples of various lengths but mostly less than 2". A staple of 48mm or 49mm would be a usual length when making the type of reed I suggest here. If you taper the staple in toward the ‘eye’ the internal staple volume will be less and therefore the staple needs to be longer (and vice versa - 1 or 2 mm is probably OK).
Remember to keep notes about what you are doing !
Remove any burr from the open tube ends. A special tool, needle file, Stanley Blade point, or similar is useful for this.
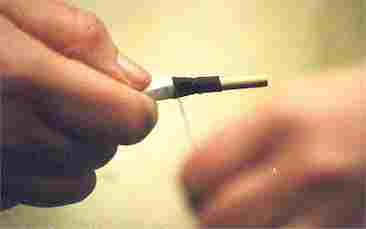
Insert a mandrel (shaped end first) into the staple tube and push through until about 10mm protrudes. If you have formed the tube from sheet make sure the seam lies over the flattened part of the mandrel head. Tap both sides gently with a hammer (or squeeze with a pliers) until the tube begins to take the shape of the mandrel. If seams open, squeeze them closed again with a pliers as you go. Now move the mandrel back into the staple tube and repeat the tapping until the staple has the desired shape. The staple should flatten gradually from round to eye over about 25mm. The eye should be between 1.7mm and 1.8mm open in the centre. I usually leave the eye oval in shape, though some makers insist on pinching the edges to get the classic cat eye shape.
Be careful when tapping with the hammer as brass or copper will spread very easily and you may end up with an eye 7mm wide or more (not necessarily a disaster).If this happens note any effect on the G note.
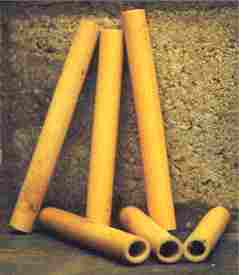
Split the Tube of Cane
Pick a tube of cane that looks even in diameter. I favour diameters of 25mm and more. I usually cut the tube to 110 mm long (or a little over this) before I split it. For the purposes of this 'method' let us work to116mm long. You should be able to split up the tube into slivers of cane 13mm by 116mm. I usually work by eye so I nearly always split slightly wider slivers, 13.5mm or even 14mm.
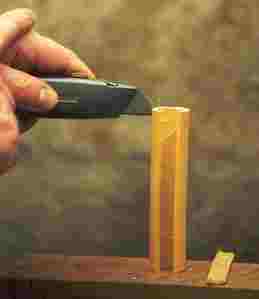
Remove Excess Pith
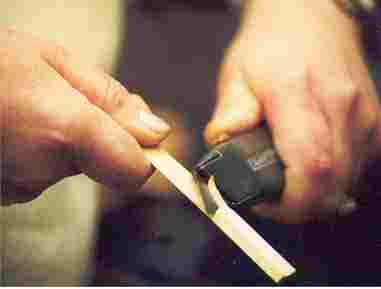
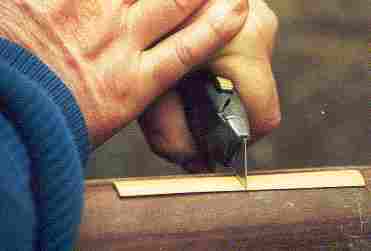
Now we need to cut away the excess pith. Hold the sliver with the pith side up (hard shiny side down) and use the Stanley Knife with the blade almost flat against the pith, slice away from your body / hand. Work at a flat angle along both edges to produce sharpish edges on the sliver. From time to time, turn the sliver and work in the opposite direction, also look along the edges to see if there are any significant uneven bits left.
As I remove the pith I would also bring the width down to about 12.7mm or 12.8mm. The profile of the sliver should now be an arc 12.7 wide.
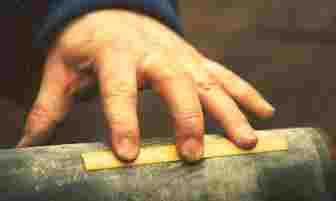
Gouging
Set the sliver in the shooting board and gouge as evenly as possible until you have produced a moon shaped profile that is about 2mm deep in the centre. Do not get paranoid about even gouging as most bumps can be removed by sanding. The most common fault by beginners is to over-gouge.
I usually make a gouge down the middle. Then a separate gouge either side of centre, but staying away from the very edges. Then I tidy up any obvious ridges.
Since watching Dave Hegarty in Miltown I'm changing my usual routine - I now spend a little more time on careful gouging to reduce time and effort sanding. It takes practice, but it's worthwhile for me, making in bulk.
 Sanding
Wrap medium grit paper around a cyclinder (a wine bottle is fine). I favour a cyclinder of 2.5" diameter but many makers prefer less. Use your finger tips to move the sliver back and forth lengthwise. You can work each end of the sliver separately near the edge of the cyclinder. Keep turning the sliver and reposition your finger pressure to ensure the sanding is even.
As soon as the obvious bumbs are gone switch to fine grit paper. The profile should be reduced to between 1.5mm and 1.7mm thick in the centre.
 Cutting
Cut the sliver in half using a rocking motion with the Stanley Knife while the sliver is on the cyclinder. Now marry the two halves and put a tiny drop of super glue in each corner. Wipe off any excess super glue immediately - watch your hands !
Tapering
Mark the bottom of the married sliver 1.5mm in from each edge. Set the sliver on its side in the shooting board and use a sharp chisel to cut a taper from blade tip to your 1.5mm mark. Now repeat the cut on the other side. Re-fix the glue joint on the narrow ends.
Holding the sliver on its side sand the joints straight. The head has probably now reduced to 12.6mm wide.
Shaping
Mark the edges 32mm from the bottom. Mark the centre of each side at the bottom. Mark also 1.5mm either side of the centre mark. Now use the knife to cut a taper from 32mm down to the 1.5mm mark on either side.
Sand the taper straight first then smooth off around the 32mm so that the blades have an even appearance and a gradual taper that smoothly narrows from about 32mm.
Staple Bed and Chamber
You do not need to gouge a Staple Bed but if you decide to do so, then you need to gouge a Chamber as well. I recommend beginners not to bother and to thin the tails on the outside only for appearance and neatness. Anyway, here is how to make the Staple Bed and Chamber.
Open the blades from the bottom. Put each blade separately into the shooting board point end in. Gouge a staple bed from 25mm to the end. Now make a gouge from 35mm towards the end. Repeat this either side of centre but stay away from the edges.
Use a narrower cyclinder and sand the new gouge marks carefully.I use a second sanding cyclinder of about 35mm diameter for this. I also give a little light sanding to the tips to remove any trace of superglue which may have seeped through.

Re-assemble the blades and bind together (I use waxed hemp). If there is a lot of wood left shave the tapered edges on the outside from 25mm to the pointed end.I use an old Stanley Knife blade for this.
Insert the staple into the blades 25mm. Check that it is straight. Pinch both sides just above the staple eye to ensure the blades will close under the binding. Adjust the staple position until both sides look OK and the reed is straight.
Bind the bottom 25mm of blade around the staple using PTFE tape (a length of 4" to 6" should do). Once again check the staple position and the sides for closing.
Binding the Reed
 If you are not under time pressure it is easier to bind
successfully by hand. Make sure the strands lie against each other and that the blade
position does not move as you bind. Increase the pressure a little after 10mm of bind. As
the bind reaches 8mm from the top of the PTFE you should see signs that the sides are
closing. Ease the binding pressure slightly at this point. The sides should be closed when
the PTFE is covered.
If you are not under time pressure it is easier to bind
successfully by hand. Make sure the strands lie against each other and that the blade
position does not move as you bind. Increase the pressure a little after 10mm of bind. As
the bind reaches 8mm from the top of the PTFE you should see signs that the sides are
closing. Ease the binding pressure slightly at this point. The sides should be closed when
the PTFE is covered.
Start two or three turns back down then open the blade binding to check sides are closed. Very small gaps are OK and will go away as the reed is shaved. If everything is OK finish the binding as neatly as you can. Cover any small gaps in the binding where white tape is visible.
If there are any significant gaps in the blade sides visible you have a number of options :
Rub the binding in your hands to melt the wax strands together. At this point I paint on Black Shellac to further seal and enhance the appearance. After a day or so I often paint on Clear Varnish.
Shaving the Blades
Within two days most of the tension we observed in the blades as we bound them tightly to close, has gone. If we cut open our reed now and remove the binding the blades will hardly move. So we begin to shave the blades.
An experienced reed maker will remove 75% of the excess wood in a half dozen big cuts from the knife. However, it is not a contest so proceed with caution.
I favour a long scrape from the binding to the tips. The scrape shape is between a V and a U, but nearer a V. Do not get paranoid about it.
Make a fist with your left hand and hold up your hand with the thumb pointing out at your face. Grip the reed in your fingers with the blades lying flat along the pad of your thumb. Very carefully draw the knife toward you cutting a shallow wedge from the top blade.Mind the flesh on your thumb does not protrude into the blade path (allow for accidental slippage !)
You can remove wood using medium or coarse sand paper also. Check regularly that both blades are even and that the scrape shape is forming evenly. Watch out for the edges of the blade tips becoming thin too early.
As the blades thin they will close a little. Usually they will be 0.75mm apart in the centre but up to 1mm is OK. Much outside this range you may need to squeeze open or closed with your fingers to test for sound.
Test by sucking and continue the scrape until you get a comfortable crow. I usually go this far with the knife and now switch to sand paper. A good reed will nearly always crow brightly and strongly and will overblow when sucked strongly.
Fit the bridle and adjust until the lips are approx.0.7mm apart.
Fitting and Tuning
With a new reed I usually sit the reed well down in the reed bed (15mm) and tune from that position. I have left plenty of leeway with a starting sliver of 116mm, so I expect to eventually slice off about 3mm from the reed lips. Your chanter may need more or less than this.
Try playing both octaves a note at a time. Because of the leeway I expect the back D to be very flat or non-existant. C# and B will be also very flat and other notes maybe 30 cents flat.
To correct a flat back D we must slice a little carefully from the blade tips (1mm at a time). If necessary we then thin the lips and re-shave a little. Try playing scales again and you should hear notes come into tune.
If too much pressure is required to play comfortably and the lips are not very open, we must take more wood away. If the problem is right across the scales then an even scrape and thinning is required.
Look carefully at the lips. Check for uneven bend when the edges are pressed. Thin either side for a more even response. Make sure both blades look even in scrape depth and shape.
A weak bottom D requires thinning nearer the binding. Difficulty jumping into the high octave needs thinner lips (or you could try a gentle sand back and forth instead of side-to-side). Poor response or tone from back D to G or F# needs thinning from just below lips to middle of scrape. If you look on the scrape as representing the Chanter (lips high to binding bottom D) you will find an appropriate spot to work on.
If the back D is sharp withdraw the reed a little from the reed bed.
What if both D’s are OK in relation to each other, but other notes not in tune.
Check that notes are proportionately out-of-tune. By this I mean that notes E F# G and so on, are progressively getting flatter or sharper as you play up the scale from bottom D (with a jump back into relative tune on the back D).
No Progression
If there is no obvious progression then I would suspect the Chanter of being flawed. It is possible to sharpen/flatten the middle notes a little (F# G and A, but especially G) by a few cents (depending on the Chanter) using reed techniques. However, if you kept anywhere near to the proportions suggested here, then you are unlikely to have produced this effect.
Progressively Sharper
This is not uncommon and is easily cured if the sharpness is not excessive. Withdraw the reed a little, say 1mm or 2mm, and check again. All the notes will have flattened a little but the higher notes will be affected the most. Now correct the flat back D by slicing a very small piece from the lips. Repeat this procedure if necessary.
Progressively Flatter
Could you have overdone the tuning of the back D ? The reed may be ruined. If the progression is not very pronounced you could try sitting the reed further into the chanter until only the back D is sharp. Use masking to bring the back D into tune.

Let me know how you get on with this method. It is impossible to cover everything in a document like this but I will try to deal with any (genuine) queries if you E-mail me
. mailto:dooleypipes@eircom.net
Good Luck
Michael Dooley