


B-25J Ground Work Two
Divebombing has been covered by other people many times before. This section will just give a few brief notes on how to use the B-25 in this role.
A throttled back dive from 8,000 feet is best. Any higher and the B-25 will accelerate too fast in the dive. Any lower and it will be too low after bomb drop to pull out safely. The B-25 cannot be yanked back up into a screaming climb after bomb drop... the wings will rip off.
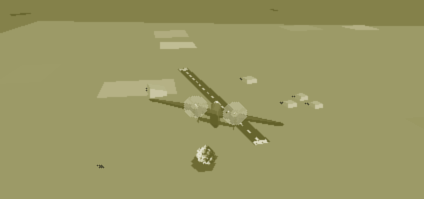
In the dive itself the B-25 is very stable... almost too stable. It's about as stable a Ju-87B and that makes divebombing incredibly accurate in Air Warrior. The main factor in a good accurate bombing is to know when to begin the dive. You have to be right over the target. There is an easy way to determine the exact point at which you should tip over. Use the Norden as you approach and put the target halfway down the lower vertical line in the Norden bombsight. The tower is the target in the picture below...
As soon as you reach that point, select the divebomb sight, throttle back fully, arm the bombs, go out of the Norden and push over. The B-25 should be pushed over nose first with the wings level. Don't try to roll one wing over the other and pull into the target. It's not neccessary.
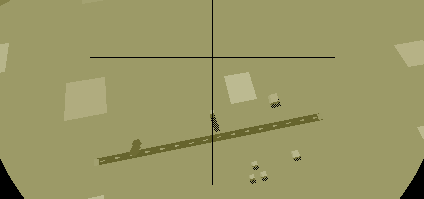
Down you go... put the CCIP "x" on the target, get it stable, and release the bombs. Pause one second to allow them to fall free. This is very important. You want to get all 3 bombs from each stick to impact the target. You don't want to see any craters around it.
As soon as you release then pull up easily (stay under 5Gs), go full throttle and apply WEP, close the doors and reach skyward. Haul the B-25 way up until speed goes below 100KIAS then flatten the climb, and apply one notch of flaps. Let the speed fall to 80KIAS and then swing around for another attack on the same target (if you missed) or a second target if you still have one stick left.
I try to release around 5,000 - 3,000 feet. The B-25 will reach a little lower on the pull out and can zoom back up to about 6,000 feet. As you swing around you can go back into the Norden and line up on the second target. Take a look at the B25a.cam to see how easy it is to knock down ack and tower at a neutral field.
No matter what happens when you are over a target you need to get a "weapons fused first pass secondaries observed" kind of thing going all the time. It's no use getting to the target... you have to make the grade too. You don't want to miss... ever. If there is a fighter hovering near you as you dive then ignore him. Drop as you practise even if you are taking pings. If you have a gunner onboard then make sure you tell him that you are about to dive. A nervous one may get all edgy as his views start whirling around when you push over.
If you are only going to make one pass and haul ass then beware of diving too low too fast on the egress. Unless of course, that you wish to get down below radar alt as quickly as you can. If you come out of a dive and point the nose down at a 500 feet per minute dive you can tip 225 - 250KIAS on down for about 2 or 3 minutes as you run for home. Do not forget to over fly the target, turn back, and then dive in the direction of home too. 250KIAS is just enough speed to just stay out of reach of any pursuers (if they were low to start with) and vector for assistance on the radio (for a while at least). The fighters will eventually catch you of course... but not right away.