PCB For sale
Dual Relay Board
€6.99
12 Available

PCB For sale
Dual Relay Board
€6.99
12 Available
Dual Relay Assembled
€15.99
2 Available
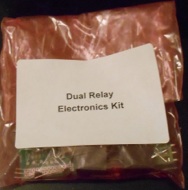
Kit For Sale
Dual Relay Board
€9.99
2 Available
Dual Relay for the Raspberry Pi

Download build manual Dual Relay Build Manual.pdf
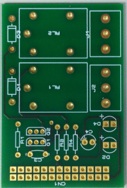
This design is a dual relay controller for the raspberry pi, the two relays are controlled by GPIO21 and GPIO10 via an NPN Transistor, relay status is displayed on one of two LED’s D2 & D4.
The board is designed on a 2 layer PCB
as shown opposite.
Bill Of Materials
QTY PART-REFS VALUE
--- --------- -----
Resistors
---------
2 R1,R3 120
2 R2,R4 560
Capacitors
----------
1 C3 100n
1 C4 10uF
Transistors
-----------
2 Q1,Q2 BC549BP
Diodes
------
2 D1,D3 1N4001
2 D2,D4 LED
Miscellaneous
-------------
1 CN1 CONN-DIL26
2 J1,J2 TBLOCK-I3
2 RL1,RL2 G5CLE-1-DC5
Connecting it to the network using Webiopi
So it’s all very well switching the relays on and off from a terminal window, but how about switching the relays on and off from a web browser using a couple of buttons like these...
Well it turns out thanks to a fantastic package called webiopi
to be pretty easy to to do.
First we need to install webiopi as the commands needed to
do this are detailed on the website and repeated below:
$ wget http://webiopi.googlecode.com/files/WebIOPi-0.6.0.tar.gz
$ tar xvzf WebIOPi-0.6.0.tar.gz
$ cd WebIOPi-0.6.0
$ sudo ./setup.sh
Once set up we will need to start the service this is done with the command
$ sudo /etc/init.d/webiopi start
Now open a browser and go to http://localhost:8000/ on the raspberry pi you should be asked for a username and password these are
username: webiopi
password: raspberry
Now you should see the default screen and switch on and off GPIO 10 and GPIO 21 to switch on and off the relays.
That’s great but how am I going to hit those little buttons while sitting on the couch browsing on my ipad ? Well it turns out it is extremely easy to customize the webiopi interface.
Firstly we need to write a HTML page as below:-
<!DOCTYPE html PUBLIC "-//W3C//DTD HTML 4.01 Transitional//EN" "http://www.w3.org/TR/html4/loose.dtd">
<html>
<head>
<meta http-equiv="Content-Type" content="text/html; charset=UTF-8">
<meta name="viewport" content = "height = device-height, width = 420, user-scalable = no" />
<title>WebIOPi | Relay control demo</title>
<script type="text/javascript" src="/webiopi.js"></script>
<script type="text/javascript">
webiopi().ready(function() {
webiopi().setFunction(10,"out");
webiopi().setFunction(21,"out");
var content, button;
content = $("#content");
// create a "SWITCH" labeled button for GPIO 21
button = webiopi().createGPIOButton(21, "RELAY 1");
content.append(button); // append button to content div
// create a "LED" labeled button for GPIO 25
button = webiopi().createGPIOButton(10, "RELAY 2");
content.append(button); // append button to content div
webiopi().refreshGPIO(true);
});
function mousedown() {
webiopi().setValue(25, 1);
}
function mouseup() {
webiopi().setValue(25, 0);
}
function outputSequence() {
var sequence = "01010100110011001100101010" // S.O.S. morse code or whatever you want
// output sequence on gpio 25 with a 100ms period
webiopi().outputSequence(25, 100, sequence, sequenceCallback);
}
function sequenceCallback(gpio, data) {
alert("sequence on " + gpio + " finished with " + data);
}
function callMacro() {
var args = ["User","Name"] // or whatever you want
// call HelloWorld(args)
webiopi().callMacro("HelloWorld", args, macroCallback);
}
function macroCallback(macro, args, data) {
alert(data);
}
</script>
<style type="text/css">
button {
display: block;
margin: 5px 5px 5px 5px;
width: 160px;
height: 45px;
border-radius:20px;
font-size: 24pt;
font-weight: bold;
color: black;
}
input[type="range"] {
display: block;
width: 160px;
height: 45px;
}
.LOW {
background-color: White;
}
.HIGH {
background-color: Red;
}
</style>
</head>
<body>
<div id="content" align="center"></div>
</body>
</html>
Now save this page as index.html I put it in the pi folder.
Now all we need to do is change the configuration file at /etc/webiopi/config
sudo nano /etc/webiopi/config
and we need to change the line starting to the new location of your index page
doc-root = /home/pi/
Now reload your browser and you should see 2 big buttons to switch the relays on and off
Control relays via GPIO from the Raspberry Pi