Poultry
Poultry
|
|
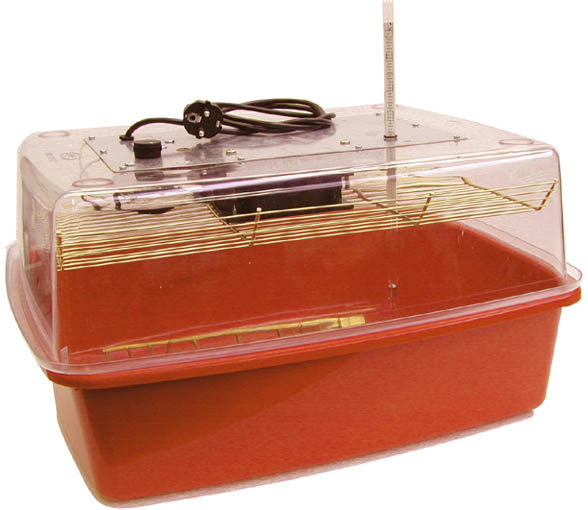
Welcome to the poultry sectionThe aim of this page is to offer information on poultry rearing, breeding, feeding. The section below can be relevant for all types of fowl, ducks, geese, pheasants Hatching, Rearing, and Care of Young Poultry For the small poultry keeper there is the choice of two methods of hatching chicks - natural or artificial. The best idea is to gain experience and confidence in both. Hen eggs take 21 days to hatch, duck and turkey eggs 28 days, most goose eggs 28 - 30 days and Muscovy eggs 35 days. Some very small bantam eggs may be a day early and really large poultry such as Cochins may be a day extra. Natural hatching The broody should be taken off the nest once each day to feed, drink and defecate. Roughly the same time each day makes for a quieter bird as she is a creature of habit and may get restless if her regular time has passed. The hen should not be disturbed after the 18th day (for chicken eggs) and feed and water should be left within her reach but out of the reach of chicks. As soon as the hatch is finished, which may take from 24 hours up to three days, empty shells and unhatched eggs (these will rattle if you gently shake them beside your ear, but be careful they don't explode!) should be removed from the sitting box and any muck the hen may have produced. Try not to disturb her while the hatch is on, tempting though it is to see how many have hatched, as she needs to bond with her chicks and turn her sitting instinct into the more aggressive protective maternal instinct. Put a water container that the chicks cannot drown in (pebbles in a shallow dish work well) next to the nest so that any early chicks can drink. The yolk sac inside their bodies will sustain them for up to 48 hours, but provide chick crumbs anyway - see Rearing. Artificial hatching Follow the manufacturer's instructions for an incubator, but go easy on adding any water. It seems to be a common misconception that water needs adding during the incubation process. The egg must lose 13% of its weight during incubation and most of this weight is water loss, giving room for the chick to move around in the shell prior to hatching. Fertile eggs which do not hatch are frequently sticky inside as the incubation time has been too humid. Try and site the incubator in a place which does not vary much in average temperature. During the incubation process the eggs must be turned in order for the embryo to develop normally (the hen does this naturally). If turning by hand do so at least five times a day and turn the eggs end -over -end so that the chalazae (strings which hold the yolk stable) do not wind up, potentially damaging the embryo. If the incubator is an automatic turning one, turn off the mechanism 2 days before they are due to hatch, or stop turning them by hand at this time. A little hot water can be added when the eggs start to pip (the diamond-shaped start of the shell breaking) to keep the membrane moist. The chick pecks its way out of the broad end of the egg by means of the egg tooth which is on the end of its top beak. The egg tooth falls off soon after hatching. Chicks may take two days to hatch or they may all hatch at once. The latter is better, but not always possible. Most small incubators have a window in so that you do not have to take off the top to see inside. It is better to fill (or part fill) an incubator, hatch the eggs, clean it out and start again, unless you can set a few eggs each week, transferring those on the 18th day to a separate hatcher which then gets cleaned out each week or after each hatch. This avoids the build-up of harmful bacteria which can adversely affect the hatch. In order to make best use of incubator space (and broody hens for that matter) the eggs can be candled after seven days' incubation. This involves holding a bright torch to the broad end of each egg in a darkened room. If the egg is infertile you will be able to see just the shadow of the yoke. Rotate the egg slightly to make this move within it. If fertile, a spider shape of blood vessels will be seen on one side with the heart beating in the middle. If there is a ring of blood vessels with none in the centre the germ has died. The infertile eggs can be removed and fresh ones added if you are going to use a separate hatcher. Using just one incubator to set and hatch with eggs of different incubation ages is courting disaster as the humidity then becomes wrong for younger eggs if you add water for the hatching ones. Also, hatching eggs produce a huge amount of bacteria, so can infect younger embryos through the porous shell. If you candle the eggs at fourteen days and the embryo is growing as it should, the air sac should have a sharp distinction from the darker remainder of the egg. If only a small dark area can be seen the germ has most likely died and the border between that and the air sac is fuzzy. The air sac gradually gets larger as hatching date approaches and sometimes the chick can be seen bobbing away from the candling light. MARVEL AUTOMATIC TURNING INCUBATOR from Dingle Poultry & Farm Supplies
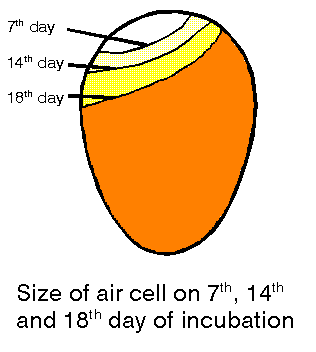
Incubating conditions Poor results are most commonly produced with improper control of temperature and/or humidity. Improper control means that the temperature or humidity is too high or too low for a sufficient length of time that it interferes with the normal growth and development of the embryo. Poor results also occur from improper ventilation, egg turning and sanitation of the machines or eggs. Obtain the best hatch by keeping the temperature at 100 degrees F. throughout the entire incubation period when using a forced-air incubator. Minor fluctuations (less than ½ degree) above or below 100 degrees are tolerated, but do not let the temperatures vary more than a total of 1 degree. Prolonged periods of high or low temperatures will alter hatching success. High temperatures are especially serious. A forced-air incubator that is too warm tends to produce early hatches. One that runs consistently cooler tends to produce late hatches. In both cases the total chicks hatched will be reduced. Maintain a still-air incubator at 102 degrees F. to compensate for the temperature layering within the incubator. Obtain the proper temperature reading by elevating the bulb of the thermometer to the same height as the top of the eggs when the eggs are laying horizontal. If the eggs are positioned in a vertical position, elevate the thermometer bulb to a point about ¼- to ½-inch below the top of the egg. The temperature is measured at the level where the embryos develop (at the top of the egg). Do not allow the thermometer's bulb to touch the eggs or incubator. Incorrect readings will result. Check the thermometer! Is it accurate? An error of one degree for 21 days can seriously interfere with embryonic growth. Check the incubator thermometer's accuracy by placing the bulb next to the bulb of a clinical (the kind used to measure body temperature) or good laboratory thermometer. Hold both under lukewarm tap water and compare the readings. Compensate for any variation of the incubating thermometer by increasing or decreasing by the amount of variation. A thermometer with a split or gapped mercury column will not give an accurate reading, discard it. Humidity is carefully controlled to prevent unnecessary loss of egg moisture. The relative humidity in the incubator between setting and three days prior to hatching should remain at 58-60% or 84-86 degree F., wet-bulb. When hatching, the humidity is increased to 65% relative humidity or more. An excellent method to determine correct humidity is to candle the eggs at various stages of incubation. The normal size of the air cell after 7, 14, and 18 days of incubation for a chicken egg is shown. Necessary humidity adjustments can be made as a result of the candling inspection. The egg's weight must decrease by 12% during incubation if good hatches are expected. |
Relative |
99o ¹ |
100o |
101o |
102o |
45 |
80.5 |
81.3 |
82.2 |
83.0 |
50 |
82.5 |
83.3 |
84.2 |
85.0 |
55 |
84.5 |
85.3 |
86.2 |
87.0 |
60 |
86.5 |
87.3 |
88.2 |
89.0 |
65 |
88.0 |
89.0 |
90.0 |
91.0 |
70 |
89.7 |
90.7 |
91.7 |
92.7 |
Rarely is the humidity too high in properly ventilated still-air incubators. The water pan area should be equivalent to one-half the floor surface area or more. Increased ventilation during the last few days of incubation and hatching may necessitate the addition of another pan of water or a wet sponge. Humidity is maintained by increasing the exposed water surface area.
Ventilation is very important during the incubation process. While the embryo is developing, oxygen enters the egg through the shell and carbon dioxide escapes in the same manner. As the chicks hatch, they require an increased supply of fresh oxygen. As embryos grow, the air vent openings are gradually opened to satisfy increased embryonic oxygen demand. Care must be taken to maintain humidity during the hatching period. Unobstructed ventilation holes, both above and below the eggs, are essential for proper air exchange.
What must be done if the power goes off during incubation? A proper response depends on several factors, some of which include the temperature of the room in which the incubator is located, the number of eggs in the machine, and whether the eggs are in the early or late stage of incubation.
The two most important considerations in this situation are to (1) keep the eggs from overheating and (2) be sure they have an adequate oxygen supply. The longer the eggs incubate and the greater the number of eggs in the incubator, the greater the chance that you will experience overheating and suffocation of the embryos.
If the room in which the incubator is located is hot and stuffy, you will have to react more quickly to power outages than if the room is kept at 75 degrees and is well ventilated. The most effective guard against overheating and suffocation is to open the door of the incubator or hatcher. Whether the door is opened slightly or fully and the length of time it is left open depends on the factors mentioned earlier.
Eggs must be turned at least 4-6 times daily during the incubation period. Do not turn eggs during the last three days before hatching. The embryos are moving into hatching position and need no turning. Keep the incubator closed during hatching to maintain proper temperature and humidity. The air vents should be almost fully open during the latter stages of hatching.
The eggs are initially set in the incubator with the large end up or horizontally with the large end slightly elevated. This enables the embryo to remain oriented in a proper position for hatching. Never set eggs with the small end upward.
In a still-air incubator, where the eggs are turned by hand, it may be helpful to place an "X" on one side of each egg and an "O" on the other side, using a pencil. This serves as an aide to determine whether all eggs are turned. When turning, be sure your hands are free of all greasy or dusty substances. Eggs soiled with oils suffer from reduced hatchability. Take extra precautions when turning eggs during the first week of incubation. The developing embryos have delicate blood vessels that rupture easily when severely jarred or shaken, thus killing the embryo.
The following table lists incubation requirements for various species of fowl.
Species |
Incub. Period |
Temp |
Humidity |
Do not turn |
Humidity |
Open vent |
| Chicken | 21 |
100 |
85-87 |
18th day |
90 |
18th day |
| Turkey | 28 |
99 |
84-86 |
25th day |
90 |
25th day |
| Duck | 28 |
100 |
85-86 |
25th day |
90 |
25th day |
| Muscovy Duck | 35-37 |
100 |
85-86 |
31st day |
90 |
30th day |
| Goose | 28-34 |
99 |
86-88 |
25th day |
90 |
25th day |
| Guinea Fowl | 28 |
100 |
85-87 |
25th day |
90 |
24th day |
| Pheasant | 23-28 |
100 |
86-88 |
21st day |
92 |
20th day |
| Peafowl | 28-30 |
99 |
84-86 |
25th day |
90 |
25th day |
| Bobwhite Quail | 23-24 |
100 |
84-87 |
20th day |
90 |
20th day |
| Coturnix Quail | 17 |
100 |
85-86 |
15th day |
90 |
14th day |
| Pigeon | 17 |
100 |
85-87 |
15th day |
90 |
14th day |
¹ Measured at degrees F. in a forced-air incubator. For still-air incubators,
add 2-3 degrees F.
² Measured as degrees F. using a wet-bulb thermometer. Use chart to convert to
relative humidity.
Rearing - day old to 6-8 weeks
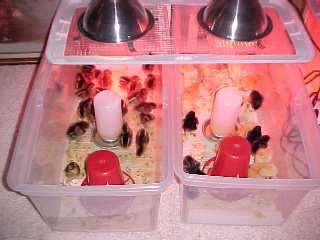
Incubated chicks need a heat lamp to keep them warm, preferably one with a ceramic bulb so that they have heat and not light. This avoids feather pecking as they have natural light and darkness. Some of the lighter or more nervous breeds certainly do better with some hours of darkness. Site the heat lamp in a draught-free place with a generous covering of shavings on the floor or make a circle using an 8' (2.4m) length of hardboard about 18" (45cm) high around it. You can also use a large rectangular cardboard box. It needs to be rectangular so that the lamp is at one end and the chicks can regulate their own temperature. Turn the heat lamp on two days before the chicks are due to hatch. It should be far enough off the shavings so that the temperature under it is about 39
°C (102°F). If the chicks are too hot they will scatter to the edges, panting. If they are too cold they will huddle in the middle, cheeping loudly. The ideal is to have a small empty circle just under the lamp. Transfer the chicks from the incubator when they have dried and fluffed up. Dip their beaks in the, again, drown-proof water and place them under the lamp.
Rearing - 8 weeks onwards
People argue when (and sometimes if at all) chicks should be given perches.
As long as the perches are at least 2" (5cm) wide there should not be a
problem of bent breastbones from perches which are too narrow, and certainly
the lighter breeds like perches. A rearing house needs to be large enough so
that all the chicks can shelter in it if the weather is bad, plus space for
a feeder and drinker. If an adult house is being used, block off the
nestboxes with cardboard, as roosting in a nestbox is a habit almost
impossible to break later, leading to dirty and partly incubated eggs.
Young stock should be kept under observation the whole of their development period. Those with obvious physical defects should be removed. This will mean cleaner houses and more room and for the others to develop satisfactorily. Take precautions (by putting cardboard to round off corners) when moving stock to new houses so that they do not huddle in corners and smother. Continue to feed best quality rations - see Feeding.
Sexing
When chick feathers start to drop between 10 and 12 weeks, new, sharply
pointed and shiny male plumage will be noticed on the backs of the males.
Time now to separate the sexes with the cockerels removed to a house of
their own. Breeds vary, but it is also possible to distinguish the sexes by
headpoints, the cockerels being redder and their heads bigger and bolder
than those of the pullets. Again, the legs and feet of males are larger. The
plumage method is the most accurate as birds develop at different rates,
except for Silkies, where a wait of at least 14 weeks will be necessary in
order to determine from comb development which are which. At about five
months old it is possible to grade young stock for colour and markings and
other breed characteristics. Time to take stock and assess the worth of the
season's hatch..
Feeding
It is suggested that only balanced feeds from reputable sources are used.
Feeding scraps tends to upset the balanced ration which has been proven over
many years. Chicks should be offered chick crumbs of 20-22% protein
containing a coccidiostat. This chemical helps to control coccidiosis and
build up an immunity to the parasite. Turkey starter crumbs have a higher
percentage of protein and are beneficial for the larger breeds. Crumbs
should be fed ad lib in a container with a series of small openings
or a swivel top to avoid waste. There should be enough trough space for most
chicks to feed at one time to avoid bullying. At about 6 weeks introduce
growers' pellets over the space of a few days. When the birds reach about 18
weeks they can be changed, gradually, to a layers' ration of 16% protein.
This can be fed either as pellets or meal. The meal can be fed dry (but may
be wasteful and also sticks to the beak and as a consequence quickly fouling
the water) or as a wet mash. When mixed as a wet mash it should have enough
water added so that when pressed in the hand and then released it should
crumble away. Pellets and dry meal can be fed via ad lib hoppers, but
wet mash must always be freshly mixed as it quickly goes rancid. Water and
flint grit should be available at all times from hatching onward. Flint grit
is needed to assist the gizzard in grinding up the food, especially hard
grain. From four weeks before laying commences, oyster shell or limestone
grit should be provided to help the formation of egg shells. Light breeds
start to lay at about five months and the heavier breeds at about six
months. In the winter, a little cod liver oil can be added to the ration.
Large fowl will eat about 4-6oz (110g-170g) per day, bantams need around
2-3oz (50g-85g), according to size. Wheat and maize can be offered as a
scratch feed to keep the birds active. If they are not free range, green
feed is always welcomed by the birds, but hang up vegetables and nettles to
get the most benefit from them.
Poultry Housing
Poultry housing is used by the birds for roosting, laying, and shelter. The welfare of the birds is entirely in your hands and certain principles must therefore be observed.
Space
Floor area should be a minimum of 1 square foot (0.3 sq m) per bird (large
fowl) or 8" square (20cm square) for bantams. If you can give them more
space then so much the better bearing in mind they will be spending time in
the henhouse sheltering from the rain and wind. Perches should be a minimum of
9" (23cm) for large fowl and 6" (15cm) for bantams.
Ventilation
Correct ventilation is vital to prevent the build-up of bacteria and
condensation. It should be located near the roof to ensure there are no
draughts. It is more difficult keeping the house cool than warm.
Window
Normally located near the roof with a sliding cover to allow for adjusting
the ventilation and covered in mesh. Glass can break and does not help the
ventilation. One window is best as the house can then be sited with its back
to the wind. The amount of light increases egg laying, 14 hours being the
optimum if you are adding artificial lighting which can come on with a timer
in the early morning, allowing the birds natural twilight to choose their
roost.
Materials
Timber should be substantial for the frame and can then be clad with tongue
and groove or shiplap or good quality ply board. If the timber is pressure
treated by Tanalising or Protimising it will last without rotting. The roof
needs to be sloping to allow rain to run off. Avoid using felt if this is
possible as this is where the red mite breeds. Onduline is a corrugated
bitumen which is light and warm therefore reducing condensation. Plywood can
be used if it is treated with non-toxic pet-friendly preservative. To
protect the plywood roof further, instead of felt corrugated clear plastic
can be used as it lets the light through and deters red mite which likes
dark places. Square mesh is best used on the window and ventilation areas as
it is fox proof. Sectional construction is best for ease of moving.
Nestboxes
Located in the lowest, darkest part of the house as hens like to lay their
eggs in secret places. Size for large fowl is up to 12" (30cm) square or 8"
(20cm) square for bantams with one nest box per four hens. Communal nest
boxes with no partitions are useful as sometimes all the hens choose just
one nestbox and queue up or all pile in together which is when eggs get
broken. Make sure there is outside access for you to collect the eggs.
Litter in the nest boxes can be shavings or straw (not hay due to moulds).
Perches
Even for bantams, perches should be broad - 2" (5cm)square with the top
edges rounded is ideal. They should be the correct height for the breed so
they can get on them easily and have room to stand up on them. See above for
spacing but allow 12" (30cm) between perches if more than one. Make sure
they are higher than the nestbox otherwise the hens will roost in the
nestbox. If you can provide a droppings board under the perches which can be
removed easily for cleaning it will help keep the floor of the house cleaner
as hens do two thirds of their droppings at night. You can also check the
droppings for colour and consistency (as a guide to health) more easily.
Security
The house must provide protection from vermin such as foxes, rats and mice.
One inch (2.5cm) mesh over the ventilation areas will help keep out all but
the smallest of vermin. You may need to be able to padlock the house against
two-legged foxes.
Litter
Wood shavings for livestock is the cleanest and best. Straw may be cheaper
but check that it is fresh and clean and not mouldy or been contaminated by
vermin or cats. Do not use hay due to harmful mould spores which will give
the hens breathing problems. Litter is used on the floor, in the nestboxes
and on the droppings board.
Cleaning
Weekly cleaning is best, replacing litter in all areas. There are
disinfectants available which are not toxic to the birds and will destroy
many if not all of bacteria, virus and fungus harmful to poultry.
Buy or make?
If housing is bought from a reputable manufacturer and meets all the basic
principles then that may be the quickest and easiest method of housing your
birds. If you wish to make housing yourself, keep to the basic principles
and remember not to make it heavy as you may want to move it either
regularly or at some stage if it is not permanent. Remember to make the
access as easy as possible for you to get in to clean, catch birds, or
collect eggs. Occasionally, second-hand housing becomes available. Beware of
disease, rotten timber, and inability to transport in sectional form.
Types of housing
Movable pens are good as the birds get fresh ground regularly. Some have
wheels which makes moving them easy for anyone. Triangular arks were
developed to prevent sheep jumping on housing in the days when different
stock was kept together. The shape of an ark can damage the comb of a
cockerel. A disadvantage of movable pens or fold units is the limit on the
size and therefore the number of birds kept in each one.
Static or Free Range housing needs to be moved occasionally in order to keep
the ground clean around the house, but the hens are allowed to roam freely
or contained within a fenced-off area. Tall thin houses are unstable in
windy areas, so go for something low and broad based. If a sliding or hinged
roof is incorporated there is no need to have the house high enough for you
to stand up in. It is useful to have a free range house with a solid floor
raised off the ground for about 8" (20cm). This discourages rats and other
vermin from hiding under the house and can make an extra shelter or dusting
area for the birds. They are liable to lay under the house if their
nest boxes are not adequate. When using movable pens and moving them on a
daily basis it is useful to have feeders and drinkers attached to the unit
so it all comes with the unit without having to take the equipment out and
put it all back again.
If you already have a stone or brick building which you want to use for hens
it can be adapted by following the above principles. Indeed, many poultry
keepers have permanent poultry runs which cannot be moved, and others have
to incorporate their poultry into the garden. You can adapt poultry housing
to suit your conditions, space, and chosen breed but it is always important
to make the welfare of the birds the prime consideration.
When choosing poultry housing go for the basic principles but remember ease
of access - if a job is easy to do it is much more likely to get done.
A good book I can recommend for incubation is
Do you keep poultry
and want a cheap guide before you spend lots of money on incubators etc then
this is the E Book for you @ only Euro 2.50 articles included
Selection of Hatching Eggs, Egg Care and Storage, Rearing - day old
to 6-8 weeks,
You have incubated
your eggs and the birds are approx 8 weeks old or purchased birds what do you do now this is
the E Book for you @ only Euro 2.50 articles included
Rearing - 8 weeks onwards, Sexing, Feeding, Poultry Housing, Poultry
Diseases, location of Coop, Predator Control
Favourite Links Animals |
|||||||||
|
|||||||||
| |
This site was last updated 03-03-2009