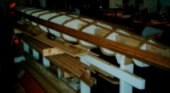
The hull Here you have a choice. To staple or not to staple. The pro/con debate on this will probably go on forever, but there comes a time when you have to make your own mind up. I chose the latter, not wanting to spoil the look of the boat with holes . I re-read the book, I re-read the for-and-against arguments on the bulletin boards. I checked out various peoples methods of avoiding the dreaded staples. I made 60 plywood L-shapes with four countersunk holes in one leg. My intention was to position each shape so it was holding the strip correctly then use two screws to attach it to the form. I also made 120 small wedges to use as pressure points between the shapes and the strips. Then I started to attach the sheer strip. There is some serious bending of strips involved with this boat, mostly as you would expect at the stem and stern. I found that I was damaging the soft cedar with the clamps I made, and they weren't holding the strips in tightly anyway. Also, near the ends there is not enough room on the smaller forms to attach the clamps. After about three strips each side, I admitted defeat and bought a stapler. I can now understand why these are so popular, they transform a difficult task to a really easy one. I wound packing tape around the strips mid-way between each form to close them tightly ( they didn't quite meet in the middle) . I didn't have a problem not using beads and coves. I used a long narrow strip of MDF to make a table mounted beside the strongbackl with some scrap strips stapled to it 1/4" apart. When I wanted to plane a strip, I merely dropped it into place on the table and planed away. After a while, I became quite good at planing, even when the curve changed along the length. I followed the guidelines in the book, and used a nice hull-closing pattern from it. Eventually, I stood back and saw that I had a boat ( well, half a boat ) and the shape was really nice. I had used my brown strips for the sides of the hull and the pink stuff I put on the bottom ( out of sight ! ). I removed the staples using an old 1/8" chisel to pry them out, with the blade of a small knife under the back of the chisel so as not to damage the wood. To my relief, they all came out very easily. This was the first transformation. What was a rather ugly-looking sight ( well, not ugly, but you couldn't call it pretty ! ) with staples and glue stains all over was now an all-wood beauty. I could not resist it, so instead of starting on the deck, I sharpened my block plane and spokeshave, poured a glass of Irish and spent an extremely enjoyable evening planing... and lo and behold !! Now it was really beautiful ! I had never seen a kayak before and I was quite delighted with the shape. I was also very relieved that I had gotten this far without making too much of a mess of things ! There were some places where the joints were not tight so I used some filler. I had bought three shades, Pine, Teak and Walnut and I found that by mixing these in small quantities, I could get a reasonably close match to the strip I was filling. I also filled the staple holes ( this took a while ! ). Whilst the filler is never an exact match, it's good enough. |
 |
|
Lessons learnt In fact, I now think that I could have used any one of the staple-less methods. The wood is very forgiving, bends to a great degree ( I had no breakages whatever ). It was just my timidity that made me switch to staples. In future, I would go the staple-less route. However, I would make some sort of square frame to fit around the stem/sterm so I could use wedges inside it to press the strips in as that area is the most difficult. Forget about filling staple holes with filler,
even when you seem to get a good match.
When the epoxy/cloth is applied every
hole
shows up as a dark spot. And
as for
steaming staple holes shut, this did
not
work either. I suppose
the solution
is not to use staples at all ! |