Trev's VWRX Project
Body-Chassis
Quick links to latest updates (or you can just scroll down!):
3-6-2003:
Chassis:
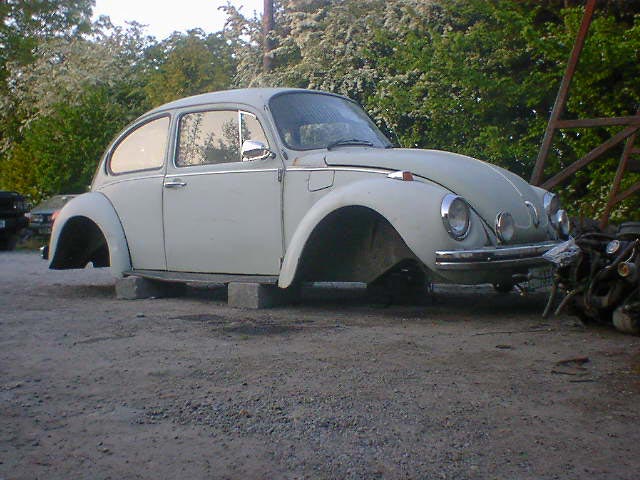
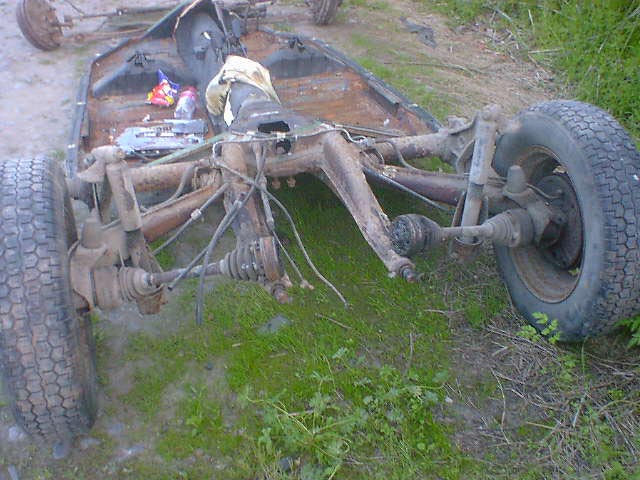
To get all this power to the ground, a few minor modifications will have to
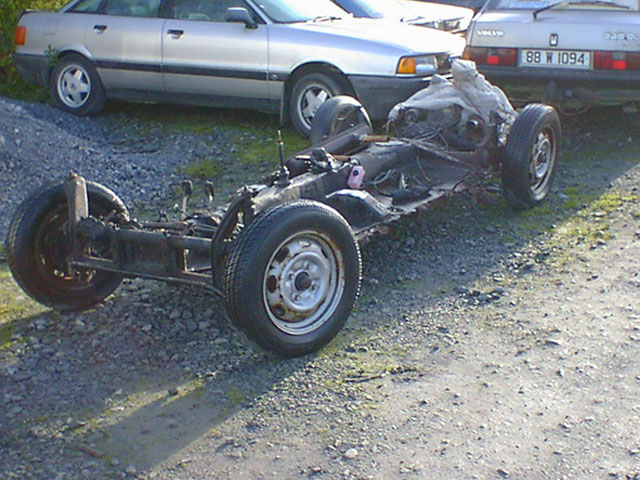
be made to the chassis ;-) . To start with, it's a standard '74 torsion bar
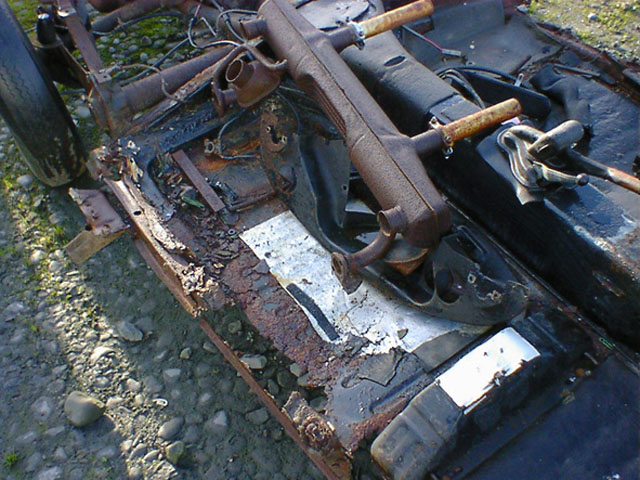
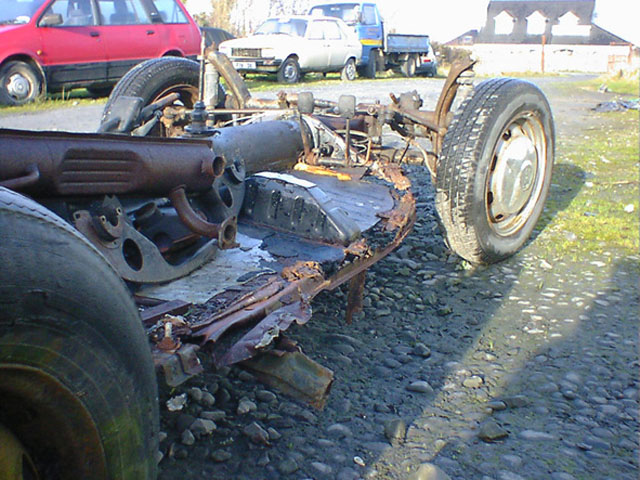
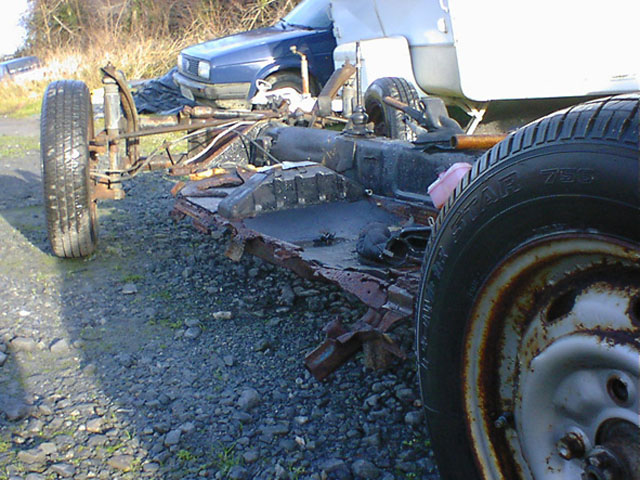
front, swing axle rear chassis. It came from a beetle that some friends scrapped
and needs replacement floorpans. Other than that, all the structural steelwork
is in good shape and straight. First of all, it'll need to be converted to
IRS, as the gearbox is designed for an IRS car. I'm going to make the front
beam adjustable and along with the CB Performance drop (raised if you want
to be absolutely correct!) spindles it will allow the front suspension to
be fine tuned.
The rear as I said will be converted to IRS, and ride height will be set by
adjusting the splines on the torsion bar.
|
|
|
|
|
|
'74 torsion bar, swing axle chassis
|
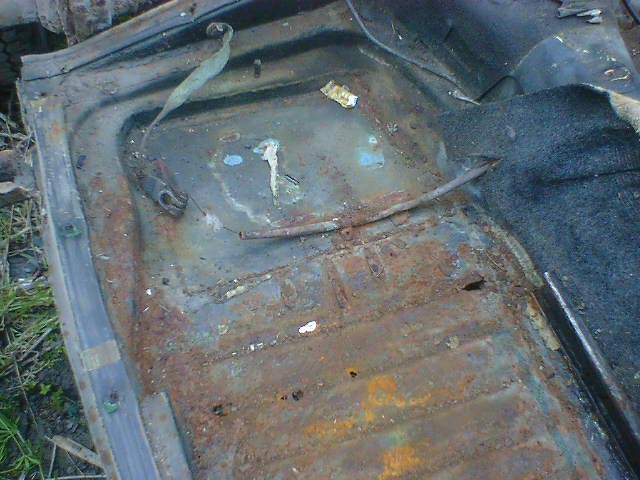
needs floor pans
|
ditto
|
ditto
|
Body:
The body will have to be considerably chopped about behind the scenes to fit
the engine under stock external panels. The idea of this project is to keep
it all looking fairly standard from outside, or at least not too obviously
modified. The rear firewall will have to be modified considerably considering
the relocation of the gearbox, and the sheer size of the engine. The "shelves"
inside the engine bay will have to be removed, and the rear apron will be
made removable. I'm considering even making the entire rear portion of bodywork
removable. A roll cage will almost be a prerequisite, and the plan is to tie
in the front torsion tubes and chassis forks at the rear. It will probably
include a subframe to support the rear panels.
The body itself will most likely be a '70s shell. I wouldn't feel too good
about cutting up a pre '67 body, as they're getting rarer by the day. '70s
beetles are still in relatively plentiful supply, so I won't feel too bad!
28-7-2003:
Chassis:
With the decision being made to base this project around a 1303, all the above
about IRS conversions, CB Performance dropped spindles etc is now defunct.
The 1303 will already have IRS installed from the factory and the front suspension
is a different kettle of fish. This means that the '74 torsion bar chassis
I have is now going to be stripped and put to a different use. I will modify
the 1303 as a whole when I locate a suitable one.
Body:
As before, the body will be kept looking as close to stock as possible. A
substantial roll cage will now incorporate the tops of the front struts instead
of the torsion bar, and the frame horns will still be tied in at the rear.
I was reading something on VolksZone today and Paul "Botch" Venners
made an interesting point: If the worst should happen and the car gets crashed,
it's easier and cheaper to rebuild the car if firstly the roll cage prevented
the occupants from getting injured and secondly it protected the vital organs
of the car, i.e. the engine and gearbox from damage. The roll cage will now
extend back beyond the engine and probably act as a mount for the rear bodywork
too. Every effort will be made to have the cage hidden within the confines
of the stock bodywork.
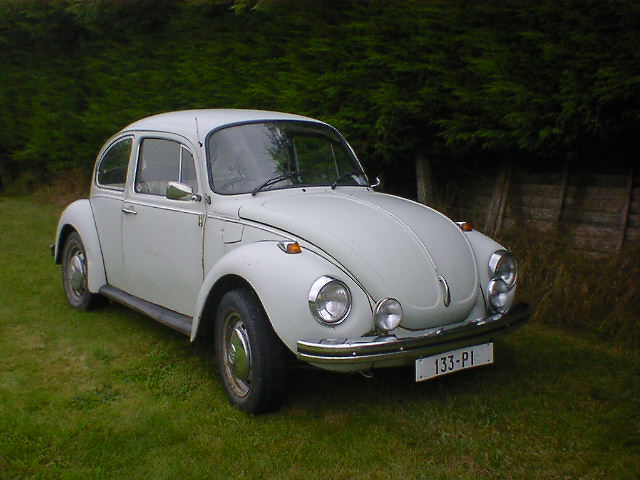
22-9-2003:
Body/Chassis:
Well, after a bit of searching I got a tip from a friend in the Irish Custom
Federation (the Hot-Rod and Custom Car club in Ireland), Pat Bolger, that a
guy he knew in Waterford had an '03 for sale. Pat knew the car as he had inspected
it when his mate Philip had bought it himself and knew it to be pretty solid.
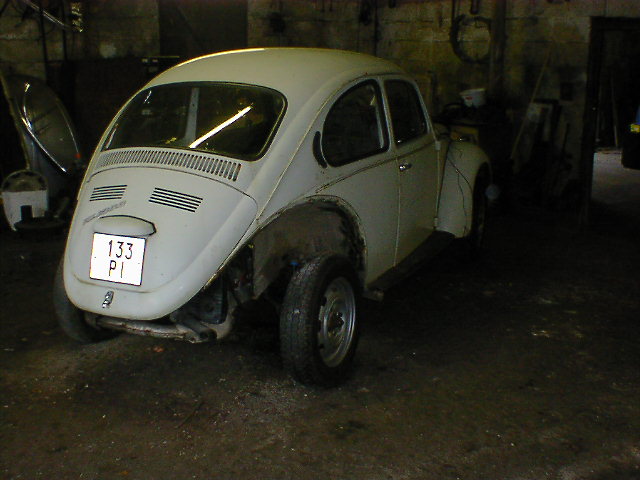
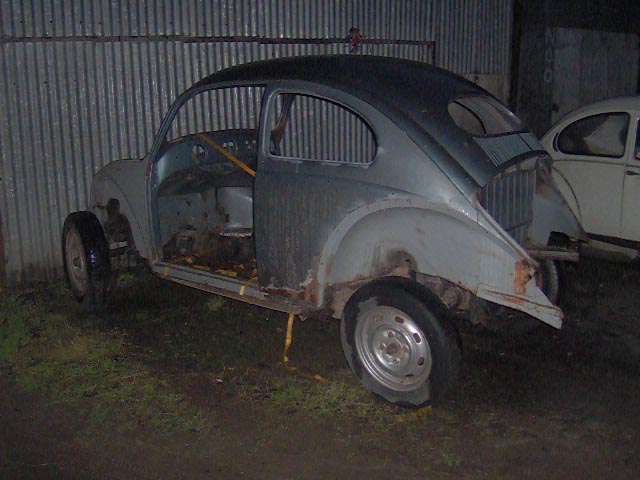
I made arrangements with the owner to come and see the car and struck a deal
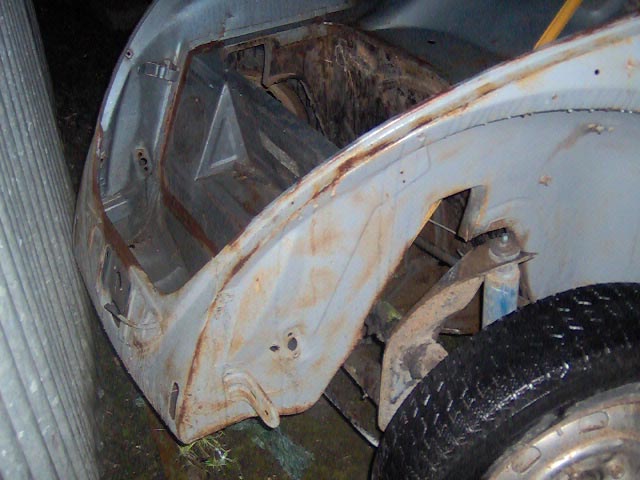
with him there and then. The car is 90% good, with solid floors, channels, frame
head, strut tops and most of the bodywork. It needs at least one of the doors
replaced and there's a bit of rust in the portion of body seam that runs vertically
in front of the door on both sides. The paint is more rat-look than show winner
but that's of no consequence as it'll be getting the full treatment anyway.
The car is a bit of an enigma. The chassis number begins with
112, which would indicate a car built between August '71 and July '72, but
the 1303 model was introduced in the '73 model year, which began in August
'72 and should be denoted by a chassis number beginning with 113. It may be
that the body was placed on the chassis of a 1302, which would explain the
chassis number. The VIN plate is missing from the front valance, but since
the car was resprayed (a couple of times!), this isn't that unusual. I think
(by scratching at the paint in the door jamb) the original colour for the
car was green, but it appears to have been resprayed as inside the door pillars
and under the bonnet etc are black. Later in life it got the off-white colour
it bears now. The engine lid isn't original, it's got 2 rows of slots instead
of 4 and has some reddish paint on the inside! The main door windows have
the shamrock that denotes the glass was made in Ireland, while every other
window has the German markings correct for the car. As far as I know, all
'03s were built in Germany.
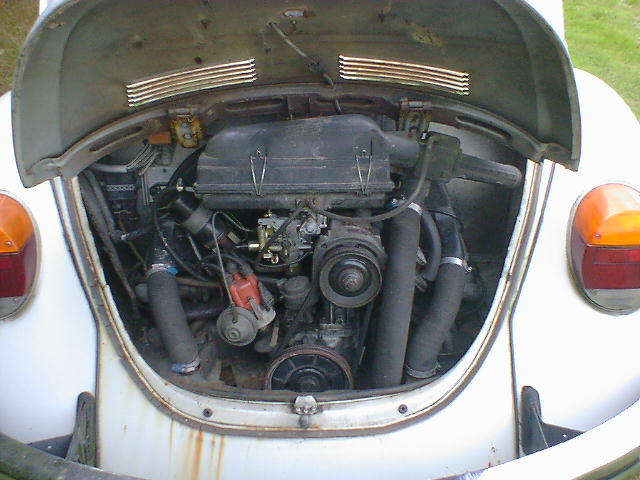
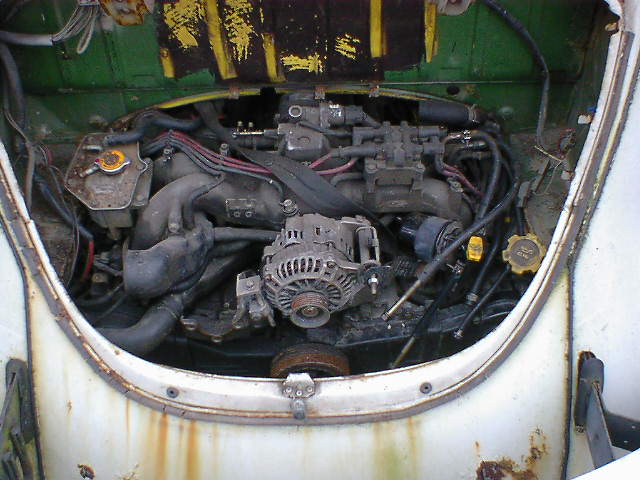
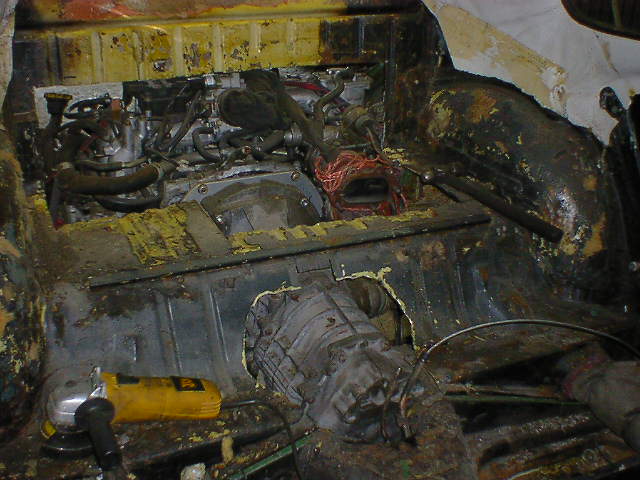
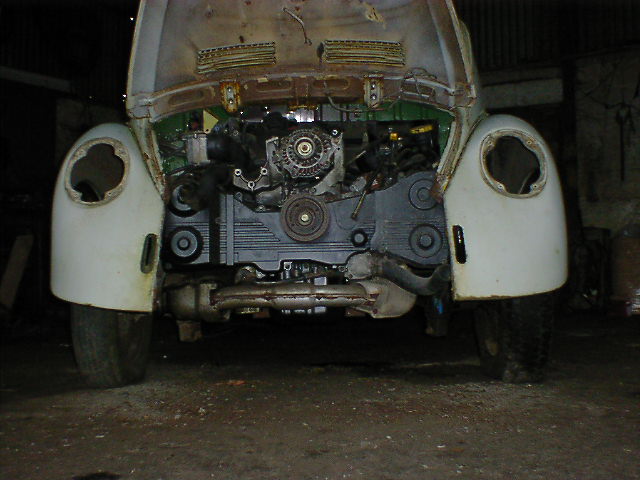
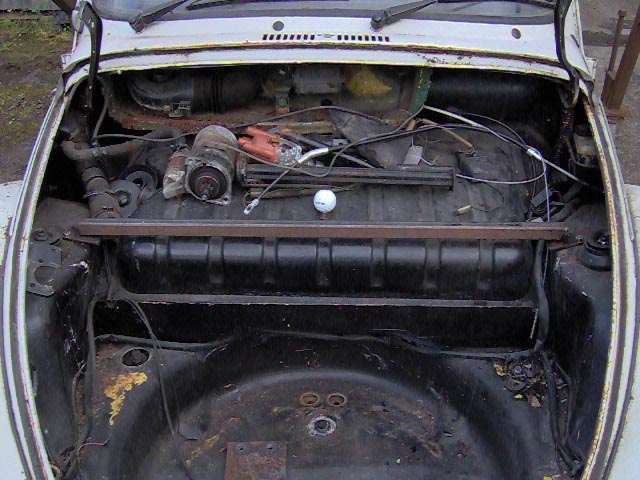
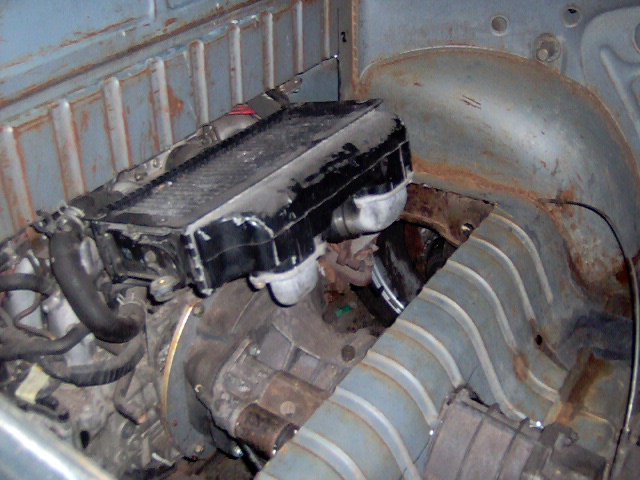
To top all this confusion, the engine has been replaced in the
car's career, and been replaced with what appears to be a '75 1200 engine.
I say appears to be a 1200 because the engine code number begins with "D"
which is the exclusive prefix for 1200 engines. However, the heads feature
twin inlet ports, which as far as I can figure, were NEVER fitted to 1200s
from the factory. There are a couple of likely explanations for this: the
later 1200 crank cases are identical to the 1300 and 1600 cases of the same
years. Earlier ones has smaller cylinder spigots. With this in mind, the case
may have been used to base a 1300 or 1600 rebuild on. This would explain the
twin ports. Another explanation would be that the engine was subject to a
custom, home brewed capacity increase by fitting 1300 barrels and pistons
and twin port heads. This would necessitate the machining of the manifolds,
heads, and a whole bunch more, and nowadays is not seen as an economic way
of gaining a few HP when hop-up parts are more readily available for 1300/1600
engines and the base units are cheap to buy 2nd hand. However, there's no
way of knowing when the engine was rebuilt (presuming it was), maybe it was
done when the go-faster parts were available for 1200s. It remains to be seen.
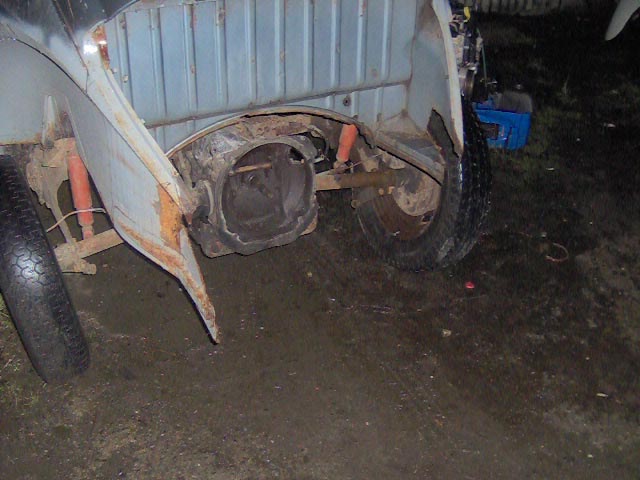
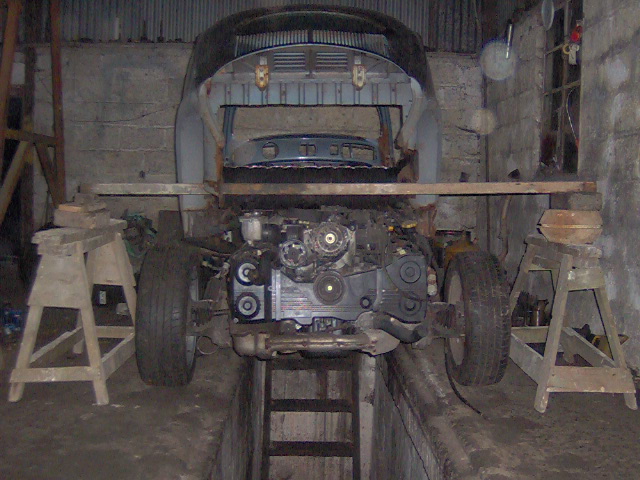
The engine features VW branded electronic ignition, which can be seen screwed
to the firewall on the left hand side. You can also see the black module stuck
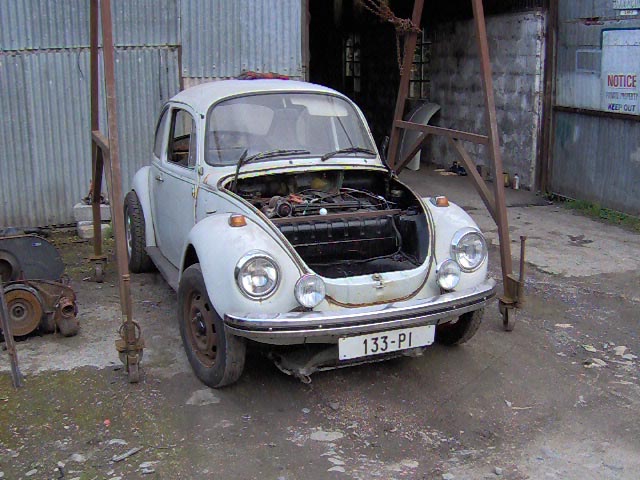
to the distributor too. The car was originally a standard 1303 model, which
would have had a 1300 engine. This is evident from the drum front brakes.
The 1600 engined 1303S model would have had disk brakes on the front.
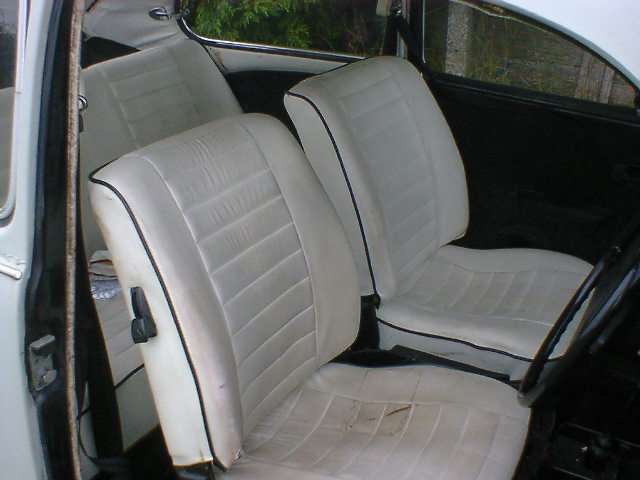
The interior obviously has had some effort put into it, it features
stock seats recovered in white vinyl with black piping. While it's a bit grubby,
there are no tears and it should scrub up nicely. The dash is in good shape
and is uncracked, usually they split in the sun. There are also a couple of
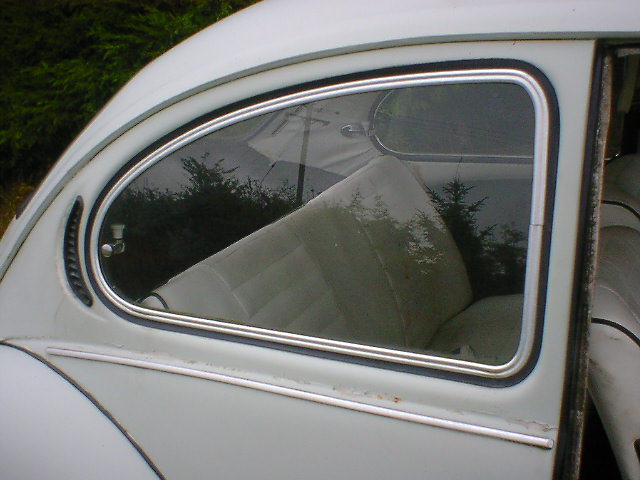
factory optional extras on the car: the rear side windows are aluminium framed
pop-out items, a nice feature that aids ventilation through the interior.
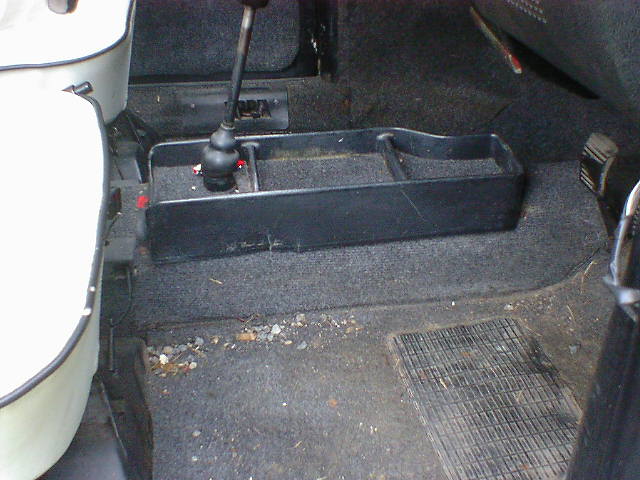
A Kamei tunnel tray is also present in front of the gear lever, a period accessory
that gives a bit more storage space for bits and pieces, to compliment the
glovebox. The car came with a few spares: a window winder mechanism, some
handbrake and clutch cables. The spare tyre is unused. There is also a pair
of spot lamps fitted to the front bumper to aid the stock headlamps. The previous
owner gave me a bundle of books and magazines which included a Haynes manual
for the model and a Robert Bentley service guide.
Immediate plans are to sort out the 45MPH shimmy in the front
suspension so I'll be working from a solid base when modifying it. I'll attack
the existing rust so it doesn't get any worse while I'm working on it. This
car will live outside for a lot of the time. I think I'll leave the engine
in while I'm sorting out the roll cage and radiator etc, and take it out at
the last possible moment. It's easier to drive a car around the workshop/yard
than push it! There will come a point however when it will have to be removed
to fit the engine and gearbox. Once it comes out the angle grinder will get
fired up and a lot of the rear body work will get cut away to make room for
the new motor. All finishing of bodywork will be left til last and the whole
shell will be stripped and repainted. A US-Spec air-con model front valance
will be fitted to keep the front end looking factory-stock while allowing
a good feed of cold air for the radiator. Remember the plan is to keep it
subtle!
|
|
|
|
|
|
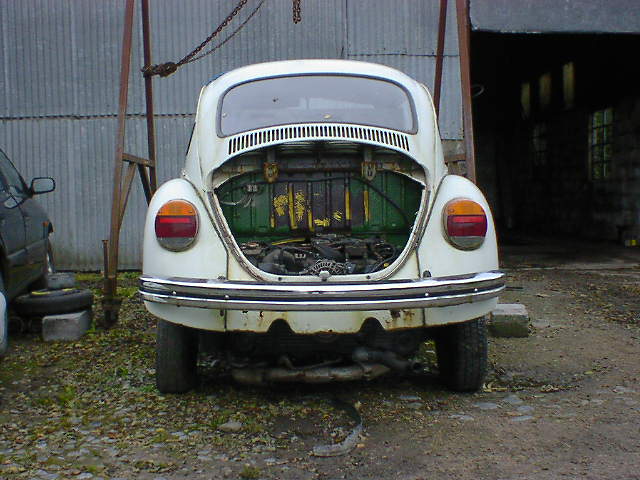
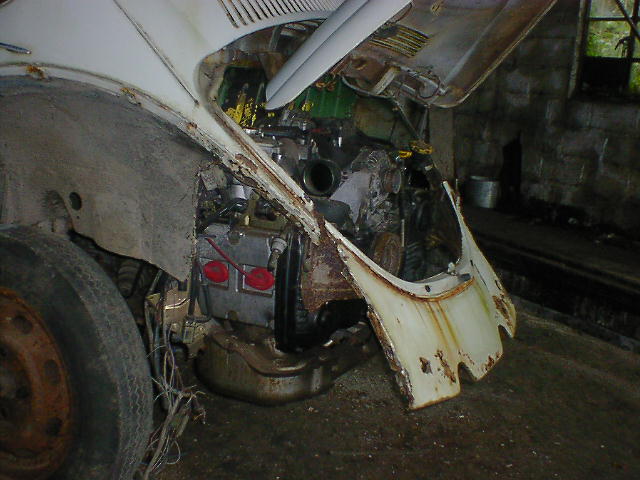
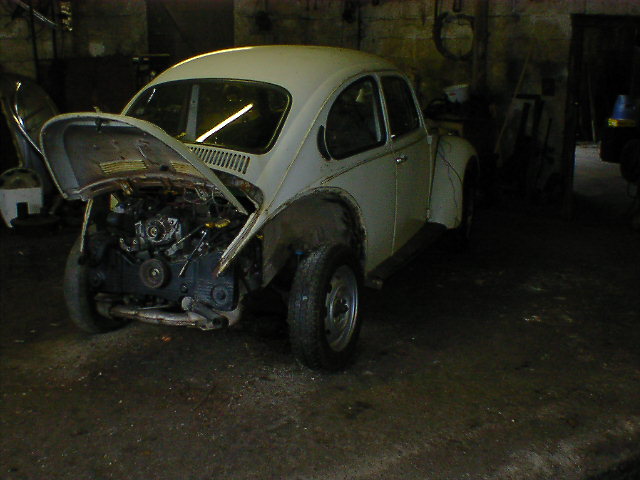
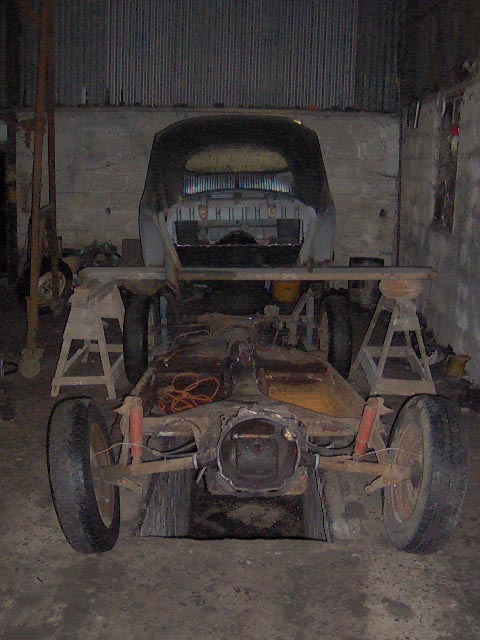
the project begins...
|
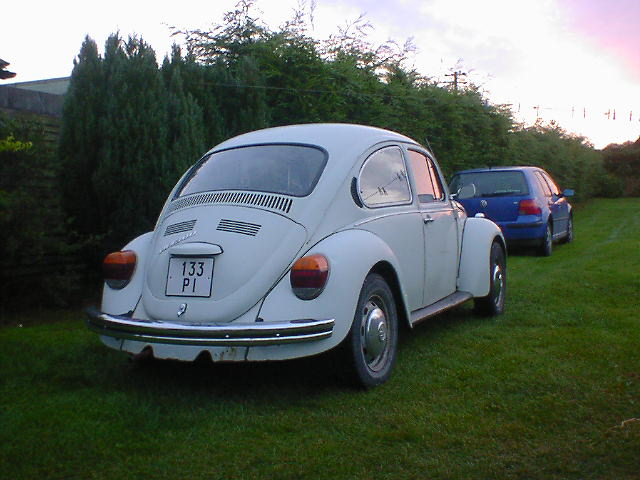
it's in overall good condition
|
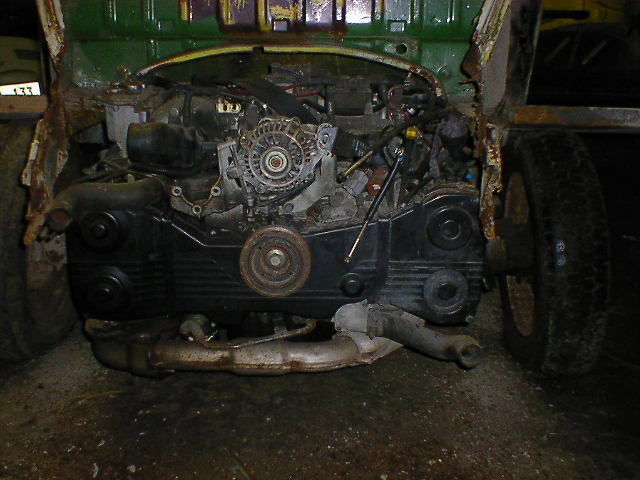
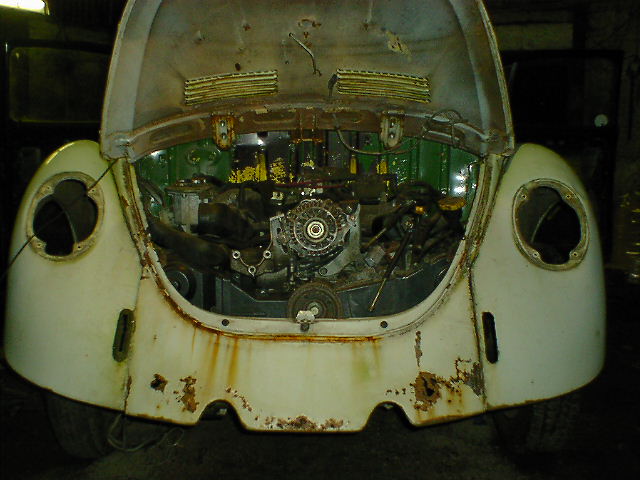
mystery twin port 1200 engine
|
shame the nice interior won't last long!
|
|
|
|
|
|
|
|
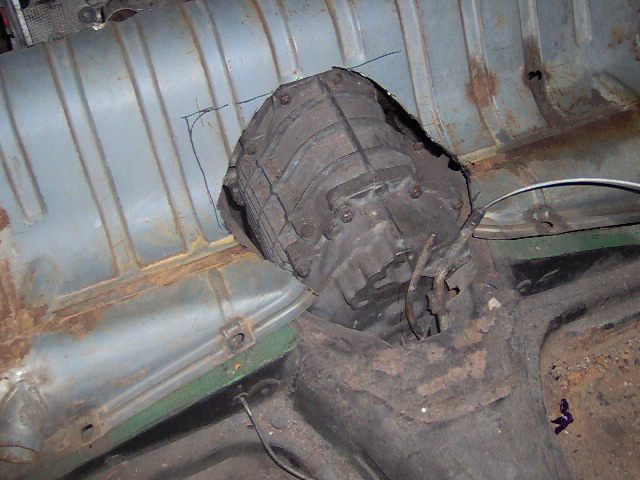
rear side pop-out windows
|
optional extra Kamei tunnel tray
|
|
12-1-2004:
Body/Chassis:
The engine has been removed from the car and sold on to Brian in the
SouthernVolksFolks,
and the Kamei tunnel tray and the rear side pop-out windows have found alternative
accommodation too. The latter have been replaced with standard fixed windows
and trimless rubber seals. The gearbox is also out and waiting for a home.
I have put the word out on the VW grapevine looking for a steel sliding sunroof
section to weld into the roof. I think this is a worthwhile addition to the
car as not many Irish beetles were fitted with sunroofs (the climate probably
had something to do with that!).
After removing the engine and the engine bay tar board, the original colour
of the car was found to be yellow, then green, then black, then white. I'm
thinking of having it repainted in black after stripping back all the old
paint...
23-2-2004:
Body/Chassis:
The gearbox has been swapped for some other parts for the car (namely
a genuine VW "bulge" rear apron) and a 1600 cylinder head for
my other beetle that spat out a sparkplug last week. I have taken the
advice of someone who has already done it and decided not to fit the sunroof
section. Apparently they're a nightmare to seal up properly and parts
aren't readily available for them. So it shall remain a hardtop. After
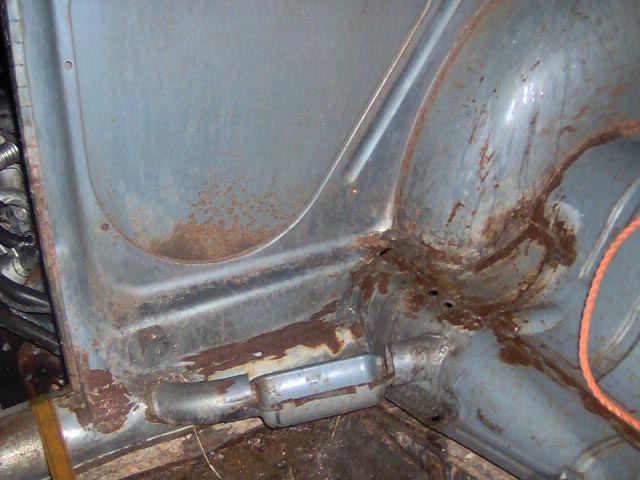
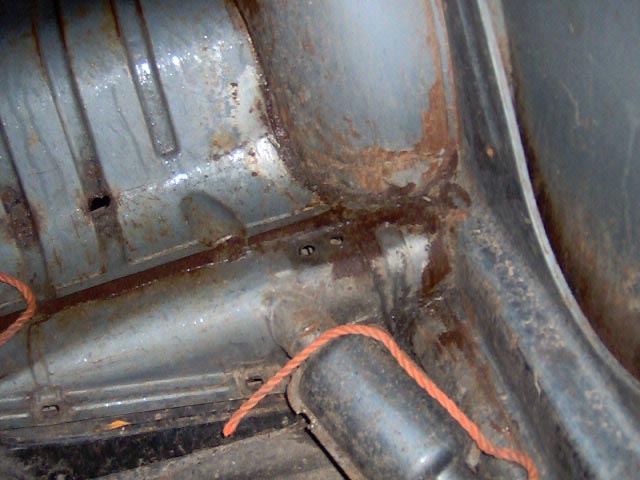
taking a GOOD look under the car, I have discovered a few more rusty spots
than originally seen. There are a couple of perforations in the floor
and previous patch work is evident. Likewise in the rear inner wheel wells.
I am now at a point where I have to decide whether to go through the whole
rust repair thing again (been there with the other bug, it wasn't fun!)
or look out for a better one to start with. If I do I will make sure I
do a thorough search of the underside for rust. Either way, I won't have
lost a huge amount of money on this car, selling the goodies off it made
back some of the purchase price. But I may be back to square one. I could
shell out a load of cash on panels, welding and paint, or I could spend
that money on a solid base car...
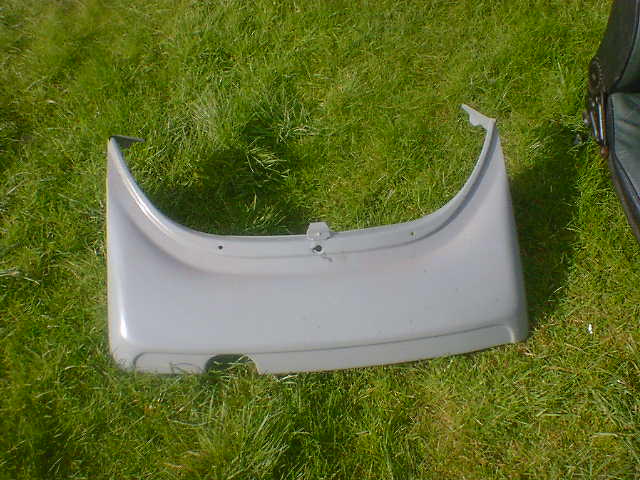
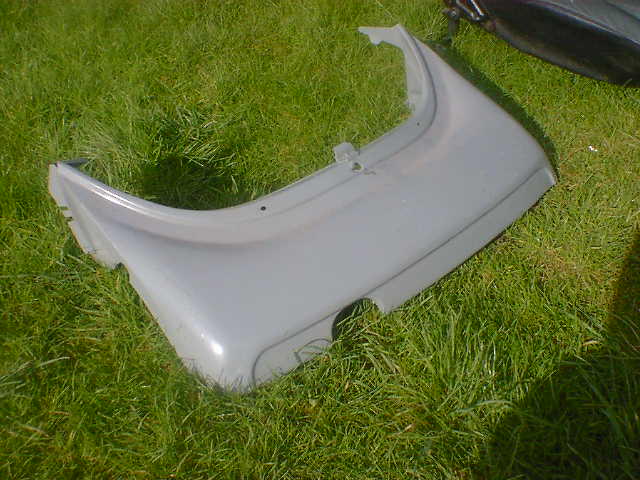
The rear apron is a genuine VW de Mexico rear valance, complete with a
single cutout for the Mexican single peashooter exhaust. It is bulged
to accommodate the catalytic convertor that was fitted to some of the
later exhausts. I plan to widen the cutout to make room for the exhaust
from the Subaru engine.
Interior:
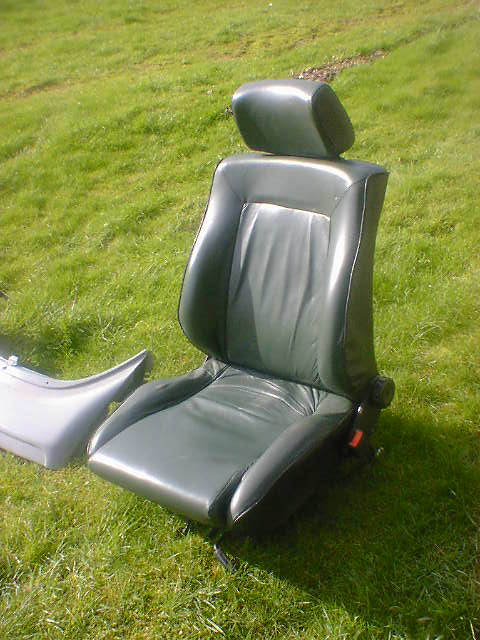
I got a complete set (front and rear) of leather seats from a Mk2 Golf
GTi from an internet ad. They're in 90% good condition, if I can find
a reputable upholsterer, I might get them recovered. However, there aren't
many trimmers in Ireland. The fronts are on 3-point runners, same as the
1303, but the rear legs will need to be narrowed approximately 20mm each
side to fit the 1303 rails. I have to see if the rear seat is the correct
width to fit the beetle. It probably won't be, but it's worth a shot.
The other thing is, they're dark green, and might not suit the colour
I choose for the exterior unless I go for a shade of green. This hasn't
been decided yet, so I might leave that til later!
|
|
|
|
|
VW "bulge" rear apron
|
ditto
|
Leather Mk2 Golf GTi seats
|
25-5-2004:
Body/Chassis:
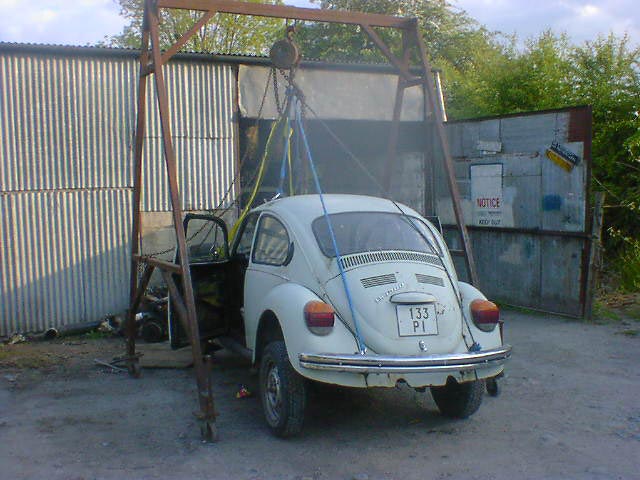
I was at a loose end last weekend and since the weather has picked
up in the last few weeks, I figured it would be a good time to lift
the body from the chassis. I think I'll keep the body I have now,
it does need some work, but isn't the worst beetle I've come across,
and you know what they say: a bird in the hand is better than two
in the bush! So I spent Saturday under the car, removing all the bolts
that hold the body to the chassis. Almost all of these came out fine,
except for two of the captive nuts in the heater channel on the passenger
side coming loose and one of the pair of 17mm bolts on the drivers
side shearing off. This one was MUCH more cooperative than my first
project! There were however, a lot more things holding the body down
compared to a torsion bar bug, like the struts, steering box, steering
idler arm, another pair of bolts hiding under the carpet on the top
of the tunnel etc. It was a bit of a learning experience for me!
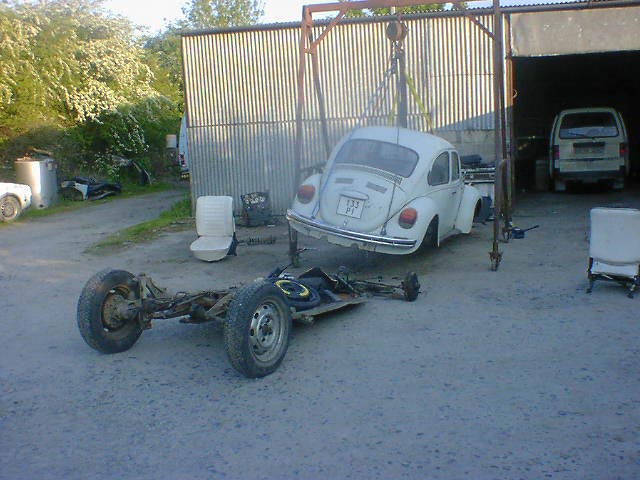
Luckily, my father has a large hoist with a block and tackle for lifting
heavy things, so I put it to good use by tying ropes to the four bumper
brackets and lifting the body enough to drag the chassis out from
beneath it. Once I had the body off and the chassis out, I put the
body back down on some blocks and parked the chassis for the night.
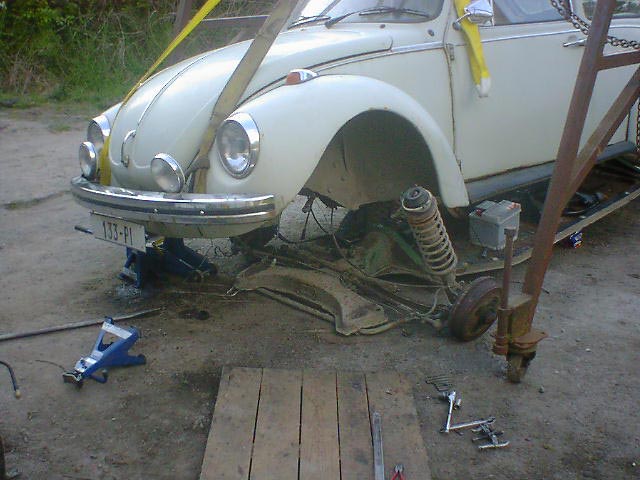
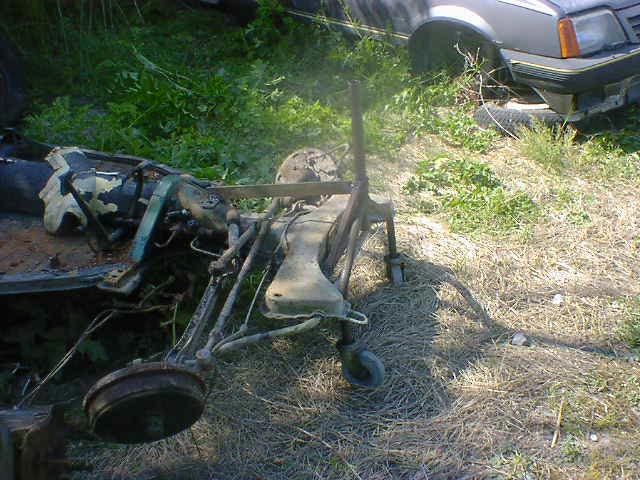
The next day I made up a castor for the front of the chassis to keep
it mobile. The 1303 chassis is different to the torsion bar bugs in
that when the body is lifted from a torsion bar bug, the chassis is
completely independent and capable of remaining on its wheels and
keeping mobile. I suppose this is what made it so popular with kit-car
manufacturers over the years. However, the 1303 front struts, once
detached from the body, are pretty much disabled and the front suspension
just collapses. I removed the struts and using a pair of wheels from
some old trolley or other (donated by my uncle!) and some scraps of
steel that were lying about I fabricated a crude frame that bolted
onto the front of the chassis to keep it mobile.
|
|
|
|
|
|
Lifting the body with the hoist
|
halfway there!
|
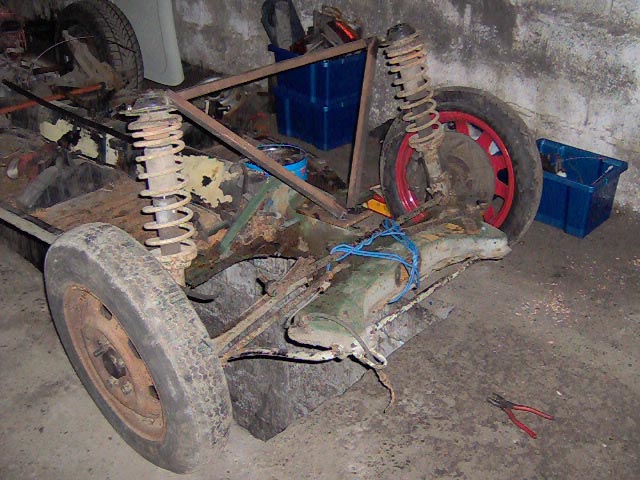
chassis freed from body
|
chassis dragged out from underneath
|
|
|
|
|
|
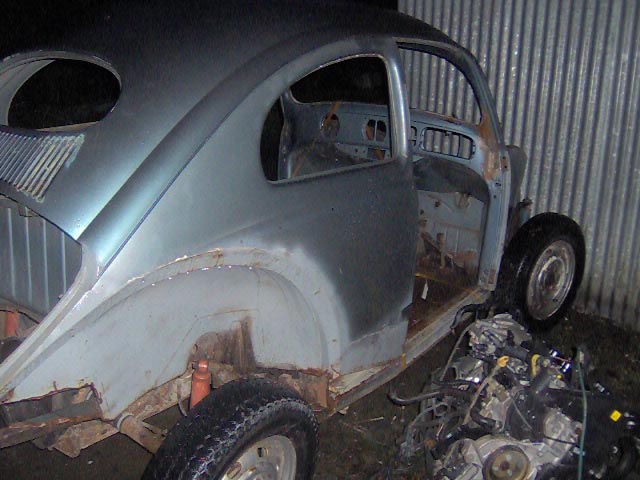
|
the body on its own
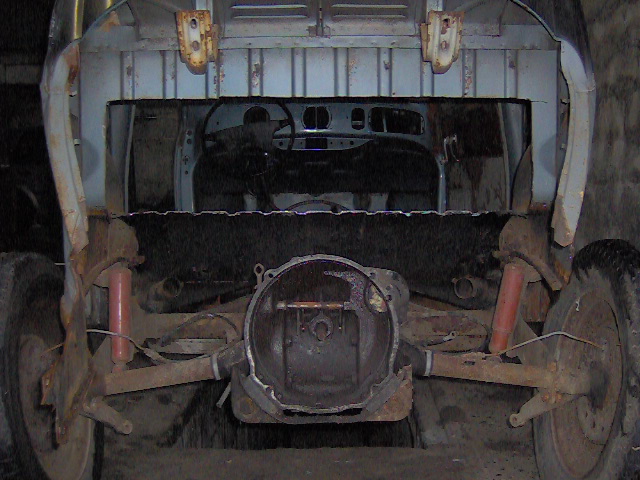
|
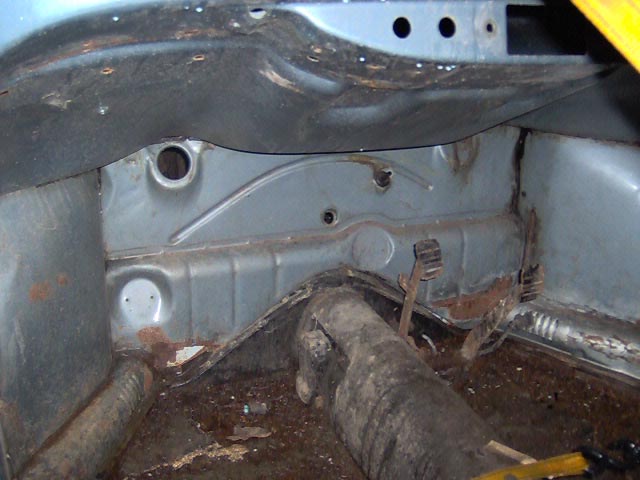
where the 915 box will go
|
will need new floorpans
|
frame to keep front of chassis mobile
|
4-7-2004:
Chassis:
Work has begun in earnest of chopping the bejesus out of the chassis
to fit the Porsche gearbox. For the full lowdown, check the engine-transmission
page...
31-10-2004:
Body/Chassis:
Since I had the engine and gearbox mounted in the chassis, and pushed
as far forward as the CV joints would allow, I figured the next thing
to do was to drop the body back down onto the chassis to see how well
the engine fitted inside the bodyshell. I realise that the CVs are
in fact too far out of alignment and would not work under power, but
at the moment I'm still working with type1 CV joints, and I will end
up type2 CVs which have more scope for movement. If I build it to
work with type1 CVs it will certainly work with type2 CVs.
So, on Saturday morning I pushed the chassis out into the yard and
hoisted the body up high enough to be able to push the chassis in
underneath. With a couple of body-chassis bolts in place at the very
front purely for location, I could see that the bodyshell was resting
on the engine at the back. It was clashing at the turbo, the inlet
throat and at the cambelt covers. To make room the rear apron was
the first to go, primarily to allow beter access but also because
it was catching on the cambelt cover. The engine bay "shelves"
were next, as the engine ancillaries needed room to fit. The bumper
mounts and some of the inner wings followed soon after, to clear the
cambelt covers too, and the vertical engine sealing plate at the bottom
of the firewall was chiselled off. However, even with all this metal
removed, the body would still not sit down properly. The gearbox,
being raised and pushed forward, was interfering with the under-seat
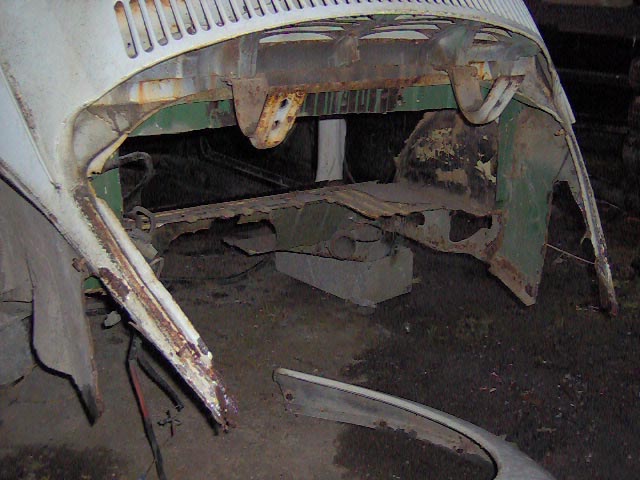
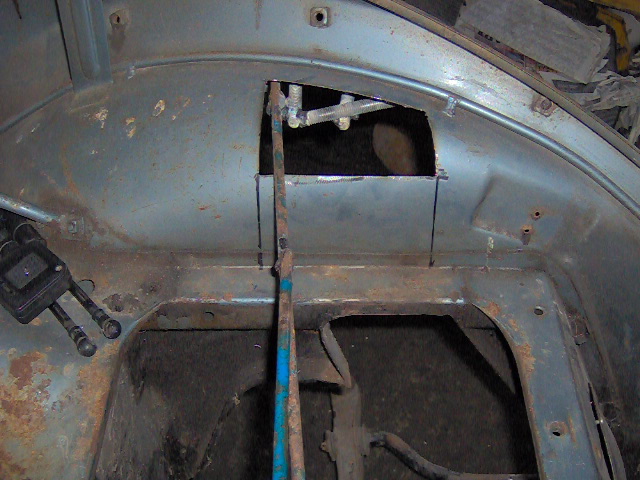
area so a large hole was made to accomodate it. Next to go was a large
portion of the rear parcel space floor and the firewall. You can see
below how much was cut out of this area. I will fabricate panels to
enclose the engine later on. I'm thinking of panelling right behind
the back seat and making a steel parcel shelf at the top of the seat
back, and having all the space inside left open to the engine bay.
It will make for good access to the engine bay once it's up and running.
By Sunday afternoon, I had the body sitting back down where it should
be, the engine and gearbox fully clearanced within the body, the front
suspension loosely reinstalled to make the car mobile again, and a
large pile of scrap metal on the floor! I will have to pull the engine
backwards a bit to ease off on the CV joints (they're even straining
when moving the car around the garage!), but now I can see exactly
how far I can go and still keep the engine within the stock bodyshell.
One of the main constraints with this project is that from the outside
the car should look largely stock except maybe for the wheels. To
get the gearbox back a bit, I will have to extend the gearbox mounts
to support the Subaru engine mounts, but that'll just involve welding
another plate on. Once I'm happy with the location, I will remake
the prototype engine mounts for final use. I also still have to make
a front gearbox mount, I was leaving that til I knew where the front
of the gearbox was going to be!
|
|
|
|
|
|
Dropping the body back down, it is resting
on the engine. Guess what, it won't fit!!
|
the body needs to be dropped a lot more
|
the rear apron was first to go
|
followed by some of the inner wings and the
vertical engine sealing plate
|
|
|
|
|
|
|
then make room for the gearbox
|
and create a huge hole to clear the rest of
the engine!
|
apron offered back up to check that everything
is contained
|
fits within stock body panels
|
|
|
|
|
|
|
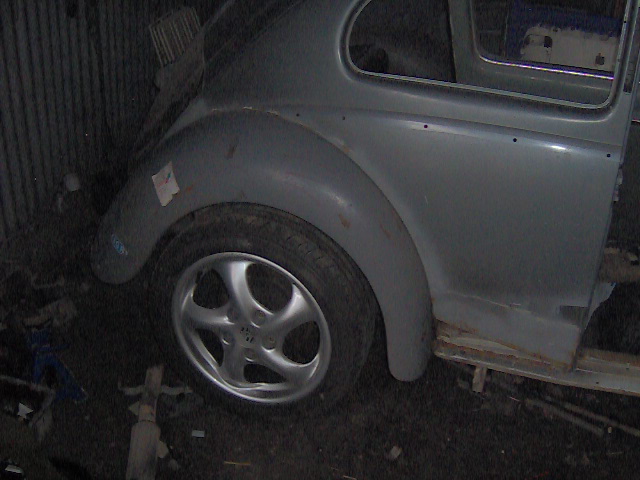
monster garage, Irish style!
|
lid closes like it should
|
loads of ground clearance
|
no need for shortened sumps here!
|
4-7-05:
Body/Chassis:
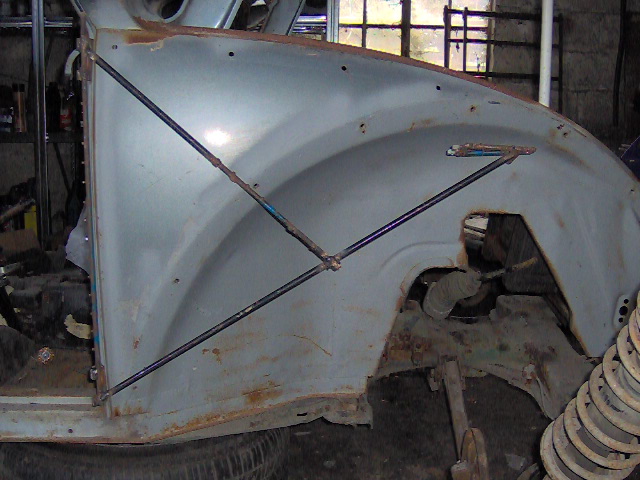
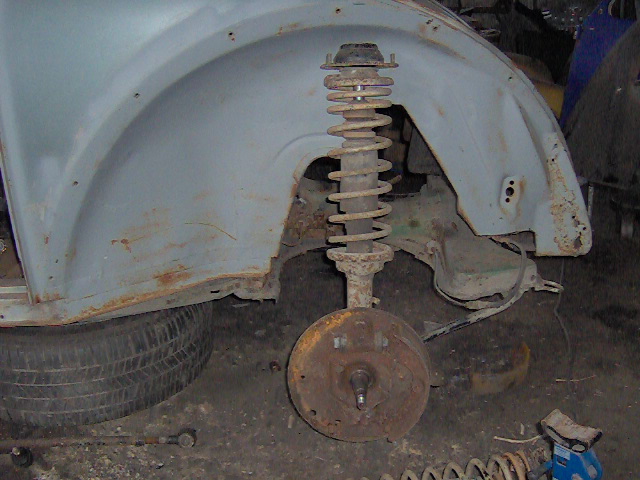
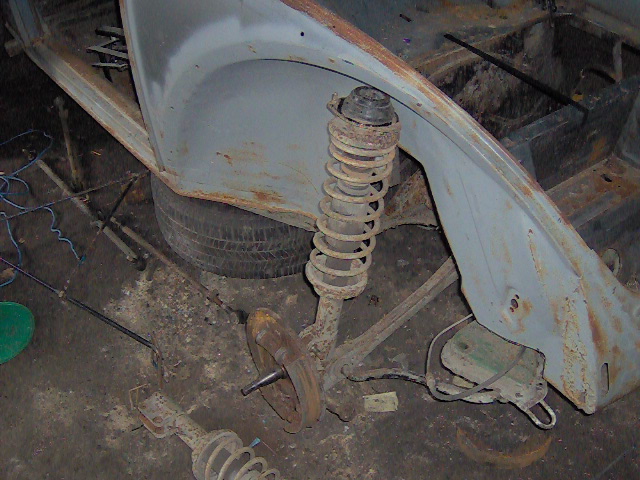
The time has finally come to make a front gearbox mount and properly
make the rear engine mounts. First thing to do is to take the body
off again. Since the front suspension collapses when the body is
lifted and last time the chassis wasn't exactly mobile with the
body off, I decided to build a frame up to support the struts. I
made a brace to go between the strut tops before lifting the body.
This ensured the distance between them stays correct when the body
is off. When the chassis was freed, I welded in some diagonals to
brace the struts front to back and tied the steering arms in place
with some wire.
|
|
|
|
|
|
Body being lifted from chassis again
|
Brace made between strut tops before lifing
body...
|
...and incorporated into a frame to support
struts when the body is off.
|
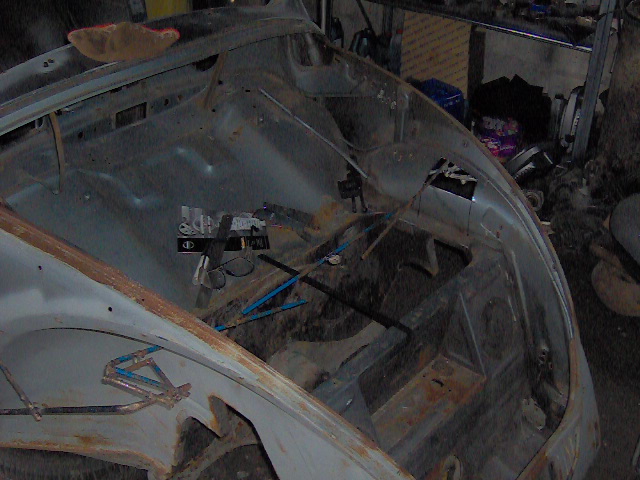
A better look at the space made to fit the
engine.
|
30-12-05:
Body:
After months of trying to find the time, I collected the '54 oval
window bodyshell I had agreed to buy from a guy in Wexford (Hi
Barry!). I bought an A-frame and hooked it up to a bare '71 chassis
I have and towed it to Wexford in the rain. The 50 mile journey
took ages due to a binding brake shoe and a kerb-side bodge to
secure a front track rod in place using a key-ring! It was well
after dark when we collected the shell and after lifting it onto
and strapping it down to the chassis we set out for home. The
next day when the rain had stopped I took some snaps, below. The
body is still on the '71 chassis but will soon have its parcel
shelf cut out and the rear body mounts altered to fit over the
1303 chassis. I intend to fabricate a subframe inside the front
bonnet area to tie the strut tops together and support the front
suspension. The geometry will be measured carefully from the 1303
shell to ensure it is consistent in the swap over, except for
one difference: I am using the Porsche 944 front spindles and
the positive camber they create when bolted directly to VW struts
will be taken back by tilting the struts further inboard. This
involved making the strut top mounts closer inboard.
|
|
|
|
|
|
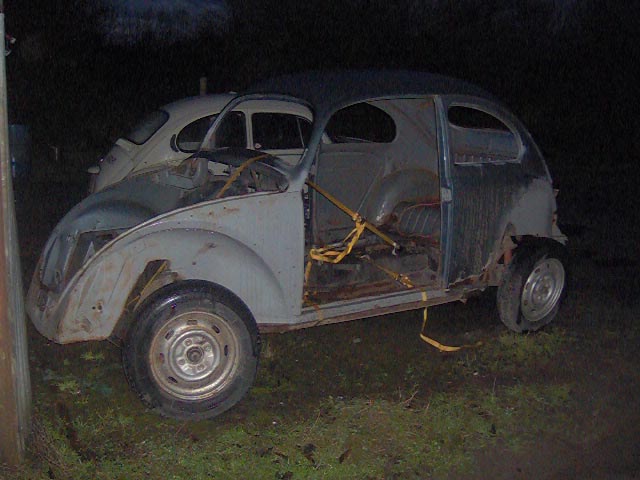
The '54 shell, the 1303 shell is in the
background
|
It will need some minor rust repairs
|
One of those minor rust repairs...
|
...another...
|
|
|
|
|
|
|
...and another.
|
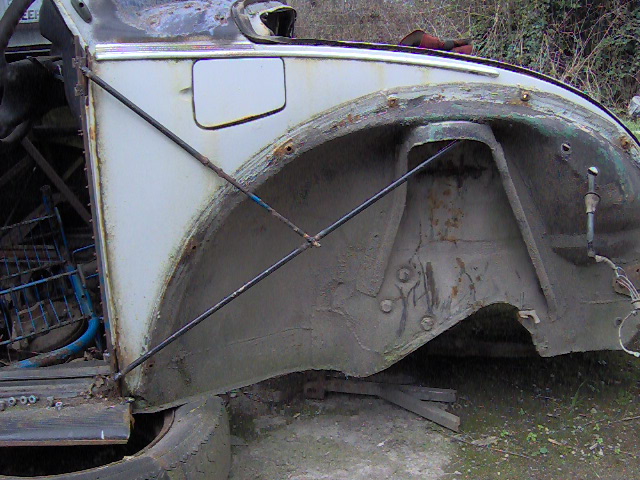
The front quarters had already been cut
and welded to clear a narrowed beam.
|
The rear bodywork was cut off to facilitate
an abandoned concourse resto.
|
More repairs needed here.
|
12-2-06:
Body/Chassis:
After measuring the required hole from the 1303 shell that I
had already cut, I made the incision in the oval shell. I did
have a pang of guilt as the grinder made its first bite into
the perfectly serviceable 52 year old metal, but that soon passed!
Once the large rectangular hole had been cut, I propped the
shell up on some saw horses and rolled the '71 swing axle chassis
out from underneath. Then the 1303 shell complete with Subaru
motor was pushed under and the body lowered onto it. Once wrestled
into position, I could see what material needed to be removed
to make room for the front end of the gearbox. The rear body
mounts on the oval shell are positioned lower on the rear quarter
panels than the '70s bdyshells, so they had to be removed and
will be repositioned higher up at a later date.
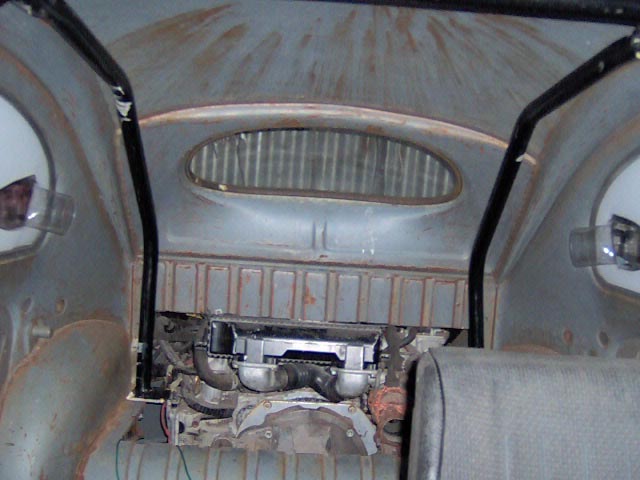
With the body settled down where it should be, I refitted the
intercooler to the inlet manifold to see how it fits. The plan
is to install NACA ducts that I bought from Ebay into the rear
side windows to feed cold air to the intercooler. If this doesn't
work out, I'll investigate a chargecooler.
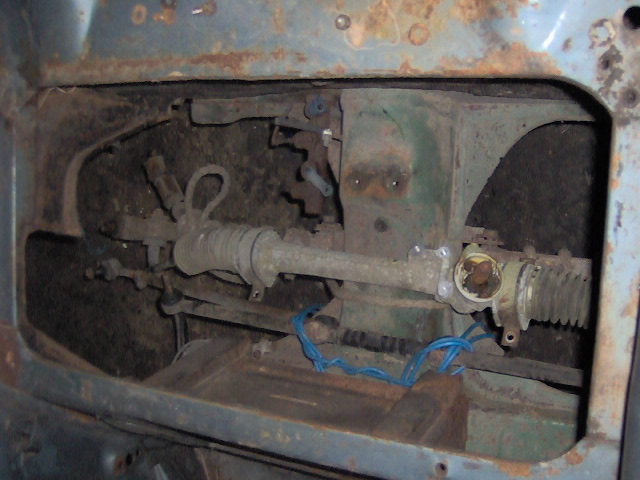
Since the body is LHD, I'll convert the chassis to suit. The
1303 steering gear was fitted to the body while the oval steering
gear was fitted to the front beam. This car has neither a front
beam nor mounting points on the body so I figured a steering
rack on custom mounts was the way to go. Eoin from Cork donated
a scrap LHD mk2 golf non-power steering rack to the project.
It was only when I got it home that I discovered that it won't
work: the steering arms on the golf are behind the spindle,
the steering arms on the Porsche brakes are in front of the
spindles. This means that if the steering wheel is turned left,
the wheels will turn right. A RHD rack fitted the "wrong"
way round will solve the problem for me. The golf rack looks
like it will do the job, it's close to the right width. I plan
to cut the last few inches from the stock 1303 track rods and
sleeve them onto the rods on the rack. That way I'll retain
the correct track rod ends and the correct amount of adjustability.
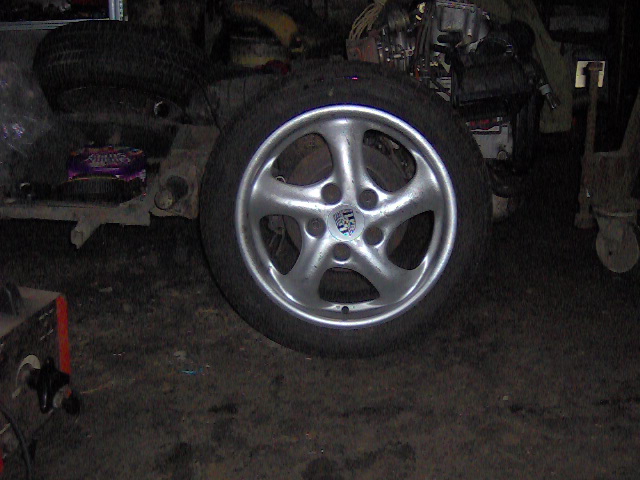
Another test wheel has been sourced from Ebay, it's a Boxster
17" cup front wheel. With a width of 7" and an offset
of 55mm, it fits nicely with no fouling on the rear. I reckon
I can even go for deeper offset wheels with no need for spacers.
|
|
|
|
|
|
After cutting a similar sized hole in
the parcel tray to the hole in the 1303...
|
...and lifting the body off the temporary
swing axle chassis...
|
...the oval body was lowered over the
1303 chassis.
|
The rear cross-member had to be clearanced
for the transmission.
|
|
|
|
|
|
|
And the rear body mounts were removed
to allow the body to sit where it should.
|
You can see now why such a large hole
was required. The intercooler is right up there
|
A mk2 golf steering rack was offered
up for size.
|
Another test wheel: Boxster 17"
twist.
|
17-4-06:
Body/Chassis:
This weekend was spent making a jig from the 1303 shell to
transfer the strut top locations to the oval shell. The furthest
forward point that is common to both the 1303 and oval bodies
is the door pillars and on the pillars are the door hinge
mounts. Since these are in the same place they make for a
convenient point to base a jig from. The first thing to do
was to weld a rod between the top and bottom hinges of a pair
of scrap doors to preserve their location and orientation
in relation to each other. Then a brace was fitted to the
strut tops inside the bonnet area to locate the strut tops
in relation to each other. From there, another brace was welded
to the door hinges to pick up the strut top locations from
the underside. This resulted in three pieces of the jig that
locate the strut top positions in relation to the door hinges.
All that was left to do was to mark the centre of the strut
top jig as the jig was free to move a little side-to-side
when in the oval shell.
Once the jig was made, it was unbolted from itself and the
1303 door pillars and offered up to the oval shell. From the
outer portions I could estimate where and how much of the
front quarter panels had to be cut out to allow for strut
top plates to protrude through. These will be laser cut from
5mm steel plate and welded to the frame that will be fabricated
to fit over the tank under the bonnet of the oval.
I also trial fitted one of the rear wings over the boxster
wheel. it sticks out beyond the wheel arch lip by about 25-30mm.
I will need to buy or make wider wings for the rear at least,
but more than likely for the front too.
|
|
|
|
|
|
This is the centre portion of the
jig in the 1303 shell...
|
...and the right side piece, from
the hinges to the strut top.
|
Transferred to the oval shell.
|
This is where the strut should end
up.
|
|
|
|
|
|
|
Ditto.
|
The three pieces of the jig bolted
together in the oval shell.
|
A hole was cut in both of the front
quarter panels.
|
Rear wing trial fitted.
|
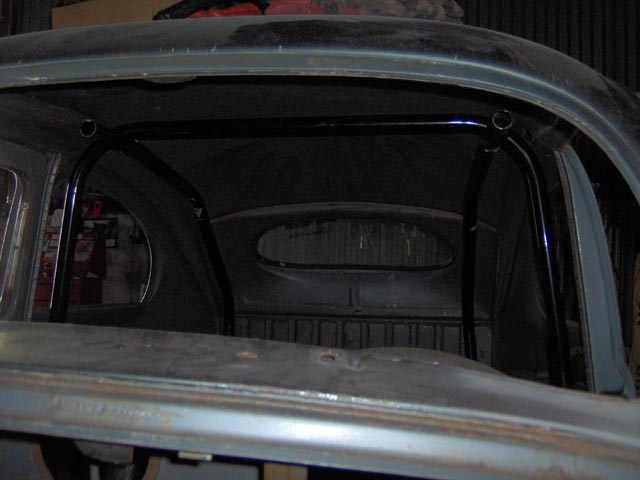
11-5-06:
Body:
I picked up a 6-point roll cage from an ad on Volkszone,
thanks to Dave Wheatley of the Ireland
Aircooled Centre for delivering it for me! After getting
it home I trial fitted it to the car to find that while
the rear section fits nicely, the front section conflicts
with the roof reinforcement above the windscreen. I reckon
this is down to the oval having a smaller windscreen than
a '70s bug and consequently larger reinforcements around
the windscreen. I think a couple of inches less on the front
legs of the cage should sort it out and bring it back into
line. Having the cage installed will allow me to tie the
front suspension frame into it and make for a 8 point cage!
|
|
|
|
|
|
6 point roll cage
|
ditto...
|
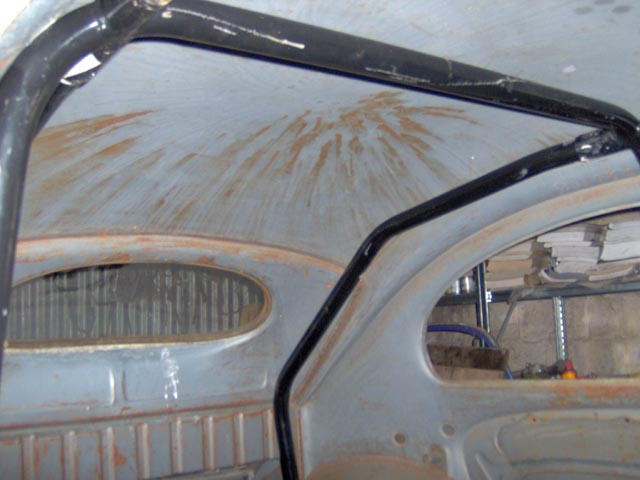
rear part of cage trial fitted
|
just enough of the rear shelf to
fix it to
|
|
|
|
|
|
|
front portion wouldn't fit
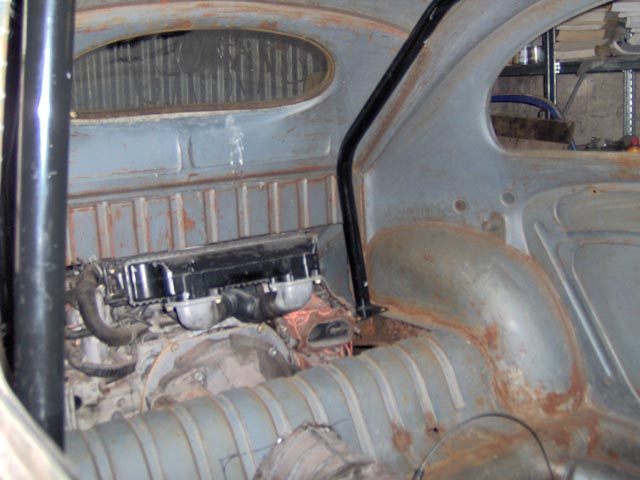
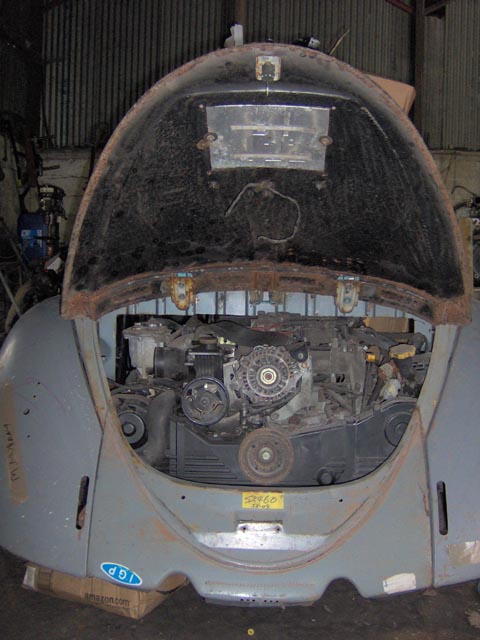
|
engine completely within stock body
panels
|
rear apron clamped in place
|
anyone got a "W" lid for
me? ;-)
|
28-5-06:
Body:
This weekend I made some perspex rear side windows for
the oval as I need to get fresh air to theintercooler
and a pair of NACA ducts seemed like a good way of doing
it. It remains to be seen how effective they're going
to be, but if they're not up to much I can always put
glass windows in and try something else. I used a stock
glass window to trace a template onto a sheet of perspex
and then after marking out the INSIDE of the NACA duct
on the perspex I cut the hole for those. You can see them
taped in place below, I still have to decide whether to
bond or bolt them in place. In the absence of proper window
rubbers I cut down some old '70s rubbers I had spare to
get them trial fitted. All is fine and should be fine
when I get the proper rubbers. I'll need to get some hose
to suit the bore of the ducts and make some kind of shroud
to cover the intercooler and accept the hose. Bigger fish
to fry at the moment though!
|
|
|
|
Perspex windows and NACA ducts
|
They shouldn't interfere with
rear seat passengers...
|