EQUIPMENT and PROCEDURES
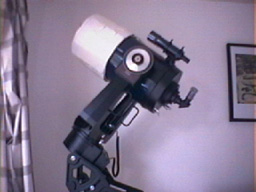
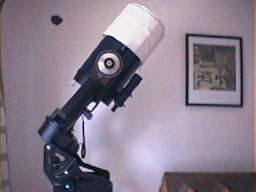
Meade 10 LX200 F10 on Super Wedge.
Dew Hood is just a white card and probably dosen't help with stray light.I
have since moved on to a plactic dew shield.
This page is quite long but it gives an idea of how things went during my
first 6 months.
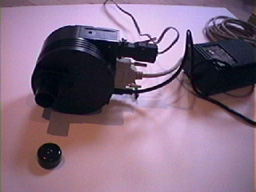
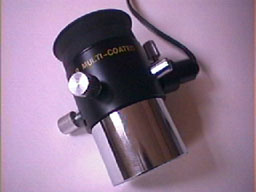
SBIG ST7 showing the cables and power supply.
My first and only CCD and well worth it.
As of April 3rd, 2000 my setup has become permanent one, check out my 'Observatory' page for what it looks like. Prior to this a portable setup was used, utilising the Meade Tripod and Super wedge. I timed the operation once and it took about 90 minutes to get up and imaging.
Recently....late March.2000...during a spell of good weather I left everthing out for 5 nights running....covered in a big plastic bag. It made life so much easier. I could be imaging in 15 minutes after arriving in from work.
I could also cheat on the flat frames...and use the ones from the night before if necessary.
I could also tweak the alignment a bit better. but even still I could slew 60 degrees round the sky and still get an object in the field, well at about F3, with the reducer I could!
What follows is a run through of what it is like to set up a portable operation
and I can wander a bit.
But if you can stick it out you will get an idea of how I do things.
Portable Setup :
It takes 30 minutes just to get everything into the right place with everything
connected and ready to power up the telescope, camera and laptop.
I turn on the laptop and camera and set the temperature to -30.
The colder the camera opeates the less noise generate within the chip.
If you don't understand noise in a CCD Image think of taking a group of school
children out in the yard to listen to a bird singing. The bird will be singing
and the children will be fidgeting...just as children do. Well if you cool
the children down by 30 degrees.....they all get much quieter and now you
can hear the birdsong without all the childish chatter.
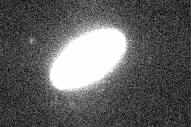
Noise appears in CCD images as a grainy effect. See some of the Extragalactic
images....lots of noise!
Setting up the scope:
I level the scope....and have bent the friction knobs at the base of the tripod over time...they warn about this in the manual but who reads the manuals...!
Question 1:
I set the RA to 0 and the DEC to 90.
I have tried this 2 ways and can't see if it makes any difference
I can align them before I turn on the scope or after I turn on the scope.
Either way anyone who has turned on an LX200 will know that the RA
will turn some amount, I believe it is searching for the zero point on the
RA cog.
Why am I confused......well on page 21 is of the Owner's manual it says Set
level, Set Dec to Zero and then
set RA to 0....(Altaz align, I know) and then power up. Then in page 33 on
Polar align it says .....Power up, set level, set Dec 90 and set RA 0.
DOES IT MAKE A DIFFERENCE.....I know one is polar and one is Altaz, but do you use the keypad to reset RA and set the dec to 90 before I hit the Enter Key prior to the slew to Polaris.
Answers please if any one has any ideas.
(03/2000) Email received suggest that powering up after setting the locks......and not locking them up too tight is the best way to go.....they find Magnetic centre and compensate for local time and location ( John Polhamus)
Thanks John

Now to continue the setup
It is handy to have something to PRISE the RA lock with.
I find that my fingers get sore. I keep a teaspoon handy in my pocket.
But since John's email....I only lock them enough to stop movement!
 The
DEC set to 90
The
DEC set to 90
It results in the scope
being upside down and
poining back over you head.
Now I align Polaris using only the adjustments on the Wedge.
I have to admit not to having a tangent arm. It will be here soon, or so I have been promised. I do not want to get into a discussion over Meade or the suppliers.
When my wedge arrived, it arrived without any of the bolts, nuts, screws etc....only the wedge itself.....That was November 99.
(April 4th 2000 The permanent pier has a tangent arm built into it...)
Alignment then becomes a matter of getting Polaris into the viewfinder and from there into an eyepiece and then into the centre. Without the tangent arm I have to 'hump' the wedge around, probably upsetting my levels.
I then use an Iterative method I found on Philip Perkins website.....LX200
Polar Alignment....Iterative method....
After you slew to the second star and centre it with the keypad....you return
to Star 19 (Polaris) and move Polaris back half way to the centre of the scope.
Then slew back to the second star. It's handy to find it's number in the Catalogue
at the back of the book, because you can just enter Star XY , GOTO and the
the same when you are working back to Polaris.
Oh Yes.....another interesting bit....I am not focused at this time....I am centering doughnuts....When I shutdown early in the mornings, I just remove the Camera and and palce a 26mm in a Right Angle Prism, so when I start again the next time, I am reasonably close to focus. I then switch to a 9mm iluminated reticle for the last stage.

I had great fun trying to get the reticle centre, within itself, in the dark,
until I tried it by day and it was easy.....just a little tip.
Having this doughnut staring at me also reminds me to check the collimination of the scope. But that requires a fiddly little allen key that always seems to get lost.
My pocket normally conatins a torch, a small long screwdriver, (to screw in the various cables on the ST7), the allen key for collimination, the teaspoon, another allen key to release the screws in the Superwedge, a Small socket and wrench for a nut that fits on the cetre bolt up from the Tripod, sweet wrappers and biscuit crumbs.
(note another bit missing, the knob for the top)....I am also missing the compass....but after so long without one I have a good idea where North is.
A Kendrick Colliminator is on my wants list, but then so is an electric focuser....
Question 2: Anyone any suggestions on either of the above.
Time to put the ST7 onto the Telescope:
I am now about 1 hour into setting up
 On goes the ST7...cables sticking UP.
Now that I have the scope reasonably aligned I put a simple card over the
end on the telescope.
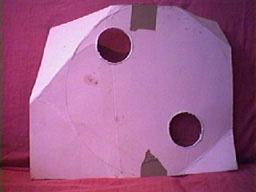
The Mark I version:
Two holes make for two images and I focus to
make them merge into one. It seems to work relatively well but it is getting
a little bashed up.
The Mark II Version:
Again thanks to John Polhamus: and
http://cometman.com/Mask.html
I think the triangle was meant to point inwards....but we all make mistakes!....the idea is that you can see what side of focus you are on and when you pass through focus the triangle flips to the other side. I hang the focus screen over the front end of the scope, aligned roughly N/S.....that way the Triangle is on the top of the image...(S for my camera setup). Then I wind the focus knob back....clockwise...about a full turn...and then bring it back anticlockwise until I feel the mirror starting to 'pull'....I can't think of a better term'....
Try it.......You'll like it
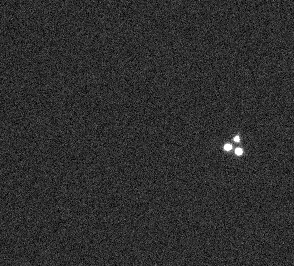

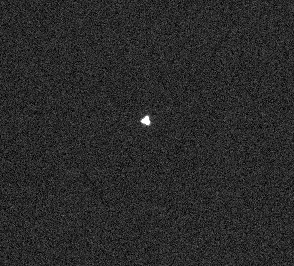
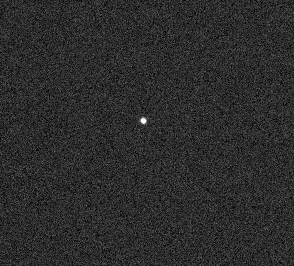
Here are 4 images taken while focusing the LX200 anti-clockwise to focus. This is the last stage of focusing, done on as dim a star as I can image, at 0.11 seconds and using the Planet mode in Hi Res. In fact this focusing was done on Regulus through 7/8ths of thick Stratocumulus.....So there is something to do while waiting for the skies to clear!!. The images themselves are reduced in size from the original , and I also use the Magnify setting on the focus panel to get things as close as possible to perfect.....OKAY...well I am willing to spend 10 minutes running in and out to twiddle the knob...No autofocus yet.
Another note:.....see the way the image has moved across the screen from right of centre until it's just in the middle... is this the dreaded image shift we hear about on SCT's..
I then try to remember to take it off.
Question: Balancing the scope:
I don't......another thing on the wants list....actually right at the top.....a
set of weights and a method of fitting them.
Why haven't I already...I hear you ask....Well I am only a slip of a lad...50
Kgs...and the scope is heavy enough as it is. Anymore weight on board and
I will be taking it to pieces to carry it in and out.
As it is now.......I have spent about 1 hour just setting up, and the thought of the extra 15 minutes to put the tripod and wedge together, including the extra weight in my pockets for more sockets.
The weights will have to wait until the permanent pier is in place, and I am not putting 1 picture of a hole in the ground on the site yet.! As of today March 20th...the hole has been filled with concrete....now the next step.
I use the Meade Epoch 2000 software to control the scope from the computer.
I start the program, tell it to goto the current telescope coordinates, normally
a prominent star and then I SYNC the two. A handy feature for finding things.
In fact it seems to take me for ever to find objects if I don't regularly
SYNC the program to the actual image.
This is probably a function of incorret balance, and inaccurate alignment
than faults in the program.
I don't even want to think that the telescope itself might be off in some way....that's for the future and for T-Point and the SKY software after the Pier goes in.
I pick a reasonbly bright star...Mar 4-6.....not too bright and using a method
found on the WEB...I have the page but not the address....but jhall@uci.edu.....is
to blame....to use the CCD to check the drift alignment. By exposing for a
few seconds....then stopping the Drive by holding down the E button, set to
Guide rate...for another say 10-15 secs...and then holding down the W button
for the same length of time, speeding the drive up at 2 x rate....gives an
image on the screen which if correctly aligned will be a single line......any
split in the line indicates misalingment.....I can correct this without taking
the ST7 off the scope....a great boon. Taking an image to the S corrects for
E/W misalingment and then taking an image to the East or West corrects for
Up/Down misalignment as in the Manual Pages 61-62.
Thanks ....jhall@uci.edu.....It does work...and thanks for taking the time
to put it out there.
Now I am reasonably aligned and resonably focussed....Time taken....nearly an hour and a half....
GET THE PERMANENT MOUNT FINISHED...I hear you all shout!!
(April 4th 2000....It is......see the observatory page.)
Two pieces of equipment I have that of yet are not getting a great amount of use are a Flip Mirror and a Focal Reducer
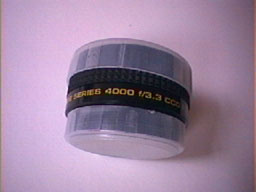
The focal reducer is the best thing I have bought yet, as far as bit and
pieces
are concerned. I have recently been using it more and more and apart from
getting a wider field of view, the exposures can be of longer duration, up
to 5 mins, without too much drift noticable on my portabel setup.
I can't wait to get the permanent operation going!
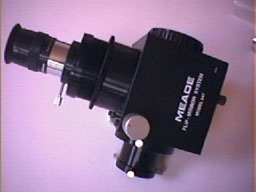 The
flip mirror tends to bang into things, like the base, and I don't have any
facility yet to stop the telescope from slewing into a position that will
cause problems....Maybe Epoch 2000 does it but I haven't found it...but I
know The Sky software will do it.
The
flip mirror tends to bang into things, like the base, and I don't have any
facility yet to stop the telescope from slewing into a position that will
cause problems....Maybe Epoch 2000 does it but I haven't found it...but I
know The Sky software will do it.
So until that is sorted out. I tend to use it only when working on the planets....and again it adds an extra moment arm to the scope and remember I am still unbalanced.
CCDOPS: the program that comes with the ST7
The first time I used it I went imaging the planets..the most obious chice for a beginner...and found that only a 0.11 sec image was necessary, that a bit of playing around with the background and range had an effect and that Auto in the processing box just gave me a big splurge.
Okay....more to this imaging that meets the eye......But after a while of fiddling and taking images lo and behold I found Jupiter...
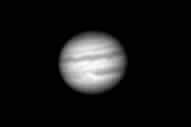 220999.....01:38:37.....
1 x 0.11 sec exposure.....in High Res with Auto Dark
Processing: Sharpen 2, Crop quarter.
And was I happy.
.I was use to seeing it in colour....It was fuzzy....Not really focused....and the scope needed collimination......but it was a start.....
After an hour or two of playing around...what struck me about this CCD Imaging was that not only were images appearing before me on a screen.....but I was getting to keep the images as well....wow....and after the rest of the family OOHED and AAHED at what a mad husband and father were up to, and then left me on my own to ponder, I became happier with the results.
No they are not magazine quality....nor are they of the quality I was seeing on the SBIG User Group....but then a start has to be made somewhere.
 :
:
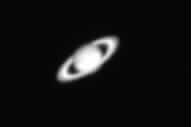
Now on to Saturn......Here is the Unprocessed Raw image:
1 image taken in High Res and 0.11 secs long with AutoDark

Here it is with the Auto Processing ticked.
And with a Planetary, Hard Sharpen.
And now with the Back at 1664 and Range at 5705.
Not a bad first effort: even if I have to say so myself.
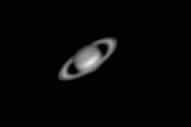
Now as time has moved on...(October 2000) I have learned how to make even better planetary images.
This is an averaged image of Saturn.....taken in Hi Res at f10 ....12 images....cropped
and then average using the average function of CCDOPS.....I still have a way
to go.....the more images I can average the better.
And here is a averaged image of Jupiter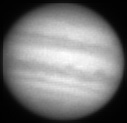
I don't know enough yet to explain all the intricate details
of CCD imaging
But I after about 6 months of using the ST7 what can I say.
I don't use the Filter or the AO so I don't need to consider them yet.....but I hope to....!!
I spent quite a bit of time using the pull down menus until one day I found the Show Icon Bar in the Edit Menu...that made life a lot easier. You can get out of the Focus mode into the Grab mode much quicker...!!
I still have all the preferences set so that it reminds me about saving images...I had a habit of forgetting, and it adds whatever extension it adds to the image files....the .ST7 bit....
In the Help section of preferences.....it mentions Mouse in Focus .....where
the mouse is a bit slow moving around...
but I never found the selection to tick to free it up.....maybe a different
version.
The Camera Menu is common sense and the manual explains it well......the shutdown option is worth following.
Histograms.......will I ever learn to understand them......they present you
with a graph of the pixel values in the image.
when I get to understand Image processing I might be able to explain more.....but
at the moment I tend to just vary the Back and Range values to get a pleasing
picture.
Parameters and Modifications......a list of when, how, what, but not why things have happened.:)
Utility covers a range of items, more than appear if you right click the
image.
All of them make sense very quickly after fiddling around with them.
Misc is what it says it is.
And Last but not least.....the most important menu...at least to me at this stage
.....the Track Menu
Calibrate is the first one to go to.......if you don't calibrate....well then nothing else works except for a quick planetary image.
But I wish I understood it better: I am sure a whole book could be written on this stage.
I select a field of stars with 1 reasonably bright star in it.......set the
exposure time to get an unsaturated image.
I set the X and Y times to 2 seconds and after checking that the slew rate
is set to guide..I set the dec;ination of the star snd then.I start the process.
The program moves the scope between each image and records the movement in the relay speeds section of the Tracking parameters.....
I have noticed differences, probably based on the balance of the scope in the Y axis and also probably due to the backlash setting....which I am still not sure is set correctly. I also don't know if the backlash setting in the Tracking Parameters overrides the backlash setting in the LX200's command set. I imagine that these differences I notice may have effect on the relay speed if I change declination significantly....so I tend to recalibrate if I move very far accross the sky.
Onto Tracking Parameters.
Active directions set to ALL: I haven't even tried experimenting here yet....but the None setting looks like a good way of checking the telescope uncorrected guiding performance as mentioned briefly in the manual....pity it dosen't tell me more on what to look for when it comes to performance....!!
X direction...leave at forward....
Agressiveness....I only tried changing this once....and during track and accumulate the X and Y errors went up and down all over the place. Minimum and Maximum move I have left alone for now as well.
So where have I got too:
Check out the few images I have posted.
Not as far as I though I would, 6 months ago.I am still on a very steep
learning curve and each time I take the equipment out it a huge a learning
experience. I am just getting to grips with the X and Y pixels diagram that
is used when Track and Acuumulate is working. I wonder if the sofware tries
to realign to the average error as time goes on during the image taking, because
it never seems to drag the image back to the original first position....
I have tended to spend most time in Low or Medium resolution....High res seems to need better seeing than is available around here and also a more stable and accurately aligned mount.
Low res is a great way to just get images of galaxies and deep sky objects...just to see things coming onto the screen gives me a great buzz. But to achieve anything like the results posted will require a lot more practice.
Image processing is not really an area I have got into....I am await better software in the post. (CCD Soft..Bisque)
Oh yes one more thing....I store all images on the computer during the session and then I transfer everything to a rewritable CD the next day....I have all the images I have taken so far....and I have no intention of throwing them away.
But on the other hand.....most of them will never be seen by anyone other than myself.
If you are thinking of gettting into CCD Imaging.....don't think...Do It....Yes it costs money....and time and patience and when your wife wakes up at 7.30 am to find you still outside, imaging and frozen to the seat with a plastic bag wrapped round your legs and the laptop in a carboard box, turned on it's side and a big blanket over everything including yourself you will know the pleasures to be gained....
So please if you can offer me any advice, or comment on the way I do things....please feel free...
In fact that is the purpose of my site.....I have always been the one in the class to put his hand up and say
I don't understand please explain again....
Aengus O' Fearghail
aengusofearghail@eircom.net