THE FLIP TOP OBSERVATORY
WHY:
Ireland is not a location famed for it's long periods of clear
skies. We do get them occasionally, but for most of the time observing has
to occur between rapidly moving weather systems. Having to carry out the equipment
every possible night, set everything up, only for the clouds to roll in, became
a tedious chore and started to affect my 'love' of Astronomy.
The 10" LX200 is a heavy enough piece of equipment and the danger always
existed of damage if it every fell...and it nearly did on more than one occasion.
So, what better reason to have the telescope permanently mounted.
Easy access, on short notice.....easily covered over in case of rain....while
still tracking an object.
And of course, the comfort of staying in out of the cold.
CONSTRUCTION HISTORY:
I thank Jim Vail.....for coming up with this idea....check out his site...http://www.pe.net/~jimvail/Equipment.htm
WHY A FLIP TOP:
Well I have a small office in a garage in the garden.....and with that as an control room I didn't need too big a structure.
A Roll Off roof sounded like a good idea but a bit hard on the construction.
Jim's idea of a flip top lid grabbed my imagination the moment I saw it.....not
expensive....easy to make and the only drawback I could see was how heavy
was the lid going to be.
HOW:
I offer no plans.....as the sizes were determined as I went along.....with the main restriction being the the size of an 8' x 4' sheet of plywood.
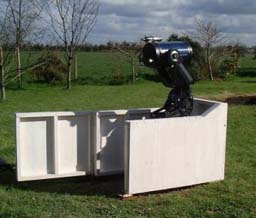
It's 4 feet long and 2 1/2 feet wide. The Base section is 30" high....and
about level with the top of the Pier.
Made up of 3" x 1" frames, as you can see. The door hangs on 2 door
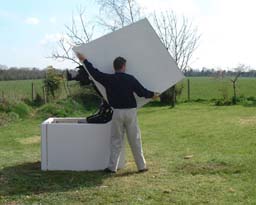
hinges. I can just about lift the whole base...
and shuffle around the Garden with it around me....by the way I only weigh
9 stone....so it's not that heavy.


The frames were screwed together and then 6" x 1" T+G Flooring
was used to cover the side.
I used the flooring because I happened to have a few lengths left over after
flooring the upstairs in the extension that we put on recently.
All I have done so far is to Prime it ready for an Undercoat and Final Coat....I intend to paint it well to help against the vagaries of the weather round here.
Cost of Timber, screws, paint....(estimated)...100 Pounds Irish...($120) ......at the most
THE LID:
The lid is made of a main base frame of 3" x 1" timber and then the covering is 1/8" plywood.
Nothing fancy in the construction but enough room was left so that the scope could be left in any position and the roof shut quickly, due to the rapidly changing weather conditions we have here in Ireland.
I intend to fit the lid out in such a way as to enable flat fielding of the camera at any time by bouncing light of the front and back and through an opaque perspex shield over the aperture.
When fully opened the roof egde rests on the ground. This blocks the view
to the S up to about 15 deg, above the horizon.
This is not really an issue for me, as a lot of sky glow is present to the
S, due to the proximity of Dublin. 25 kms.
But it might be a consideration for others......I wouls suggest a sloping
design in this case, which would help to throw off the rain, but would restict
the ability to close the lid over a telescope without having to 'Park' the
scope.
THE PIER
So I dug a hole in the ground......3 feet square and 3 feet deep
.....in good thick Irish Clay....
I mixed a cubic metre of concrete ....by hand....a bit slow but by
the time I had organised a trailer and gone and got my mixer
from Carlow....60 miles away...I would have been long finished...
Nothing special about the mix I used.....4 or 5 shovel fulls of sand
( I used to forget to keep count ) to 1 of Portland cement...
mixed dry...and then water added. Another good mix around...
.into the wheelbarrow and then dumped into the hole,
I placed some steel rods about 18" to 2ft long into the hole and occasionally
threw in some larger stones that were lying around....to save the mixing of
extra cement.....My back is bad and after 2 hours of this I was getting pretty
sore.
I gave it a quick levelling off......nothing fancy..... the more you fiddle
with the top surface the more concrete and water you draw to the surface and
the more crazing and dust you get afterwards.
I covered the filled hole with plastic to help conserve the moisture.
I headed off to a local Engineering works....with the Super wedge and after an hour of chatting we had figured out a plan.
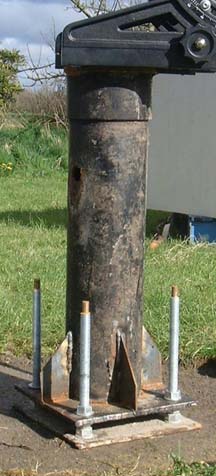
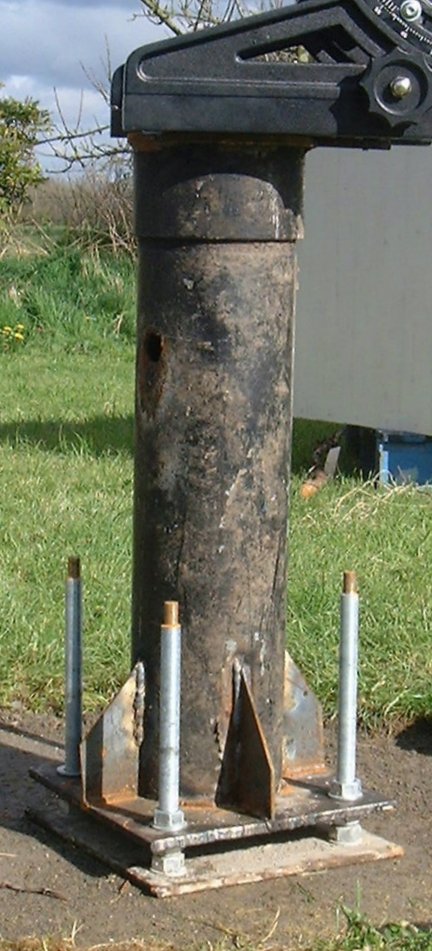
A much larger image of the pier is available here.....pier.jpg (98 KB)
He had some 8" Galvanised Steel Pipe....an ex-gatepost....and with that
and a couple of plates he made up the steep pier
The base of the pier has a few fillet's....'Eric the Welder' reckoned I didn't
need them....But I had this image of a rocket in my mind!......funny thing,
when it was all finished...Eric hoprd I didn't get stopped by the cops...It
might look a bit like a rocket launcher!.......and you know Politics in Ireland...:).
The top plate is 9 inches in diameter and has 3 bolts welded through to fit the Meade SuperWedge and also has an extension fitted at the rear for the RA manual adjustment.
In the welding of the bolts and extension the top plate became a little bent.....but
we reckon over time it will flatten out under tension.
When I say little I mean little....the Super wedge will sit but has a slight
wobble without the nuts on....

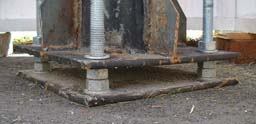
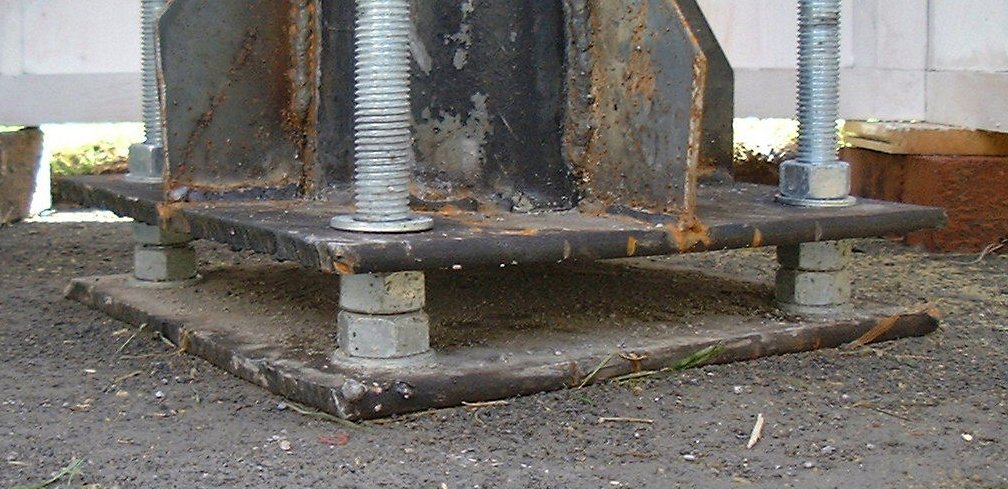
The Base consists of 2 plates....matched up and drilled together....so that
all holes are aligned.
I drilled 4, 25 mm holes about 16" - 18" into the concrete using
the free base plate as a template.This was the tricky bit.....The holes would
define general alignment.....The adjustment on the Super wedge would allow
fine alingment. And it worked.....though I have to refine the alignment over
the next few nights.
Into these holes I dropped Cemical Anchors......glass phials containing a
mixture of chemicals that when exposed to air and mixed....harden up......and
then I shoved 4, 20mm steel threaded bars down into the holes.
I used the full pier to stabilize the bars in place.....with the nuts threaded on as shown in the picture.
24 hours later I came back for a look.......2 bars were 'loose'.....that is, they moved from side to side....
I mustn't have shoved them down as far as I could......Next time I will beat
them into the holes with a hammer....
If there is a next time.......no matter how hard I pulled I couldn't pull
the lose bars out of the hole.....
Anhow I tightened up the nuts.....and 1 of the 4 felt like it was moving up
slightly.....I left it alone and locked up the other 3 sets of Nuts....The
idea of having two nuts between the base plate and the base of the pier means
that I can level the pier
by working one nut up or down slightly.....
A much large image of the pier base is available here......pierbase.jpg (139KB)
When I am happy I also have the option of concreting in the whole of the base.....bolts, nuts and all.
Still a little tiding up and painting to be done.....and also shortening the threaded bar.....
Cost of everthing...including chemical anchors....bar....pier plates and labour.....125 pound Irish...($150)
SUGGESTIONS : IMPROVEMENTS
I have a few:
The roof I built was flat.......and over time I have noticed that water can
lie on the top.
I have subsequently cover the roof with roofing felt, allowing about 2 inches
of an overhang.
I installed 2 vents, One on each side ,close to the top. This allows a flow
of air through ,helping to reduce the moisture
buildup, and reduces the heat inside, on hot days.
I have wondered about some method of 'assistance' when opening