Buy PCB
2 Available
€4.99

Buy PCB
2 Available
€4.99
Buy Kit
1 Available
€8.99

Buy Assembled
3 Available
€9.99
Adding a LM75 temperature sensor to the Raspberry Pi

Note this page was written before the Raspbian operating system if using raspbian please see the Using Raspbian as LM75 data logger page as an alternate starting point for the software.....
The LM75 Board is also supported by Pilogger see below
The Hardware
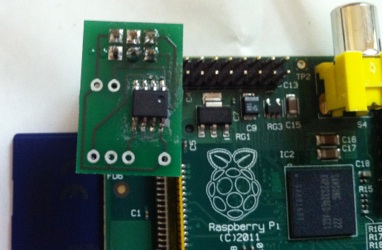
This project shows how to connect an LM75 I2C temperature sensor to the raspberry pi using the GPIO connector.
The raspberry pi GPIO connector contains an I2C port in this case we only need access to the 6 pins on the left hand side of the connector a good description of the connector pinout can be found here http://elinux.org/RPi_Low-level_peripherals
In this case we only need access to 3 pins on
the GPIO connector connected up as follows
Pi GPI0 Function Adapter
Pin 2 SDA Pin 5
Pin 3 SCL Pin 4
Pin 26 5V Pin 1
The SCL & SDA lines are pulled up to 3.3V on the raspberry pi so there is no need to pull them up on the adapter, this also automatically handles the level translation as I2C is an open drain bus.
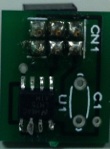
On a small adapter board the LM75 can be connected on the top of side
of the PCB so it will better sense the ambient temperature. The 6 pin
connector then attaches to the GPIO header of the Raspberry pi.
Take caution to connect this the right way round or you may damage the
pi....
The Software
Firstly we need to load an image that supports the I2C drivers fortunately chris at boot c has done this for us already. An image can be downloaded from the link below
http://www.bootc.net/archives/2012/07/01/updated-debian-wheezy-image/
Now install the image on a compact flash card and insert into the Raspberry pi
Log in as root using
login: root
Password: raspberrypi
Next we need to get the latest updates
root@raspberrypi:~# apt-get update
Next we need to fetch 2 programs i2c-tools and lm-sensors
root@raspberrypi:~# apt-get install i2c-tools
root@raspberrypi:~# apt-get install lm-sensors
Now we need to modprobe i2c-tools
root@raspberrypi:~# modprobe i2c-dev
We should now be able to run i2c detect to see if our LM75 is present the 0 at the end instructs it to use bus 0 which connects to the GPIO connector, as we can see here it shows that there is a device located at 0x48
Note the raspberry pi changed the i2c port from 0 in Rev 0 to 1 in Rev 1 if using a rev 1 board type i2cdetect -y 1
root@raspberrypi:~# i2cdetect -y 0
0 1 2 3 4 5 6 7 8 9 a b c d e f
00: -- -- -- -- -- -- -- -- -- -- -- -- --
10: -- -- -- -- -- -- -- -- -- -- -- -- -- -- -- --
20: -- -- -- -- -- -- -- -- -- -- -- -- -- -- -- --
30: -- -- -- -- -- -- -- -- -- -- -- -- -- -- -- --
40: -- -- -- -- -- -- -- -- 48 -- -- -- -- -- -- --
50: -- -- -- -- -- -- -- -- -- -- -- -- -- -- -- --
60: -- -- -- -- -- -- -- -- -- -- -- -- -- -- -- --
70: -- -- -- -- -- -- -- --
Now we know the address we need to let the system know it is connected so it can get the drivers we do this with the following command for a rev 0 board
root@raspberrypi:~# echo lm75 0x48 > /sys/class/i2c-adapter/i2c-0/new_device
For Rev 1 board
root@raspberrypi:~# echo lm75 0x48 > /sys/class/i2c-adapter/i2c-1/new_device
And finally we can run the command sensors to tell us the temperature
root@raspberrypi:~# sensors
lm75-i2c-0-48
Adapter: bcm2708_i2c.0
temp1: +23.0 C (high = +80.0 C, hyst = +75.0 C)
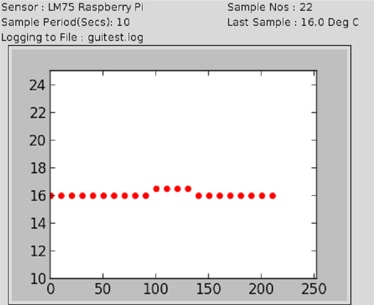
In order to get the temperature continuously then the watch command can be used with sensors
root@raspberrypi:~# watch sensors
Adding a LM75 Temperature Sensor to the Raspberry Pi