1/16 Big Tank Series No.3 - Item 36203
| German Tiger I Early
Production - Display Model 1/16 Big Tank Series No.3 - Item 36203 |
|
| Well, firstly it has to be said that Tamiya have surpassed themselves with this kit. Obviously the large scale affords a high degree of detail - but the moulding is of the highest standard, excellent die-cast drive wheels - and the brass shafts are engineered to a very high standard indeed. |
|
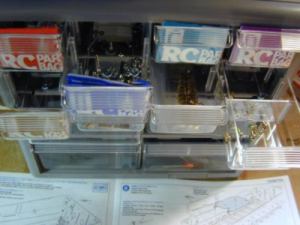
| Even though compared to the R/C versions, the number of parts is small - it still comprises of way more loose parts than your average kit. Getting a store cabinet is is a wise move. |
|
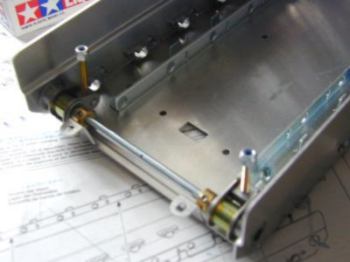
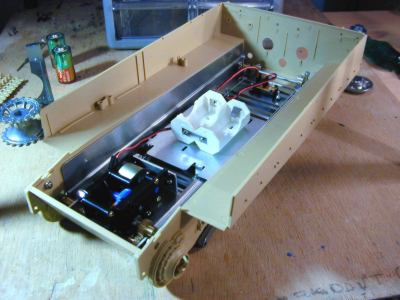
| Photo 1: The suspension arm supports are attached to the inner chassis and the tension pulley assembly is fitted at the rear. |
|
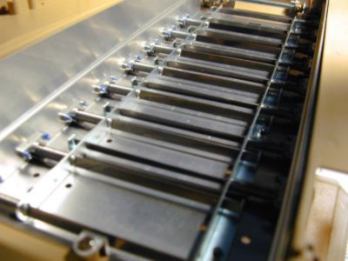
| Photo 2: Once the inner chassis is attached to the lower hull, fitting the torsion bars is next (a little tricky). You have to thread the bars through to the opposite side, but only enough so that you can engage the suspension arm, then turn the arm hard 90 degrees (causing the torsion bar to twist) and then force it fully into the chassis so it snaps into place - after a couple of goes it gets easy. |
|
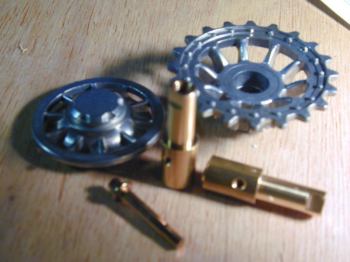
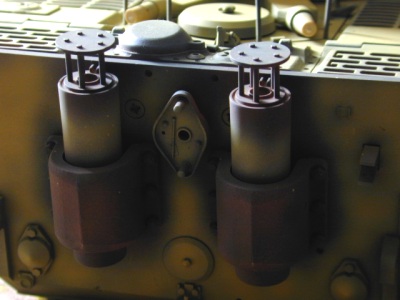
| Photo 3: Gear box & switch is mounted onto the unit. Sprocket shaft is fitted onto the drive shaft. |
|
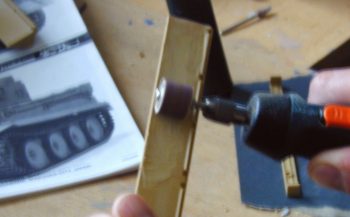
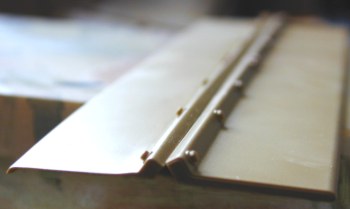
Photo's 4&5: The side skirts have to be thinned to scale thickness (one of the very few cases in the whole kit). The use of the power tool makes this an easy job. (wear safety glasses & mask doing this). Of course, with the plastic thinned to wafer thickness, battle damage can be added easily. Make sure you don't thin right to the bottom edge, doing this perfectly simulates the lip of the sheet metal. The picture below illustrates before and after this process - just be careful not to go too thin, or holes will appear in the plastic. If this does happen, you can either modify it as battle damage, or fill it with putty. |
|
|
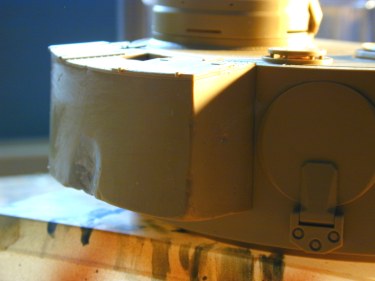
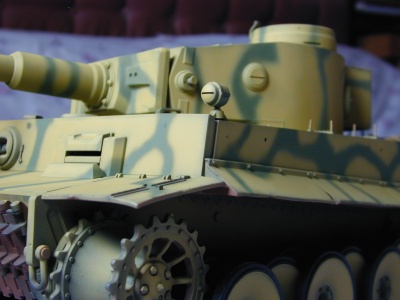
| Photo 6: A chamfered hole was created on the stowage box, and filled using 'Muliput'. Also, using one of the small shaping attachments on the power tool - groves and dents can be effectively sculpted onto area's that would be likely to get damaged. |
|
| . |
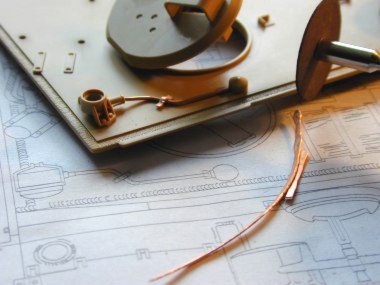
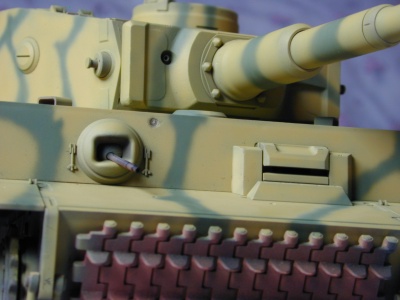
| Photo 7: One scratch detail I've added so far is the steel cable conduit's for the Bosch headlights. Working from the scale print out from the Tiger I CD - at 1/16th scale, this can be made from 20 gauge copper wire. I then used a rather unorthodox method to make the fixing bracket, by hammering some of this wire flat and grinding it to shape, then bending it to fit the conduit. A little tricky but it seems to work quite well. |
|
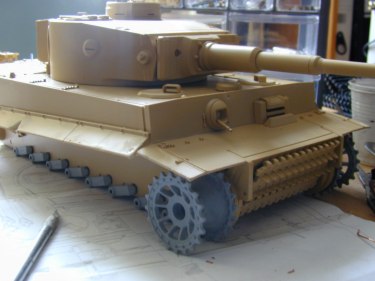
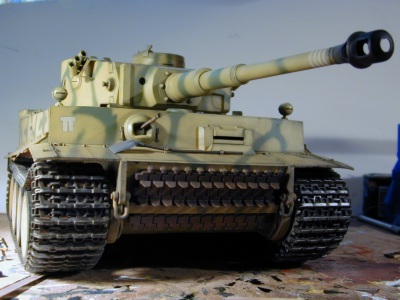
| Photo 8: This is the kit with pretty much most of the construction work done. Next stage will be the painting. Note the metal parts have been primed gray before using the enamel base coat. |
|
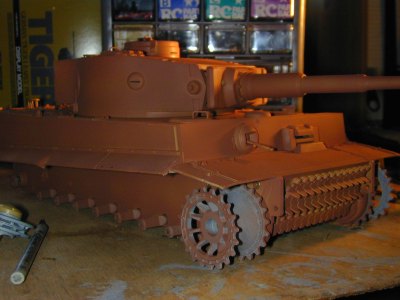
| Photo 9: Decided to try something I've never done before. Instead of pre-shading in a darkened base colour or a black undercoat - I sprayed it in brick red. Hopefully this will add to the to pre-shading effect, but because of the large scale, it will also simulate the actual red-oxide primer applied during construction at Henschel & Sohn. This may also allow the simulation of worn paint, especially on the cast wheels . |
|
| I spent a long time deciding on the
type of camo to use on this project - and must confess that appearance is more important
to me than historical accuracy. I'm going to use a scheme similar to the Russian campaign
in the Summer of 1943 - but am not going to get too stuck on correct unit numbers, ensign
or 100% accurate colouring. The reason for this is two-fold. I simply don't have access to
all the accessories & materials I'd like in the building of this. But also, I
want to end up with (all going well) a good generic representation of an early production
Tiger, basically, if it looks good, I've done it. Determined not to allow super-detailing
to obscure my development of this hobby. This attitude may be considered heresy in some
quarters, but its pointless trying to achieve too much too soon. If I get hold of the
right materials & after-market stuff for future kits, I'll certainly use them. But, notwithstanding, I've have tried to make some modest changes to the 'out-of-the-box' kit - something I've done very little of to date. The size of the kit not only allows this, to some degree you've no choice. Here's a list of the custom modifications I've made on this kit - some are pretty elementary. |
|
| Photo's 10&11:. |
| As mentioned earlier
I gave an under-coat of brick-red to simulate the primer used by the Germans in WW2. On
top of this was added a 'pre-shade' coat of dark green. Approximately: 35% Tan (hum. 93) -
25% Yellow (hum. 99) - 10% Dark Green (hum. 102) - 30% matt black was made up. This
mix was then sprayed over the whole model, but ensuring full coverage on recessed areas
& panel lines. I refrained from spraying this colour on the tops of the exhausts -
retaining the red-oxide colour. Quite a period of time elapsed between these two coats to
allow each coat to cure fully - this is for a particular technique I'm gonna try later on.
On top of this dark coat was a similar mix as above (a lot is needed for 1/16th scale),
but with no black and a good bit of white added. Used the well established technique of
spraying from the panel centre's & main hull sections - but backing off at the edges
or corners so that the darker undercoat shows through. In places I deliberately allowed
the 'primer red' to show through , I'm sure in reality the primer undercoat was more
thoroughly applied than the base coat (recessed areas for example). I wanted a light yellowy base coat instead of the traditional dark-yellow base - main influence was the scheme shown on the Tamiya CD of sPzAbt 502. Another technique I tried at this stage was to temporarily fix the stowage equipment (Shovel's etc) before spraying the lighter base coat. What this achieves is a silhouette of the equipment in the previously applied dark undercoat. Once the area around this equipment had been sprayed, they can be removed for detailed painting later. These darkened areas were then sprayed to lighten them to a faint shadow of the equipment. If this is done right, it gives a nice effect under the stowage equipment - but if too prominent, it looks as is the equipment was sprayed around, rather than being removed during the painting process. |
|
|
| Photo's 12&13: |
| The next step was to spray the camo lines. I decided to use the pattern supplied with the instructions, circa 1943. I deliberately added some white to the dark green colour. This tie's the camo lines to the base colour. This avoids the step most modeller's take of misting a coat after the camo has been applied to 'bind the colours together'. |
|
|
| When the main painting work was complete, it almost
looked as if I wouldn't have to do too much more. The reasoning behind this was partly my
satisfaction with the application of the base coat and camouflaging (being somewhat loath
to spoil it) but also the scale of the kit meant that the shadows are actually real, not
simulated. I spent a number of days deliberating on how best to proceed with the finishing
of the kit, but eventually overcame the urge to leave it more or less in pristine
condition. However, I was determined not to proceed with the conventional two step process
of wash & dry-brush. As mentioned earlier, I under-coated the kit in brick-red. So I started to remove the base/camo paint by very very gently brushing areas of high wear with wet/dry sandpaper. This theoretically can remove; Camo line, Base coat, pre-shade coat, red-oxide and finally expose the plastic or primer/metal part. At this scale it works very well, you can actually see the layers of paint - allowing each coat to cure fully helped this process. It's very easy to rub too hard and actually expose the plastic, however, all that needs to be done is to paint this area in a gun-metal colour. Provided it's not over done, this can be very effective. Another break from convention was my refusal to use the supplied decals. I scanned the decal sheet, then using a photo editor, cut out the markings I wanted, i.e. Ballencruz, and unit ensign. For the numbers I made up '144' and scaled it down by about 80%. These were then printed on a sheet of transparency using a standard Laser printer. (you need a couple of each) It was then simply a case of cutting out the shapes using a sharp craft knife, then using magic tape to hold them in place, holding the airbrush perpendicular to the surface, spray over the stencils in the correct colour (dulled down accordingly). I used quite a thick consistency and a lower than normal pressure. This in effect splatters a reasonably thick coat of paint onto the surface of the tank, helping to avoid the paint running under the stencil. This worked very well. I also cut thin strips of the magic tape, for masking the kill markings on the barrel. I decided to modify the base
colour by using a series of techniques to gradually build up the weathering effects,
basically this cautious approach ensured that I wouldn't ruin the paint job in one fell
swoop. Firstly, I used an extremely thin mix of artist oils (Cinnamon & Peat Brown)
similar in principle to FM's Filter's. This did 'tone down' the colours somewhat. Next I
applied some 'spot-washes' using a dark brown mix, working on bolt heads & weld seams
etc. I then gave another wash with the previously applied Cinnamon/peat mix. These coat's
were applied using a generous sized brush, then quickly removing the excess with a large
soft flat headed brush. Working on the turret & hull separately. One thing to note,
this was all done without a prior application of a clear matte coat. This is
normally a golden rule for most modellers, but if you work quick the base coat will not be
damaged. I also felt that the number of coats applied and cure time aided this process
also. |
|
| For an intro to this project: click here |
|