Word Tips - Text |
|||||
| Working
with Graphics: Working with Text: Working with Tables: Word Tips - General |
|||||
|
Centre text on the page between the top and bottom margins by choosing File, Page Setup, Layout tab and setting the Vertical alignment to Centre. |
To create a printable list of shortcut keys choose Tools, Macro, Macros. Under Macros in | Select text by holding the [Shift] key as you move with the cursors or use [Shift] + [Ctrl] + a cursor to move one word at a time. | |||
| Strip all formatting from text pasted from the Web by choosing Edit, Paste Special, Unformatted text. | Embolden text as you type by placing an asterisk before and after it - switch this on by selecting Tools, AutoCorrect Options, Auto Format as you Type and ticking the *bold* and _italie_ with real formatting box before clicking OK. |
Select text and press [Ctrl] -t-[Space] to remove all character
formatting from it. Apply bold, italics or underline to an entire word by clicking
in the word - no need to select it - then pressing the appropriate
toolbar button |
|||
| Create your signature or company logo as an AutoText entry by selecting it in a document and choosing Insert, AutoText, New, typing a name for it and clicking OK. | To use the AutoText entry in your document, type its name and press [f$\ (or press [Return] when the tooltip appears). | Count the words in a selection by choosing Tools, Word Count, or view the Word Count Toolbar in Word 2002 by selecting View, Toolbars, Word Count. | |||
| Copy the format of one piece of text to use on another
by clicking the Format Painter button then clicking the text to copy
the format to. Start a new page at any time by pressing [Ctrl] + [Return]. |
To see what a selected piece of text will look like in a font, choose Format, Font, select the font and check the Preview window. | Adjust the spacing between letters in a word by selecting
the word and choosing Format, Font, Ungrouping a WMF image Enables you to change some of its colours and to remove unwarned pieces from it. |
|||
|
Fill a drawn shape
How to draw any closed shape then fill it with an image. 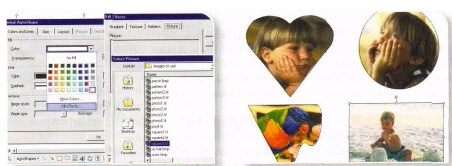
|
|||||